What's new
What's new

18" American Tool Works, 8 Speed, Gear Head Lathe

Andy Pacemaker

Plastic
Joined
Jan 13, 2014
Location
Halifax, Nova Scotia, Canada
Hello Everyone,

This is my first post on the forums here at Practical Machinist. And I'm fairly new to machining concepts. So If I spit out anything that is way off base, dont hesitate to correct me. I'm looking forward to learning.

So my main piece of equipment is an 18" American, 8 speed, gear head, as the post title suggests. I picked the machine up for $500 from a guy who was going to scrap it! Lucky for it, I have an appreciation for old gear like this.

After only a few hours of labour I had a 3 hp motor mounted up top, changed out the gear water with gear oil and got everything freed up for operation. The ways seem to be in pretty good shape for its age. All the power feeds and lead screw even worked. So overall I am very happy with the machine.

But there are a few little problems.

- The chuck is stuck.
- The spindle bearings are pretty loose
- The transmission seems to drag the motor down in certain gears

As for the chuck. I cant seem to figure out how to safely hold the spindle in place for chuck removal. I tried sticking a bar into the bull wheel through the oil fill hole. But It is so stuck I'm afraid the gear will snap under the torque from a big bar in the chuck. Anyone know how to safely keep the spindle still in these machines for chuck removal?

As for the bearings. I'm wondering if anyone on here has ever converted one of these machines to tapered roller bearings on the spindle?

As for the transmission. I put about 6 litres of 80-90 gear oil in. I've been reading and am lead to believe that it is too thick. So this could be causing some of the "dragging down"
Does anyone knows what type of oil is supposed to be in these gearboxes?

Also does anyone know what size the spindle taper of this machine would be in the headstock?
 
** please do not stick crap into the headstock to jam the gears **

Sorry to come across so strong but there is breakable stuff in there- if that bull gear breaks or you take off teeth then you might as well scrap the headstock... or spend $$$ for the fix, if you can even swing it. ATW was pretty fussy with the engineering and you'll need to be on top of your game to do anything but a shade tree repair in comparison.

Spindle nose is probably threaded- most of the High Duty's were. ATW used a proprietary nose, not hard to duplicate but short of finding ATW spindle tooling you'll have to make it yourself. They specified a snug fit which if present will make the chuck difficult to get off, then there are all the other causes.. Put the lathe in low gear, put a couple foot long rod across the face of the chuck- held by the jaws and give it healthy whack with a big hammer. Things get more serious from there but its worth a try 1st.

Headstock should have approximately Mobil DTE Heavy/Medium (ISO68). If its too full the oil can definitely put a load on the motor- you might have too much in there.

If they're not too bad the spindle halves can be closed up by adjusting the shims between the top and bottom at both ends. Viability of that will depend on the amount of wear.. it will take some measurement. Quite a bit of flex can be in there and the lathe still turn reasonably true.

As always, pics are very welcome!

I have a good deal of ATW documentation here;

http://pounceatron.dreamhosters.com/docs/index.html

Regards,

Greg
 
Thanks Greg for the reply.

I agree with your concern about breaking stuff inside the head. I've also got a 16" ATW belt head lathe with a busted backgear. It was busted when I got it. But I'm pretty sure it was caused by similar abuse. It is really only good for plain turning now. Shameful really.

I did try the big hammer approach before I even got it off the trailer. No luck.

I also tried a propane torch on the chuck mount but I used a whole tank of propane and it still wasn't hot enough that I couldn't hold on to it.

Next approach will be remove the chuck from the mount, pack the spindle taper with a bag of ice/water, then conservatively/evenly apply heat with oxy/ace. I've got a few tempsticks I could use to prevent overheating. Then the hammer. Or I might get creative with the my 3/4 drive Ingersol impact gun.

I only seem to have trouble with the head bearings when I'm working close to the chuck on stuff 1" or smaller. The work seems to want to "climb up" onto the tool. Pretty much have to steady everything with the tail. Parting things completely off is almost impossible unless its hollow. Some of this may be caused by my poor technique.

Would the use of plastic gauge that engine builders use be suitable for determining bearing play?
Anybody know what the bearings are made of?

I'll see if I can snap some shots with my crappy digital cam.

Thanks again for the input.
 
I had a regal that the chuck was stuck on, I did as mentioned above out something in the jaws and then put the lathe in low gear and turned the hand wheel to unscrew the chuck. Does your lathe have a hand wheel?

I am with you about saving old machinery............

Tim
 
...

I did try the big hammer approach before I even got it off the trailer. No luck.

I also tried a propane torch on the chuck mount but I used a whole tank of propane and it still wasn't hot enough that I couldn't hold on to it.
...
.

Now is the time to back off and use fineness, before you break anything. I never had any luck with the hitting the bar in the chuck idea. I always block the chuck jaws against the ways and with lathe in low gear rotate the motor backwards by hand. Careful as this too can shear gear teeth. Not likely though as you are only using hand power on a motor that normally pulls pretty hard.

Failing that remove the chuck from the backplate and start soaking the spindle nose with ATF/Acetone 50/50 mix. Reapply every day for a couple of weeks then try backing the plate off the spindle again. Repeat till the plate comes off. Patience wins the day here. Some have resorted to turning the backing plate off. This a personal choice as it leaves one without a lathe to make a new backing plate.
 
I tried the low gear turning backwards from the motor end too. No Luck. I feel it'll break something if I apply more torque than I did.

I feel that the chuck is not stuck on from corrosion. I think it had been forced onto the spindle by way of the leadscrew. There is quite a deep mark in the face of the chuck. The mark is probably about 5/8" wide and at least 1/8" deep at the deepest spot. It looks to me like the tool may have been jammed into the face with the leadscrew engaged. Probably at about 4-6 tpi judging by the rapid increase in depth. I feel the chuck may have been jammed on with several hundred, maybe even 1000 plus lb/ft torque.

It appears to me that I am not the first one to try and remove the chuck either. There are marks in the chuck mount similar to what you would see when you are heating a workpiece and accidentally old the torch too long in one spot.

Sorry no pics yet. Forgot my Cam when I left for work. There is going to be a big blizzard here in Nova Scotia tonight so I'll be out plowing for the next couple days. Hopefully I'll be able to snap some shots when around the shop.
 
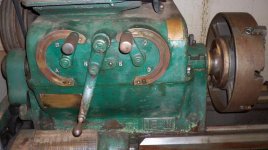
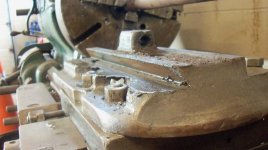
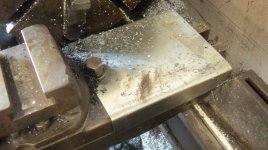
Here are some pics of the old girl.
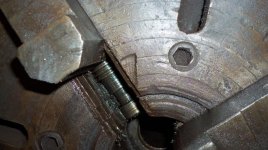
100_0320.JPG100_0324.jpg100_0322.jpg100_0323.jpg100_0319.jpg

You can see the mark in the face that I suspect has the chuck jammed on so tight.

I also got a chance to set up my test dial on the face of the chuck. It showed .027 of wobble! Not to thrilled about that. Hopefully its just the chuck or mount and not a tweaked spindle.

Cant wait to get that chuck off.
 
That is a bronze bearing headstock, I'm very afraid for the state of the bearings- no proper oilers on them, if they've been run dry they could be worn into ruin. OTOH theres no way to tell short of getting the chuck off and getting the caps off etc. I'd take the bolts out holding the chuck to the backplate, at least it will get that out of the way and you can do your indicator test on that machined surface- theres always the possibility of a botched chuck install etc.

Greg
 
So I had some time to tinker with the old lathe today. And I did manage to get the chuck off the spindle. It went as follows.

First off was to remove the chuck from the chuck mount. Lucky for me, the rail for the chainfalls at our shop goes almost directly overhead of the chuck. So all I had to do was slide the lift chain over and hook it up to the chuck. 4 bolts holds the chuck to the mount. They were easily removed, possibly a little on the loose side. The chuck did have a good snug fit on the mount, so I just bumped if off with a rubber mallet.
100_0327.jpg

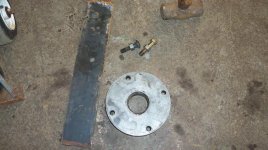
Then I hunted around and found a nice big piece of 1/2" thick flat bar. It even already had one hole in it. So I marked and drilled another so it could be bolted to the chuck mount.
100_0328.jpg

Then it was time for some heating/cooling.

First I balled up a rag and stuffed it about a foot into the spindle. Then I packed the spindle hole/taper with snow from the shop yard. I stuffed snow in there until it was pretty much ice. Then I bolted the flat bar to the chuck mount. This helped to hold the ice in the spindle and made a way to hold the mount in place for removal.

Next I fired up the oxy/ace and proceeded to heat up the chuck mount. Doing my best to heat it gradually and evenly. I decided it better to move the torch around the mount rather than turn the mount/spindle because this kept from making the bearing hot in one spot. I had a 200 farenheit temp stick that I tested with every so often. Once it started melting on contact I applied only a little more heat. I had 250 degrees in mind.

Once I was satisfied with the heating, I shut down the torch and proceeded to crank the big drive pulley backwards with the lathe in its lowest gear. I had the big flat bar against the rear way, coushined with a wood board. I cranked as hard as I could by hand. No luck. So then I went for the hammer. The mount started turning on the third light blow. But it didn't come loose right away like I suspected it would. It probably went about 1/6th of a turn before it was loose enough to move by hand.
100_0325.jpg100_0326.jpg

Once I got the mount off, it was still hot enough that it was difficult to handle with bare hands. But the spindle was still fairly cool. There was still a tiny bit of slush inside the spindle. The snow trick had worked!

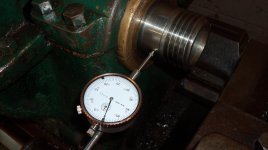
So the spindle threads looked fine once I wiped off the excessice amount of chips. I put my test dial on the machine surfaces on the spindle. both faces showed about .001 of wobble and runout. That might translate into something larger wen you get far out from centre. But I think it is still acceptable for the work i'll be doing.
100_0332.JPG

The threads on the chuck mount were a whole other story. The metal in the chuck mount seems to have a defective area in the threads. The threads were also marked up and plugged with chips. I would say the previous operator had often neglected to clean the threads during chuck changes.
 
Last edited:
Nice! Tough going and a good result.. :) The partial turn could be due to thread backlash- I have a poorly fit backplate on the threaded spindle of my dividing head which acts like that if I'm milling on a tangent- I literally have to clamp the chuck to an angle plate to stop the chuck from moving around.
Now that you're in there you might consider pulling the bearing caps to clean the oil galleries and perhaps adjust the shims to snug up the bearings. Mine had solidified waxy oil all through them, it took a lot of cleaning. Your oilers are nice.. :) I fit a pair of glass drip oilers to my 14" 8 speed which are nice but bulky.

Greg
 
Enco and others sell unmachined backplates, I've done two backplates using them. The iron wasn't great but it wasn't bad either, no slag or bits of junk in it at least. Having the rough form there already is of some help.
 
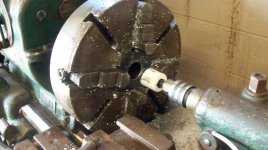
Cleaning the backplate / spindle threads of chips and gunk seems to have cured the sticking chuck problem.

I lubed up the spindle and slammed the chuck on there pretty hard a few times in a row just to see. It seems to be coming off ok so far. I'll run it for a bit and see.

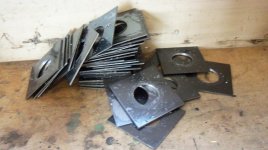
Speaking of running it. I cut a 2" hole in 40, 1/8th plates today with a hole saw. Only took 2hrs. Thats 3 mins each. Not bad eh?
100_0344.JPG100_0345.jpg

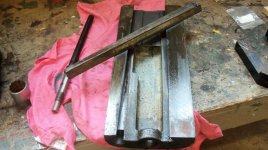
I also got started on a #5 Morse Taper for a dead center. But the compound slide was so stiff to move I ended up tearing it all apart to see what was the matter. I always thought the slide was just set up stiff but it turns out it was full of hard gunk.
100_0350.jpg100_0356.JPG
 

Attachments

  • 100_0358.jpg
    100_0358.jpg
    73.7 KB · Views: 310


Back
Top