What's new
What's new

1898 Hendey 14x6 restoration

RCPDesigns

Hot Rolled
Joined
Sep 3, 2014
Location
Atlanta GA.
First, many thanks to all that have contributed their knowledge to this forum. It is a lot easier to begin a restoration knowing that such a supportive group is available.

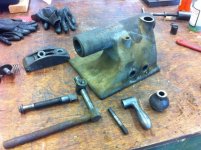
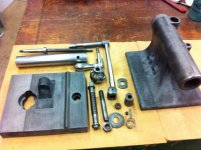
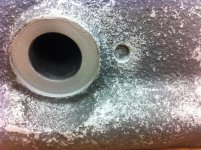
I bought the Hendey in June of 2015 with Hendeyman virtually holding my hand through the whole process. I probably paid too much but I wanted something old and it was close by. The bull gear is missing a dozen or so teeth, various hand wheels are not original and it shows a lot of wear. I believe the last few years were pretty tough on the old girl and any parts not covered in grime have a heavy coat of rust and are pitted.

My goal for the lathe is twofold. First, I want to enjoy taking it apart, learning how it works and restoring it to its original glory. Second, I'd like to learn to use it to do some basic work to support my addiction to restoring antique cars.

The pace of this restoration is likely to be slow as time in the shop is rare. Hopefully I'll be able to make some steady progress.

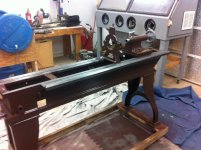
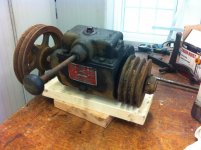
So here she is after arriving in the shop.
 

Attachments

  • IMG_3078.jpg
    IMG_3078.jpg
    96.3 KB · Views: 703
I started with the transmission. I was able to get in contact with Midwest Tool and Gear (which bought the remains of Western Mfg) and they got me a parts list. Unfortunately their records didn't go back far enough and they were not able to provide any replacement parts. I managed to find replacements for the oil seals and I cut new gaskets. The rest of the unit looked pretty good. I stripped of the grime and gave it a coat of paint.
 

Attachments

  • IMG_3095.jpg
    IMG_3095.jpg
    94.8 KB · Views: 382
  • IMG_3137.jpg
    IMG_3137.jpg
    94.3 KB · Views: 370
  • IMG_3383.jpg
    IMG_3383.jpg
    91.3 KB · Views: 388
The holidays have granted me some more time in the shop so I have started working on the tailstock. I stripped off the grime, taped up the machined areas and media blasted it. The 'brightwork' was in terrible shape. I had to start with 80 grit sandpaper on it to remove the pits and other damage. From there I progressed up to 400 grit and then switched to the buffer. It isn't perfect but it looks a heck of a lot better is and much easier on the hand to work with. I'm going to fill and prime later today and then get some Patrick Black Moss Green (TM) mixed up next week and start painting. After drooling over his restoration thread there really wasn't any other color this lathe could be. :)

I have a question about the last three pictures. There appears to be two copper/brass wires (or similar) stuck in the tailstock casting. What is this/what does this do? The last picture shows a small indention in the casting. What is this for?
 

Attachments

  • IMG_3394.jpg
    IMG_3394.jpg
    97.5 KB · Views: 331
  • IMG_3396.jpg
    IMG_3396.jpg
    93.4 KB · Views: 321
  • IMG_3406.jpg
    IMG_3406.jpg
    92.9 KB · Views: 370
  • IMG_3395.jpg
    IMG_3395.jpg
    93.6 KB · Views: 316
  • IMG_3398.jpg
    IMG_3398.jpg
    99.9 KB · Views: 322
The small indentation in the casting, shown in picture 5, is the broken off pin that should stop the handle falling down on to the ways when the tailstock in unlocked. It is just a round pin with threads on one end and a slot on the other, easy to make a new one.

David.
 
I've gotten a little more done on the lathe. I went ahead and built a parts washer as it quickly became apparent that I'd spend the rest of my life trying to clean this thing. I'll post some pictures of it another time. I made it out of a 55 gallon poly drum turned horizontal with the upper third cut out. I got an 12 volt RV pump to pump the solution (Zep industrial purple) from a 18 gallon container on the bottom that has a 1000 watt heater. When heated the solution cuts through anything (oil, grease, paint and flesh). I've been very pleased with the results. Just about everything has been cleaned at this point. I cleaned the bed/legs outside using mineral spirits and while it made quite the mess, it worked quite well. I was planning on painting the lathe Patrick Black Moss Green but while taking the lathe apart and cleaning each piece it became apparent that the lathe was brown. Maybe not at birth, but it has been brown for a long time and whenever it was painted, it was completely disassembled before being painted. As such, brown is the color. She seems quite happy with the color and so am I.
 

Attachments

  • IMG_3559.jpg
    IMG_3559.jpg
    92.9 KB · Views: 380
  • IMG_3561.jpg
    IMG_3561.jpg
    94.2 KB · Views: 359
  • IMG_3565.jpg
    IMG_3565.jpg
    95.5 KB · Views: 385
Man, you know, there's just something about inherently good iron. That thing has more balls than an equivalent SB built fifty years later. Nice lines, a finish like an automobile--if you want to keep it nice it was a good idea to paint it the original color. One restoration mistake I always made was using a 1942 machine tool gray. Made it impossible not to try to cover it in chips, and there goes all your work...
 
Apron is cleaned, painted and re-assembled. Many thanks to the forums members for helping me get it back together. Hopefully these pictures help someone in the future.


For me one of the joys is taking something that is really rusted and going through the many steps to get it shiny again. Typical approach is media blast, phosphoric acid, 80,120,240,400,600 grit sand paper and then 3 stage buffing. Here is the hand wheel and some other parts going through the process.


The Norton gearbox is one of the prettier parts of the lathe and I've been anxiously awaiting the time to work on it. I couldn't be more pleased with how it came out. I could see a glimpse of this when I first washed the lathe and that was when I fell in love with the brown color. I think it looks fantastic here.


Oops...my apologies for the pictures being so big. I posted links to a Photobucket album. Does anyone know how to do that but have the images be smaller?
 
Very nice job great to see the pictures of the apron assembly. I know it's off topic a little but do you have any pictures of the parts washer you set up.

Bob
 
For me one of the joys is taking something that is really rusted and going through the many steps to get it shiny again. Typical approach is media blast, phosphoric acid, 80,120,240,400,600 grit sand paper and then 3 stage buffing. Here is the hand wheel and some other parts going through the process.

That is some good information right there. Is the sandpaper in to form of flap wheels or is it all done by hand?
 
Tagged to follow post . Amazing work. Can you explain how you performed the brass / black lettering on the information plate?
 
That is some good information right there. Is the sandpaper in to form of flap wheels or is it all done by hand?
Thanks!
The majority of the work was done on a 1"x30" vertical belt sander that I removed the platen from. Without the platen it has a lot of 'give' and thus can wrap around curved surfaces. I bought 1"x30" belts in all of those grits. I also bought extra and cut them up to use to do the inside of curves by hand. Flap wheels work as well.
The phosphoric acid is Kleen-Strip Phosphoric Prep and Etch. I believe that it helps get rid of any rust left in the bottom of the pits. I end up sanding everything anyway so it might be a wasted step.
Buffing is on 12" sisal, spiral stitched and loose wheels. Since I go to 600 grit sand paper I probably don't need the sisal wheel. You do need to check carefully for scratches between each stage of sanding. It is quite a pain to have to go back to 120 grit and start over.


Back
Top