What's new
What's new

Dragged a Hendey home.

raven007

Aluminum
Joined
Dec 7, 2010
Location
georgia, usa
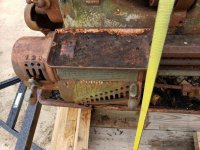
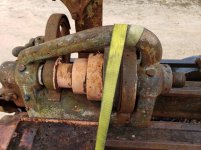
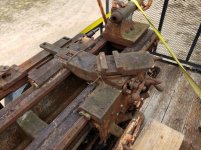
Today I dragged a tiebar, cone head Hendey home. Its in pretty rough shape, but the price was fair for me. Serial #7442, has a 9 speed uni-drive mounted. Does not have "Hendey" on the tie bar, nor does it have the size cast into the side of the bed. Its spent awhile outside, everything is stuck. So far with a lot of oil, a bit of rubber mallet and patience, things are starting to move. I will grab some pics shortly. Paging hendeyman for more info. :D

Update: braved the cold of GA (northerners are eyerolling hard...) and measures through hole, and distance between center. 15/16" through hole, a little over 36 inches from the face of the spindle to the face of the tailstock ram with the tailstock flush with the end of the bed. So I am guessing its a 12x6. I have had all the usual pdfs of Hendey stuff downloaded for forever, since I have wanted one for awhile.

The only thing missing is the compound gear and the stud gear.
 
raven007:

Hendey Lathe No.7442, a 14 x 6, Cone Head model, was completed on August 24, 1905. It was shipped with a Taper Attachment, an Oil Pan, a
New Style Gear Box and a Counter Shaft. The original owner was Yale and Towne, Stamford, Connecticut. On May 27, 1938, it was rebuilt by
Hendey with Cabinet Legs and a new style Oil Pan. There are no longer any Patterns, Castings or Repair Parts left in inventory for this lathe, but all of the original drawings are still in the files, so parts can be made if required. This lathe has a single walled Apron.
Most of the Parts on this lathe were used between 1903 and 1915. The 1904 Parts Book will give you a good inventory of the parts used
on your lathe.

Hendeyman
 
Ah ha! I suspected it had been rebuilt or something by the cabinet legs.

The taper attachment appears different than the later ones. There is no slotted bit on the cross slide. I am missing the bolt which goes into the piece that rides the taper/since bar. And that piece is missing its gib strip.

Disregard above comment about the taper attachment. I am an idiot who couldn't see the tree (slotted bit thats missing) for the forest (taper attachment as a whole).
 
Last edited:
Still patiently working to free this thing up. I have identified I am missing the following pieces:

stud gear (48t) labeled D in the handbook
Sector gear (48t) labeled C in the hand book
Sector gear (72t) labeled E in the hand book
double pinion inside the compound and its associated idler gear (the one the rides on the double pinion)

I am also missing the cross slide extension and a few odds and ends from the taper attachment. I am more concerned with the gears above as the taper attachment is not a critical thing.

So far I have the compound free, the cross slide mostly free, the back gear free, reversing box mostly free (it turns about 100 degrees and gets tight), and the tailstock free. It's presently my lunch date. I go home for lunch and spray and move things back and forth a little bit. I haven't attacked the spindle yet, the inspection pins had been replaced by snap top oilers. Penetrating oil runs clear out the level checks and no rust is down in there. I have some hope. This is a labor of love for me, it makes no sense time/finance wise to fix this thing, I am doing it because I want to.
 
Gears should be available off the shelf. A few pictures of the beast would be helpful. I have a 16" tie bar and I am thinking of getting the bed reground and saddle fitted with turcite. $$$ Headstock was totally redone and the cone bearing was shimmed to allow free rotation. Many members on this forum have machines like yours and know every in and out to them. Good luck.
 
Few more. It's been out in the cold a very long time. If I am being honest, I paid what I felt a good unidrive would be worth for the thing.

20200208_144049_resized.jpg

20200208_144132_resized.jpg
 
"level checks" are the chambers below the journals - for the rings hung on the spindle to bring oil up from. They sometimes go all the way through out the back and can be very nicely flushed like Pat is doing here

DSC02429.jpg

Penetrating oil runs clear out the level checks and no rust is down in there.
 
I have been reading a lot of your posts and have found a wealth of information. I opened the little sleeves on the front and flushed the cavities with penetrating oil and then closed them and filled the cavity up. I have gotten the rear most collar off, but have been unable to get the two adjusting collars for the front bearing to turn. I believe I will need to fabricate a proper pin spanner before I will be successful. The rear collar had already been molested at some point so I didn't feel bad about bumping it free with a pin punch. The frightening thing is the cone pulley is seized to its sleeve. I have downloaded all the pics and diagrams that have been posted on spindle freeing and disassembly. It will probably take me a while longer to free it.
 
The best way to clean up this lathe is to put it in a giant electrolysis tank. If you could find someone with an old swimming pool, that would be best (I have seen it done). But if you disassemble it you could maybe use one of those large square white plastic tanks you see used for holding industrial liquids (what are those things called anyway?).
 
I could just dig a hole and put a big tarp in and rock and roll. I would think the current would be a little higher than in a five gallon bucket though. :D
 
use one of those large square white plastic tanks you see used for holding industrial liquids (what are those things called anyway?).

Well, I looked it up myself. They are called IBC (Intermediate Bulk Container) Tote Tanks. You can buy them for $50 used on Amazon Marketplace.
 
The totes are limited to 48 inches in length. The only piece you would have problems with is the bed. but you could do it end for end.

Takes the pieces out when clean, spray with alcohol to displace the water and then immediately spray with oil.

No painting needed.
 
raven007:

It was the normal practice at Hendey to use three different Diametric Pitches for the gears in a Cone Head style Headstock. The Spindle
Gear, the Intermediate Gear and the Sleeve Gear were one DP size, the Change Gears were another size and finally, the Cone Gears in the
Quick Change Gear Box were another size. The Spindle Gear on the fourteen inch lathe maybe an "off the shelf" item, but the Change Gears
and the Cone Gears are not. Gear thickness varies even when the gears are the same DP, this is common with Cone Gears, four gears will be
one thickness and the other eight will be another thickness. When I am making gears, I usually check several times with the lathe owner
to make sure that my drawing agrees with his machine, I have found differences that aren't on the drawings.

Hendeyman
 
Interestingly, this lathe had no taper pin or set screw retaining the handle on the back gear. There was a set screw through the head stock that retained the eccentric on the handle end and a pin through the eccentric and shaft at the other end. This came apart easily. Still no luck on the spindle although I managed to get the collar off the front.

Leadscrew is now free, tailstock is moving, compound is moving, cross slide is moving. Forward/reverse mechanism is still solidly frozen.
 
Here is some info when you get to it

Thrust block is attached to back end of cross slide screw - probably have to get most of T/A off to access nut on end of screw

Thrust block is clamped by the long binder screw passing thru right rear carriage saddle wing

Locking bolt for Thrust Block.jpg

Here is a non rusty thrust block

thrustblock2.jpg


Back
Top