What's new
What's new

Early style Judson Steam Throttling Governor.

Lester Bowman

Hot Rolled
Joined
Apr 9, 2011
Location
Modesto california USA
I haven't posted here for awhile due to Covid ( which so far I have escaped ) and getting ready for retirement and other events. But I did use the time to create pattern's for a smaller version of the first generation Judson patented throttling governor. The castings are on their way back from Cat Tail Foundry. I have prepared the shop for this long term project finally managing to clean the shop of sawdust and shavings.

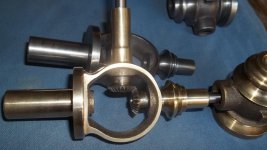
These pics show a governor loaned to me by Greg Johnson a member of this site. Thanks Greg :) I made full size working drawings using this as a pattern then scaled the drawings to accept either 1/4 " or 3/8" NPT in the bosses. This early steam governor has all the ribs and rounds and decorative additions all turned and polished. The patterns show these details a bit oversize to allow for this machining.

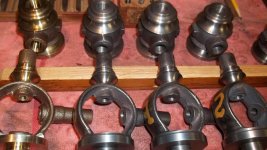
Rather than use " loose " patterns I opted this time to mount them to a Match Plate. The body is cored so you can also see the Core Box.

I'll update periodically to show my progress. After they are finished I intend to use my retirement to finish some of these steam engine projects I have... and many other things besides :)
 

Attachments

  • 100_5606.jpg
    100_5606.jpg
    71.6 KB · Views: 260
  • 100_5607.jpg
    100_5607.jpg
    95.9 KB · Views: 254
  • 100_5419.jpg
    100_5419.jpg
    82.9 KB · Views: 285
Thanks for sharing. Pattern making is always interesting, almost a lost art.
Keep us posted on your progress.

Hal
 
Here we go :) Castings arrived today mostly Cast Iron but a couple sets in Silicon Bronze just for the challenge. Next step is to sort through these and choose the best using the lesser pieces as trial pieces. Most of the castings turned out very nice with sharp detail. All these need fettling and cleaning up first. This will take awhile. I very glad the coring went well on all the body's.

Everything has a " chucking " piece added except the pulley's. It is mostly lathe work on a project like this. The drawing shows what the finished governor's will look like. The valve is a "semi balanced" valve of fairly simple construction.

These are simple projects but very time consuming and somewhat labor intense with all the polishing and turning to do. A good project nevertheless. Now you have seen my progress. It'll be awhile before I show more :)
 

Attachments

  • 100_5621.jpg
    100_5621.jpg
    101.6 KB · Views: 172
  • 100_5622.jpg
    100_5622.jpg
    101.2 KB · Views: 158
  • 100_5624.jpg
    100_5624.jpg
    71.5 KB · Views: 155
  • 100_5623.jpg
    100_5623.jpg
    100.6 KB · Views: 154
  • 100_5625.jpg
    100_5625.jpg
    64.3 KB · Views: 161
A few pics of the progress thus far. I was relieved when I reached the stage where the 1/8" Silver steel test pin slid smoothly down through the assembly's showing excellent alignment. Chucking piece's on the castings are essential when making pattern's. The top hanger where the ball hinges still show the chucking piece in the last photo.

Still much to do. Some of it has been a challenge. The Silicon Bronze parts all ream tighter fit than the cast iron. We'll get there in the end :)
 

Attachments

  • 100_5643.jpg
    100_5643.jpg
    84.5 KB · Views: 130
  • 100_5921.jpg
    100_5921.jpg
    92.1 KB · Views: 127
  • 100_5937.jpg
    100_5937.jpg
    88.4 KB · Views: 129
  • 100_5966.jpg
    100_5966.jpg
    90 KB · Views: 129
  • 100_5967.jpg
    100_5967.jpg
    66.8 KB · Views: 115
Those are looking very nice!

On first pass, I doubted the ability for the pour run into that bow framed center piece.

But that came out just fine in both materials from the pics.

NICE!
 
I was fortunate in finding another early Judson in 1/2" npt with a bronze body. Obviously it has issue's but should be a straight forward restoration. I can use the existing piece's adding to them for the new casting.

What makes this one interesting is how the valve body is marked. On one side it has the standard Judson and Son, Rochester NY marking. The other side is marked F.O. Babbitt and E.U.Whippitt (?)The last letter is obliterated and cannot be made out.

I could find no direct reference to either name or to a manufacturer of steam engines with such a name. Isaac Babbitt is known as the originator of Babbitt bearing alloy but seems to have no connection to F.O.Babbitt. I would appreciate very much any additional information on these particular names.
 

Attachments

  • 100_5943.jpg
    100_5943.jpg
    75.5 KB · Views: 105
  • 100_5947.jpg
    100_5947.jpg
    86.9 KB · Views: 93
  • 100_5941.jpg
    100_5941.jpg
    71 KB · Views: 86
Just a bit more progress. Miter gears and shafts fitted. Balls are in a finished state. Now comes the Pivot arms. One of these days these will be finished and I can play with steam engines again. Playing with my balls grew wearisome..
 

Attachments

  • 100_6016.jpg
    100_6016.jpg
    100.7 KB · Views: 87
  • 100_6017.jpg
    100_6017.jpg
    100.1 KB · Views: 87
  • 100_6022.jpg
    100_6022.jpg
    48.5 KB · Views: 86
  • 100_6021.jpg
    100_6021.jpg
    84.2 KB · Views: 87
Hi Jim.

I'm unaware of any connection to the Supercharger reference. I believe Judson went the way of other steam governor companies but I'm not positive. I've spent many an hour looking back.. but failed to look forward in Judson history :)

All the turning was done on a 10" Logan using using a combination of a quick change and Carbide or Lantern toolpost using 1/4" High speed steel. I ground roughly twenty quarter inch bits to get the profiles. Some were left/right, others singular in shape.

Through it all I planned everything to maintain centricity of the parts using fixtures to hold parts while machining. Also the parts maintain centricity by a register between the mounting flange. It has been a rewarding project thus far. Lots of Face Plate work here.
 

Attachments

  • 100_5630.jpg
    100_5630.jpg
    76.1 KB · Views: 54
  • 100_5765.jpg
    100_5765.jpg
    99.1 KB · Views: 54
  • 100_5923.jpg
    100_5923.jpg
    97.1 KB · Views: 51
  • 0000466.jpg
    0000466.jpg
    71.5 KB · Views: 51

Attachments

  • 100_3861.jpg
    100_3861.jpg
    84.9 KB · Views: 61
  • 100_4013.jpg
    100_4013.jpg
    82.3 KB · Views: 59
  • 100_5419.jpg
    100_5419.jpg
    82.9 KB · Views: 60
Balls need a bit more refinement in finish. Ball pivot levers are profiled and threaded. The unthreaded portion of the pivot arm will fit into a slight counterbore in the ball itself to hide the threaded portion.

My Die filer came in very handy making these small Pivot arms :) Not shown are the four Silicon Bronze Balls and the Hard Drawn Brass Pivot arms. These are finished as well.

Assembly requires an assembly Jig to ensure each are identical in terms of center lines and arm angle. I will probably use JB Weld or Loctite when setting the Pivot thread depth into the balls.

Afterwards I have a bunch of small parts to make plus the valves which will be made of Phosphor Bronze. The last castings to be machined are the drive pulleys. It will be a huge step reaching a point where I can begin assembling these little governors.
 

Attachments

  • 100_6049.jpg
    100_6049.jpg
    82.9 KB · Views: 46
  • 100_6050.jpg
    100_6050.jpg
    72.8 KB · Views: 41
Hello Jim. No.. I thought about EDM but being retired I have more time then money. Also keeping in the spirit of old time machine work I did it the hard way. I used a pin in the predrilled and reamed blank to locate a template I made. A series of center lines and tiny holes in the template helped to make sure everything lined up. I thought of making a fixture for the milling machine machining them all at once but weighed the time involved in that against roughing them individually to shape so.. labor intense but I felt it was easier.

I had to have a set of centers on each blank so I could cut the 1/4-28 threads on the lathe. I used a bandsaw to rough shape the blanks and a thin grinding wheel to get closer.. then my Die filer. Here is a pic showing the Bronze balls after grinding. After each was " filed to line" on the Die Filer I used needle files to blend and clean up followed by emery cloth. I was glad when the arms were finished !
 

Attachments

  • 100_6051.jpg
    100_6051.jpg
    55.1 KB · Views: 49


Back
Top