What's new
What's new

Hamilton Lathe Refurb

nt1953

Hot Rolled
Joined
Sep 4, 2004
Location
Huntsville, Alabama
I have owned an old Hamilton 16"x6' lathe with the round QC gearbox for several years, and have never taken the time to do anything with it. However, a museum not too far from me is interested in it and wants to be able to use it, so I have started working to get it back in decent condition mechanically, not cosmetically. I thought that because it is a rare beast, some of you might want to follow along.

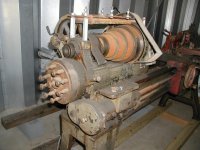
This is what it looked like when I got it:

P1010006.jpg

P1010007.jpg

P1010008.jpg
 
Last edited:
I also have a South Bend 16"x8', so as I worked on the lathe, I compared them.

The Hamilton is a much heavier lathe than the SB.

The Hamilton uses a feed shaft and a threading shaft. The SB uses a threading shaft with a keyway to combine functions.

The Hamilton uses a forward/neutral/reverse shaft so that all that function is controlled in the apron, and the lathe can be set to turn off the feed at any carriage position.

The Hamilton uses a round QC gearbox on the end of the headstock while the SB uses a more conventional QC gearbox below and in front of the headstock.

The Hamilton has three saddle gibs, one in front, and two in the back. The SB has one longer saddle gib on the back.

The Hamilton uses square threads for the lead screw, and for the crossfeed and compound. The SB uses acme threads.

The Hamilton does not have a graduated collar on the compound. The SB does.

The Hamilton has slightly smaller diameter headstock and tailstock spindles than the SB.

The Hamilton does not have any wipers or felts. It does use lots of ball oilers though. The SB uses felts and wipers, and some flip cap oilers, but very few ball oilers.

The Hamilton has a lot more machined and flaked surfaces than the SB.

The Hamilton, and my 1930 SB both use bronze headstock spindle bearings.

The Hamilton does not have a tailstock handwheel handle. The SB does.

The Hamilton has two clutches in the apron; one for longitudinal feed, and one for crossfeed. If you wanted to, you could engage both at once. The SB has one clutch, and a selector to choose longitudinal or crossfeed.

The Hamilton apron is fitted with a tongue that fits into a groove in the carriage. Its threading/feed/control shaft bearing at the end of the lathe also has a tongue and groove. SB mostly just bolts things together.

The Hamilton has one more headstock spindle pulley than the SB.

I guess that will do for a starter. When I come up with more differences, I will post them.
 
Last edited:
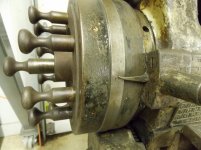
The first thing most people notice on the Hamilton is the QC gearbox. The picture below shows that unique QC gearbox.

QC Gearbox.jpg

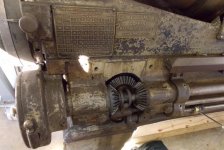
The next picture shows the QC gearbox settings plate and the feed/threading reversing mechanism.

Reversing gears.jpg

If you look at the QC settings plate, it shows that you have three adjustments; the center pin, the screw gear, and the QC box number. The center pin is pretty clear; it just slides in or out just like a sliding gear on a SB. The QC box number is changed by pulling all the outer pins out (only the bottom one should be in), then pulling the locking pin to the left of the settings plate and rotating the QC box until the desired number is under the pointer next to the locking pin, and then releasing the pin to lock the QC box in the new position. Then you push the bottom pin in the QC box in to engage the new gear. The screw is a little more confusing.

The picture below shows the screw with a 50 tooth gear installed. The gear is keyed and slides off of the shaft so that it can be interchanged with a 20 or 80 tooth gear. Those two gears have been lost, but I have told the future owners I will cut new ones if they make the blanks.

Screw Gear.jpg
 
The next two pictures show the crossfeed and compounds. If the pictures were a little better, you could see the flaking on the machined surfaces (wear surfaces have lost their flaking). Both slides are still good with very little wear. Note the ball oilers on the carriage. One oiler is for the crossfeed gears, and the other is for the carriage V-way on the front side (there is one on the back as well).

Compound.jpg

Crossfeed flaking.jpg

While the compound screw and nut were still excellent, the crossfeed nut had almost no threads left, and the screw had pretty bad wear. I will be making a screw repair and a new nut, but will change to Acme instead of square threads (not really up for the challenge of square threads).

Hamilton Screw 1.jpg

Hamilton Screw 2.jpg
 
The picture below shows the back side of the apron. It is complete except for a machine screw and washer that hold the miter gear (bottom center) on its shaft. The larger gear on the upper right shares a shaft with the small gear that engages the rack. That gear pair is mounted on a swing arm so that you can engage and disengage the rack. I am not sure why they did that, but is does make putting the apron on the carriage easier.

Hamilton Ohio.jpg

The longitudinal feed clutch is the knob on the left, and the crossfeed clutch is the knob on the right. The left lever is for forward/neutral/reverse, the center lever is the feed/threading selector, and the right lever is the halfnut control lever. The large nut just to the right of the handwheel locks the rack gear pair swing arm.

Apron Front.jpg
 
I have made a brass blank for the thread dial pinion, and have cut a hob blank to cut the brass pinion teeth. I have also made a fixture for my South Bend so that I can cut the teeth on the brass thread dial pinion with the hob, once the hob is finished. Now I need to figure out the best way to cut teeth in the hob blank.

Below is a picture of my South Bend cutting the 1 3/16-6LH hob blank, and the finished blank.

Cutting hob blank.jpg

Hob blanks.jpg

I guess I should add that the hob blank on the right is a 1 1/8-6RH acme so that I can make a new thread dial pinion for my old South Bend!
 
The next two pictures show the crossfeed and compounds. If the pictures were a little better, you could see the flaking on the machined surfaces (wear surfaces have lost their flaking). Both slides are still good with very little wear. Note the ball oilers on the carriage. One oiler is for the crossfeed gears, and the other is for the carriage V-way on the front side (there is one on the back as well).

View attachment 159459

View attachment 159460

While the compound screw and nut were still excellent, the crossfeed nut had almost no threads left, and the screw had pretty bad wear. I will be making a screw repair and a new nut, but will change to Acme instead of square threads (not really up for the challenge of square threads).

View attachment 159461

View attachment 159462

You seem to have figured out the square threads on the hob for the threading dial pinion...still planning to switch to Acme for the crossfeed now?
 
I really like the QC gearbox. At first it reminded me of the stops on console of the Wicks pipe organ at church. The mechanism is revolver like. What a combination.

Observer: "What thread are you cutting?"

Operator: "It's a 45 cal 8' Diapason."
 
My hobbing is not going too well, but I think I will have better results tomorrow.

I have learned some things about gashing and hobbing a thread dial pinion.
1) The setup needs to be as ridged as possible.
2) An unhardened steel hob gets dull fast, even when cutting brass.
3) The gashes in the pinion need to be at least as wide as the outermost edge of the hob teeth otherwise the hob will not follow the gashed teeth in the pinion. You can't make them too wide or they will be too wide at the bottom of the tooth.
4) The gashes probably need to be a little deep if the cutter is going to get dull. You need to leave room for yielding of the pinion brass (plastic deformation) as the cutter dulls.
5) For a thread dial pinion, the gashing cutter and hob can and probably should be larger in diameter than the lead screw. (gashing cutter about 2-3 times the diameter of the lead screw, hob about 1.15 times the diameter of the lead screw)

Results and pictures tomorrow.
 
The thread dial pinion for the Hamilton turned out pretty well. I used a gear cutter to gash the teeth a bit wider and deeper than the hob was supposed to cut. When I did that, the hob followed the gashes and because there was less material to remove, the hob stayed sharp longer.

Here is a picture of the finished hobs.

Finished Hobs.jpg

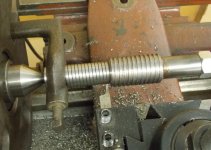
I used a dovetail cutter to cut the teeth, and a regular end mill to cut relief on the tops of the teeth. I ended up having to chase the threads of both hobs to clean up the flashing produced when the teeth were milled.

Initially I did not cut the gashes deep enough or wide enough. Here is what bad gashing looks like:
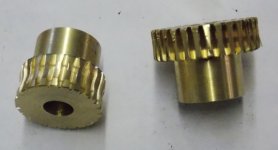
Initial Gashing on Pinions.jpg

After I regashed the Hamilton pinion, I hobbed it in the lathe:
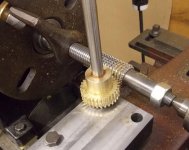
Hobbing the Hamilton Pinion.jpg

The fixture is just a block of steel with a piece of drill rod holding the pinion. There is a roller thrust bearing under the pinion to reduce some of the friction during hobbing.

Here is what the pinion looks like in the Hamilton:
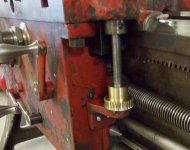
Pinion Installed on Hamilton.jpg

So, if I ever attempt gashing and hobbing again, I will follow the advice I gave in my previous post, and maybe things will work out better.

As a side note, the screw seen above and to the left of the lower thread dial bracket holds a spring and a plunger rod that fits into a detent on the half nut to keep it in position.
 
The pictures below show the front spindle bearing and cap. Despite the coloration you see, you can not feel any ridges or wear. The rear spindle bearing and cap look just as good. I only wish my younger South Bend looked so good.

Front Bearing Cap.jpg

Front Spindle Bearing.jpg
 
I finally finished the crossfeed screw repair and fabricated a new crossfeed nut. I bought some acme rod from Roton, cut off and discarded the threaded portion of the old screw, bored the good part of the old screw, cut a slip fit section on the new screw to fit inside the bored hole in the unthreaded portion of the old screw, bonded the two parts together with some Loctite 638, and finally installed a taper pin just in case. I decided I did not like the fit of the gear on the screw, so I used Loctite 638 on it when I pressed it back on.

Repaired crossfeed screw:

Hamilton Crossfeed Repair.jpg


New nut:

Hamilton Crossfeed Nut.jpg

With the new nut and screw, I get a backlash of about .003". I can live with that.


Lathe functional repairs complete:

Hamilton Complete.jpg
 
Hate to bring up a old thread but im curious to know a few other things of this particular lathe as i have recently acquired its twin
 
The best thing to do is use the thread starter to start a new thread for your lathe.
Be descriptive in the title of your thread. Read the stickies.
Its not good to start posting adding on too old threads. Ask your questions in your thread.
welcome to P.M.
 
This forum site isnt the easiest to follow and since you cant be helpful in the least this is a site i will not return to
 
You didn't ask your question did you . Starting a new thread helps get better results when doing searches.You hurt my feelings
.:cryin:


Back
Top