What's new
What's new

Hendey Lathe Help

Arclight

Aluminum
Joined
Feb 6, 2008
Location
Fullerton, CA
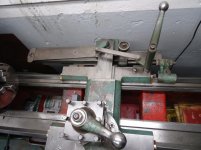
We have what I think is a 1940s Hendey lathe. It's marked as a 12x30" model and has power feeds and a QC gearbox.

I'd like to get the proper lubrication procedure, and need to get the apron apart to service the oiling system and see why the half-nuts aren't engaging. I also have an issue with the leadscrew power/reverse lever being fiddly.

Pics are attached and the serial number is 35225. Is there a manual and a way to find the date of manufacture out there somewhere?


hendey2.jpg
hendey1.jpg

Thanks!

John
 
Arclight:

Hendey lathe No.35225, a 12 x 30 geared Head model, was completed on June 14, 1943 and was to be shipped to the Transportation Officer,
Army Air Corps Staging depot, Des Moines, Iowa. From there it was shipped to the Supervisor of Shipbuilding, San Pedro, California. The
following information is taken from the original Order Form. Any information in parenthesis is my addendum).

Date Ordered: October 28, 1942
Date entered: November 3, 1942 (into production)
Sold to: Lloyd and Arms, Philadelphia, Pennsylvania (Sales Agent)
Urgency 2: Priority AA-1 Navy-Bu. Ships

TO BE INSPECTED BY NAVY DEPT.

Description: 12" x 30" - 12 speed Geared Head Lathe CR (Compound Rest) - To swing 14-1/2"
Oil Pan
Regular Equipment (as shown in catalog)
Timken roller bearings on main spindle - Multiple splined shafts
Taper spindle nose
Spindle speeds -19 to 598 R.P.M JOHNSON CLUTCH
High speed reversing mechanism
Drawing-in attachment and set of 15 #6 Collets from 1/8" to 1" inclusive by 16ths complete with cabinet
Taper attachment
Pump and Piping
New Style follow rest (Bridge Type)
Thread chasing dial
Arranged for vee belt connected motor drive with motor in cabinet leg
Fit ball bearing motor, 3 HP, 440 volts, 3 phase, 60 cycles, 1800 RPM, frame 225;
together with reversing magnetic starter and push button station. Continental motor
Customer will send us the following to be shipped with lathe:
6" universal chuck
12" independent chuck
Jacobs #34 drill chuck, and #3 chuck wrench
Fit Monitor push button station; type 9003 R-4
Fit Monitor reversing magnetic starter #A-67302


There are very few Patterns, Casts or Repair Parts left in inventory for this lathe. All of the original drawings are still in the
files, so parts can be made if required.

The Operator's Manual (third or fifth edition) is available as a free download on this forum. ISO, GST Hydraulic Oil No. 32 or 46
works well in the Headstock and Apron. If I get a chance later this evening, I will post one method of removing the Apron for servicing.

Hendeyman
 
Thank you both for the quick reply! I got it at least lubricated correctly and will be getting the issues sorted out over the next couple of weeks. I read all of the old posts I could find, and will probably have more questions later.
 
Arclight:

I remove the Apron using the basic plan from the Hendey Engineering Department. I use a mechanics creeper to mount several 4x4s and a
small jack, either scissor or hydraulic type. Remove the brackets from the right hand end of the Bed that support the Leadscrew, Apron
Reverse and the Auto stop Rod. Support these temporarily, using cord tied to the Tailstock. Unbolt the Auto Stop Rod Bracket under the
Apron and let it hang free on the Rod. Move the creeper/jack assembly under the front edge of the apron, about mid-way and as far in as the Oil Pan will allow. Unscrew the four bolts in the top of the Carriage that connect the Apron to the carriage, do not unscrew the
bolts completely. Make certain that the Half-Nuts are "open". Lower the jack slowly and at the same time continue to unscrew the bolts.
As the jack is lowered, the space between the Apron and carriage will increase. Stop when about a one inch gap has developed and using
a flashlight, check to see if the Cross Feed Screw Gear has cleared the Carriage, if not lower a bit more. When the Gear has cleared the
Carriage, remove the bolts completely. Slide the Creeper/Jack/Apron unit toward the end of the Bed. Using another set of cords, tie up
the shafts on the left side of the Apron and remove the cords on the end of the Bed. If everything has gone according to plan, the Apron
should roll pass the end of the Bed and be ready to put on the bench for servicing. For the reassembly, I recommend that you use a set of longer bolts to help with the alignment process while jacking the Apron back into position. It will be necessary turn the Cross Feed
Screw to get the gears to properly mesh. One more thing to remember after you rebuild the Apron is to put the Worm Feathers (keys) in
the twelve o'clock position and the Featherway (keyway) in the Leadsrew in a similar position. Keep the Quick Change Gearbox in the
neutral position, this will make it a bit easier to turn the Leadscrew to line up the Worms as you are putting the Apron back on the
shafts. I will leave the servicing procedure of the Apron for another time when you have it on the bench.

Hendeyman
 
Arclight,

I see that Hendeyman already provided professional advice while I was preparing this reply but anyway, here's what I wanted to say:

If you search this forum I think you will find a lot of good information conc. Hendey apron.

As to apron oiling system, the oil pump is accessible from underneath the apron under the round cover, and the metering can be adjusted from top of apron. See operators handbook (so kindly provided for by Johnoder).

Apron reverse lever being "fiddly" - might be a worn key in lever. Or a loose arm on the shift rod.

Halfnuts not engaging - probably something to do with lock-out mechanism not working properly. Means that you have to dismantle the apron.

Forum member C.Clement made some good videos abt apron and other Hendey topics on youtube which I don't seem to be able to give you a link to but search for youtube Clemwyo Hendey apron part 1 and 2 and you will find them.

Lars
 
Thanks, Lars. We are going through the shop top to bottom, and now the Hendey is serviced, I used it to make new handles for the drill press. It turns out I also need to make a 1/2 x 16 TPI quill stop, so I have a good reason to get the halfnuts working. It sounds like the various rods and lockout devices probably have 50 years of grit and such accumulated and something is sticky. I may tackle the apron reverse lever first as I think it's accessible from the end.

Arclight,

I see that Hendeyman already provided professional advice while I was preparing this reply but anyway, here's what I wanted to say:

If you search this forum I think you will find a lot of good information conc. Hendey apron.

As to apron oiling system, the oil pump is accessible from underneath the apron under the round cover, and the metering can be adjusted from top of apron. See operators handbook (so kindly provided for by Johnoder).

Apron reverse lever being "fiddly" - might be a worn key in lever. Or a loose arm on the shift rod.

Halfnuts not engaging - probably something to do with lock-out mechanism not working properly. Means that you have to dismantle the apron.

Forum member C.Clement made some good videos abt apron and other Hendey topics on youtube which I don't seem to be able to give you a link to but search for youtube Clemwyo Hendey apron part 1 and 2 and you will find them.

Lars
 
Okay, I think I have a handle on the apron drive engagement. It looks like everything just needs a good cleaning with solvent and lubrication. It was all of 3 screws to get the selector out!

Next question: I believe I currently have the taper attachment installed. But I also have this other item, is it also for the Hendey (like some sort of compound taper tool) or is an extra or for some other lathe?

Pics are attached. The unit that is sitting on the table is just loose and separate from the one installed in the lathe.

PXL_20201202_081820303.jpg
PXL_20201202_081834564.MP.jpg
PXL_20201202_081837722.jpg

Cheers,

John
 
John,

The taper attachment on your lathe seems to be complete provided that you have the clamp that locks the slide to the bed. It might be there but I don't see it in your picture. Anyway, looks like this on a 14" Hendey:
DSC00482.jpg

I don't think the the loose taper slide on your tool chest is from a Hendey lathe but I might be corrected here by people with better knowledge then me.

Please keep us posted abt the progress with your lathe.

Lars
 
I made some more progress on the lathe today. From Hendeyman's build sheet, I determined that my lathe has an L1 tapered-nose spindle with a 5MT bore. So I soaked the threaded collar in penetrating oil and made a proper 7.5" spanner to remove it. I traced out the profile on some 3/8" plate and cut it out with the plasma, then welded on a machined steel retangle to engage the slots and a long handle. The nose is in good condition.

L1_wrench.jpg

Now I am in the market for some L1 accessories...
 
Is that a piece of PTO shaft tubing you have there for a handle?:scratchchin: Tip. That tube also makes a great cheater bar for pipe, adjustable and combination wrenches. Easy to grip/orient AND the wrench can't turn inside of it. I keep an old dented one next to the door expressly for this purpose.
 
Is that a piece of PTO shaft tubing you have there for a handle?:scratchchin: Tip. That tube also makes a great cheater bar for pipe, adjustable and combination wrenches. Easy to grip/orient AND the wrench can't turn inside of it. I keep an old dented one next to the door expressly for this purpose.

I think so. I bought it out of the scrap pile at my metal dealer.
 
Hey! new to the forum and I just recently purchased an old Hendy lathe. The the previous owner thinks is from the early 1900s possibly 1910 and was wondering where I could go and look up the serial number as well as a manual if possible. Any advice?
 
Welcome. You are better off to start a new thread titled Hendey lathe or something similar. Next, we need pics, good pics. The serial number is on top the bed at the far end between the ways. Let's start with that.


Back
Top