What's new
What's new

Lathe spindle scoured

shandit66

Aluminum
Joined
Jan 5, 2011
Location
Toronto
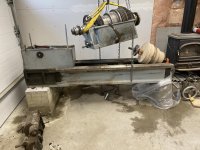
I'm attemping to revive old lath.
Its a 1920 (ish) Amercian Tool Works, tool room lathe, 16"

Its ways are worn out too much for metal use.
So its being converted to a patternlathe, for wood working

The spindle however has some scouring on it.
When I spin it by hand, it goes for about 1/2 a rotation before stopping.
I pulled off the bearing tops and found some significan scouring on the spindle.

scour2.jpg
Scour1.jpg

The bushings are plain bronze and appear to be in good shape.

Since I have only one big lathe... :(
How could I polish these up?

(I've called around for a mchinist to do it, but have been quote more than I paid for the entire lathe.

Any advice is greatly appreciated.

Olaf
 
Put it back together and keep it oiled. It is plenty good enough to turn wood. Do not try to run it at wood lathe speeds or the scoring will get worse.

Larry
 
I've salvaged antique engine crank journals that look much like your spindle by doing the following. Cut a piece of 400 grit wet or dry the width and circumference of the journal. Wrap it around and secure the ends together with tape. Now take a shoe lace and wrap it once or twice around the paper and grasping each end, pull it back and forth thus spinning the paper. I find WD40 works well as a cutting lube, though others may suggest better. Wind the lace back and forth across the journal until the paper gets loaded and repeat with finer paper. This won't remove any appreciable metal but does a pretty fine job of removing burrs and ridges. Be sure to check your bearings for imbedded crap that can undue all your hard work before reassembling.
 
if you want to take the time and spend the money you could take the spindle to someone that grinds crankshafts or has a cylindrical grinder have them grind tell it cleans up and make some new bearings to fit or if you have the room sealed bearings or just a light polish to knock the high spots down and trim the caps a bit and put some oiler's on it and run it
 
I've salvaged antique engine crank journals that look much like your spindle by doing the following. Cut a piece of 400 grit wet or dry the width and circumference of the journal. Wrap it around and secure the ends together with tape. Now take a shoe lace and wrap it once or twice around the paper and grasping each end, pull it back and forth thus spinning the paper. I find WD40 works well as a cutting lube, though others may suggest better. Wind the lace back and forth across the journal until the paper gets loaded and repeat with finer paper. This won't remove any appreciable metal but does a pretty fine job of removing burrs and ridges. Be sure to check your bearings for imbedded crap that can undue all your hard work before reassembling.

This seems like a good first step. Then I'll see if it still needs improvement
Thanks!
 
Very possibly got that way by running it way too fast. ATW thought such a lathe should have a top speed of about 350.

Couple that fact with previous POs being clueless of how thin spindle oil should be did a fine job on your spindle

A page from 1919

ATW LEVERS.jpg
 
With the speed limitation, will this be viable for woodwork?

Also, wish my first lathe spindle looked that good (also an ATW)
 
(I've called around for a mchinist to do it, but have been quote more than I paid for the entire lathe.

Any advice is greatly appreciated.

Olaf
Why is it always that the purchase price must always exceed the repair cost ?

You put gas in your car every week, might even pour more thru it in it's lifespan
including oil & tire changes exceeding the purchase cost.

The cost of this machine, working, on your shop floor, is the summation of the purchase, the install cost, and the ongoing maint/repairs.

What if you got it for free, how could you justify spending a single cent for repairs ?....:nutter:
 
I had a 1912 ATW 14", quite a bit of spindle wear on it as well. I did dig out and replace all the wicking around the bearings (was packed off with wax and so on), adjusted the spindle cap shims and end play and called it good :) The large, long journals will take a lot of abuse before the spindle starts moving around alot- the machine won't be tight but it will do good work nontheless- even on demanding cuts. I did a bit of wood on mine, slightly oversped to about 400rpm, which is plenty fast with a 12" chuck whizzing around. Wood is fun, makes you feel like a pro lol

btw, would love to see pics of your machine if you're inclined to post any...
 
Get it Spray welded, heat is low so there is no distortion then turn it to size needed assuming you have another lathe, if not spray welder can probably turn it.
 
Polishing the journals with emery cloth is a good approach, IMO. If you can swing the spindle in another lathe to do the polishing, better yet.

An old trick I've used to 'restore' scored journals on engines and other old machinery is to make a kind of "diestock" out of wood. Two pieces of wood are cut so they are about as wide as the journal. These two pieces are bolted together (all thread rod works for this). A round hole perhaps 1/16" bigger than the journal diameter is cut in the assembled wood blocks. Two handles, made of wood or flatbar are bolted to the body of this device using the through bolts that clamp the halves together.

I'd get some medium grit aluminum oxide cloth and cut strips as wide as the journals. Coat the journal with oil, then wrap the abrasive cloth around it. Leave a tab sticking into the split joint between the halves of the block and lightly clamp the through bolts. Work this device like a diestock, keeping it liberally oiled.

The idea is not to restore a perfectly round journal but to clean off some of the damage on the surface of the journal. You can progress to finer grits of abrasiv cloth, and as the abrasive breaks down, keep taking up lightly on the through bolts and keep turning the device.

Some scoring on an old lathe journal is a fact of life. The kind of surface damage your photo shows should be addressed. When you are satisfied with the surface finish from the abrasive cloth/device, I'd oil stone the journal. An "India Medium Hard" stone worked on he surface of the journal should break down any ridging. Hold the stone at about 45 degrees to the centerline of the spindle and work it around the journal with plenty of oil.

The normal rule of thumb is to drag a fingernail lightly over a journal. If your fingernail catches on anything such as a burr or the ridge of a score, stone it down.

The bearings themselves should be inspected. With what I am seeing on the spindle journal, I would think there is some corresponding damage to the bearings.
Without getting into a full blown job of spotting and scraping the bearings to the journal- since you are to use this as a woodworking lathe- I'd give the insides of the bearings a shave. This is done by taking the edge of a parting tool blank or a power hacksaw blade ground to a good straight and square edge, and dragging it over the surface of the bearing. This should clean off any burrs or glazing. After you give the bearings the shave, you can lightly polish them with fine "Scotchbrite", but be sure to wash the bearings thoroughly before reassembly.

Reassembly: place the spindle in the headstock and put on the bearing caps with no shims. Lightly snug the cap bolts. If the spindle can be turned by hand, check the clearance in the bearings using a dial indicator. Hopefully, the spindle will be bound when you clamp down the caps on the bearings. If the spindle is bound, loosen the caps and start adding trial shims. To check clearance, put a bar about 3 feet long into the headstock spindle bore and mount a dial indicator so it contact the spindle at 12:00. Push down HARD on the bar, and zero the indicator. Pull up with perahps 75-100 lbs of force and see what the indicator reads. This is your bearing clearance. I do not know the journal diameters of your lathe, but I'd guess for what you are going to be doing and the overall condition of the journals and bearings, maybe 0.002"-0.003" might be a good clearance to start with.

My own test is to pull the lathe spindle over by hand for a few turns with oil in the bearings. If the spindle seems to 'glide to a stop' you should be OK. If it jerks to a stop as soon as you stop turning it, chances are4 the bearings are a little tight. A 0.001" shim added to one side of a bearing cap can do wonders.

When you are satisfied with the bearing adjustments, it's time for a 'heat run'. Set the lathe to run at its lowest speed in 'direct' (back gearing disengaged) and start it under power. Keep checking bearing temperatures. I use the back of my hand since fingers tend to be too callused. If the bearings seem to be getting hot in a hurry STOP the lathe, loosen the caps and flood with oil. Some more shimming is needed. Repeat this test in each speed, and let the lathe run at its highest speed for at least 10-15 minutes until the bearing temperatures stabilize. If you can't keep your hand on a bearing it is too hot.

Some 0.001" shim stock comes in handy for jobs like this.
 
IMO, the lathe may work as a wood lathe, but would be greatly under-utilized. Wear doesn't mean it can't work with metal, just that it needs to be repaired and/or it's accuracy could be limited by the wear. If a machine gets treated like a "beater," it's only going to get worse.

IMO, do as mentioned above and polish the spindle faces just enough to clean any burrs and ridges so they don't grind into the bearings. With split bronze bearings like that you'll use shim stock to set the gap so that when the bearings are clamped down they don't bind to the spindle and to account for any back-lash. Those two things alone could be enough to get the machine running. Long term, I would get the spindle faces ground concentric and if needed, make undersized bearings to account for the material lost.

The bed wear would be another issue, but from my experience unless you're dealing with 1/8"+ of material lost, or your making long close tolerance parts, the wear can be worked with and still make satisfactory parts.

It's just an old machine, but IMO the new manual stuff coming out of the Orient, is not an equal comparison to the quality of the machines made back in the day (with the exception of limitations from top spindle speed and other features). Wear can be fixed, but you can't always fix a poorly designed/built lathe-shaped machine.
 
Joe M's procedure is good. American used paper shims under the bearing caps- brass sheet would work also. When you set up the spindle bearing caps to check rotation and deflection, be sure to take up the end play nut until just before it starts to add drag to the spindle
 
This is getting to be a lot of work just to make a "tooslow" speed wood lathe. Considering how little dedicated used wood lathes bring on the market, be careful how much time and effort you sink into this one.:scratchchin:
 
Yeah, as a good wood lathe it won't do very well otoh I've made tailstock centers for pipe work out of 2x4's screwed together into a block then turned down and hammered to fit into the end... some other odds and ends for the house.

These lathes show their stuff at lower rpm and heavy cuts.. its an interesting job when you plow a HSS cutter 1/2" deep into a piece and hear the headstock muscle up and the chip comes off like a spiral garden spike- all from a 2hp motor. But given bad spindle and bed wear maybe its better fit for a spray welding machine. I once saw a forsaken old Fay&Scott set up to turn granite ballisters.
 
Wow! Thanks for all the great feedback!

So I hooked up the chain hoist and pulled the spindle - I'm guessing its 150-200 lbs.
And found the first, likely main issue. One of the shims was under the spindle, in the journal!!!
And it was a copper shim.

I'm guessing that really didn't help reduce friction. :)

While it was dissambled, I followed the suggestion above and took some ermery cloth to it. Wrapped it and took off any burrs. By the time I got to 400, it was pretty good. But still has some streeking.

No, it does not pass the fingernail test

I cleaned it all with WD40 then engine oil and reassembled.
Its much better. Spinning by hand, it does a full rotation now.

Once I get the motor mounted, I can try an oil stone. Turning it by hand while holding the stone, just wont work.

I picked this up a few years ago, for $200 and it sat around for a few years.
Normally I would feel bad about that, but I think it sat unused for about 30 years before that! :)
Many of the gears were missing and it wasn't really functional as a metal lathe. But the owner didnt want to junk it.
So I figured it was a worthwhile project
IMG_1492.jpg
IMG_1494.jpg
IMG_1495.jpg
IMG_1496.jpg

My intention was always to use it as a wood lathe.
Most of my work is large diameter 25 - 32". So I had riser blocks made for a 32" swing.\
Hence my rpms will stay low.

Once a piece is balanced, I can use my other lathe, which is much lighter (say 1800 lbs), but can't handle the big stuff.

My RPC is still problematic, so once that works, I'll fire it up and see if theres much heat build up at the bearings.

I'm hesitant to remove too much material from the spind;e because I have no idea how to replace the bronze bushings.

So, thank you for all the great advise!
 
Why is it always that the purchase price must always exceed the repair cost ?

You put gas in your car every week, might even pour more thru it in it's lifespan
including oil & tire changes exceeding the purchase cost.

The cost of this machine, working, on your shop floor, is the summation of the purchase, the install cost, and the ongoing maint/repairs.

What if you got it for free, how could you justify spending a single cent for repairs ?....:nutter:

Fair enough!
I just moved to a new town and don't yet have any good contacts for this sort of work.
And yes, I've already invested WAY more than the purchase price.

My rule now is:
- get it running
- see if it does what I want
- Only THEN tune it to perfection.

That saves going down too many rabbit holes. :)
Plus time and money
 
That riser is wild lol

Nice that you have the gearbox and leadscrew/feed rod- but perhaps missing the quadrant shifter and gears.. there are 5 or so involved leading from the teeth seen on the outside spindle end down to the gearbox input shaft. If the gearbox has the placard that will specify the final 2 in the train. The quadrant that mounts on the end of the headstock allows the operator to select fwd/reverse for the leadscrew and feed rod.

The blocks were made by a local machinist. Large surface area for a good base. 4 threaded rods for each piece, 5/8", grade 8.

Yes - But I dont think I have a need for the gearbox. I'm storing the spare parts for now, but am happy to part these out for anyone who can use them.

Pattern lathes generally don't use a feed. And I can't see any use for me.
 
Shandit66, I'm a bowl turner, I think your lathe will do perfectly fine for what you are doing. Considering that Wadkin & Oliver pattern makers lathes are priced in the thousands of dollars, you are way ahead of the game.

Paul


Back
Top