I would have posted this in general forum but I can't hide the fact that I'm not a machinist so easily over there.
Oh and by the way, I'm not a machinist.
I'm making a part for a friend and am not sure about how to make the taper.
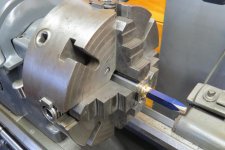
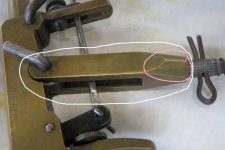
The part is for a Taylor Fur Getter Set-gun. It wasn't legal very long and is fairly scarce. I'm making the brass piece in the white circle, the pink circle is the taper. I've machined a brass bar down to .508 square. The only way I can figure to make the taper, notice the taper is only on two opposite sides, is to bore two center drill holes off of true center and cut one taper, switch center holes and cut the other. If this is the best way, what is the math needed to determine the distance from true center, to the taper center, to get a 9 degree taper on each side?
I hope I'm making myself clear. Or is there a better way to do the job?
The first picture is the example I made my drawings from.
Second picture is the part I'm making.
Third picture is where I am in the job.
Any help much appreciated.
Oh and by the way, I'm not a machinist.
I'm making a part for a friend and am not sure about how to make the taper.
The part is for a Taylor Fur Getter Set-gun. It wasn't legal very long and is fairly scarce. I'm making the brass piece in the white circle, the pink circle is the taper. I've machined a brass bar down to .508 square. The only way I can figure to make the taper, notice the taper is only on two opposite sides, is to bore two center drill holes off of true center and cut one taper, switch center holes and cut the other. If this is the best way, what is the math needed to determine the distance from true center, to the taper center, to get a 9 degree taper on each side?
I hope I'm making myself clear. Or is there a better way to do the job?
The first picture is the example I made my drawings from.
Second picture is the part I'm making.
Third picture is where I am in the job.
Any help much appreciated.


")