What's new
What's new

New/Old-Iron day: Ames Triplex multi-machine

M.B. Naegle

Diamond
Joined
Feb 7, 2011
Location
Conroe, TX USA
So I'm no longer a proud Logan lathe owner. I sold my model 200 a couple years ago, and my 820 went away on Monday (I kept my T-shirt though!). I'm still set with small tool-room lathes so other than the regret of letting go of old iron, I can still turn parts. Letting go of the 820 made some room, which my wife loved, but I got the eye-roll this morning when she saw what I drug into the garage last night.

I struck a deal with a gentleman south of Houston for an Ames Triplex. It's fairly complete minus a few small pieces. Biggest issue at the moment is that the spindle was partially disassembled by a prior owner. Not sure what the issue was, so I'm doing visual inspection, cleaning out the gear-box, and putting it back together to start with. I don't have time to do a full rebuild right now, so I'm going to focus of getting it running and learning all I can about it.

There's a good write-up on Lathes.uk Ames Triplex Multi-function machine and a couple other threads on here giving some spindle info and pictures of other machines, but not a lot else, so I'll share what I learn as it comes.

Mill-Lathes get a bad wrap in general as they're a "jack-of-all, master-of-none" machine, but some initial impressions of this machine now that I have my hands on one is that for its limited size range, it looks fairly ridged and well built. Regardless of how it was marketed, I get the impression that it won't completely replace a mill and lathe, but the size and adaptability of it make it a great 2nd-op machine.

There's no power feeds or screw-cutting capability, but the spindle has 3 geared speeds and a 2 step belt drive (6 speed head). It has a small but present through-bore that's in the range of a 9" tool room lathe, and accepts tooling in the size/power range of an M-head Bridgeport mill. The ways are built similar in size to a 10" South Bend.

It looks like you can quickly set it up, but to what accuracy I want to learn. Once it's running, I want to see how well everything holds tram and how repeatable it is. So, pictures to come...
 
20190403_205835.jpg
So here was tonight's progress. When I picked up the machine the top shaft was removed. The taper pins, square keys, and nut that held the pulley on were missing, but we had them all in our fasteners. The nut was a 3/4" fine thread jam nut. The keys were 3/16"x3/4" for the pulley, and 1/8"x3" for the selector shaft, which I played with the fit until it was pressed into the pulley shaft and slip-fitted on the selector shaft, that way it wouldn't fall out of place when the shafts slide against themselves(as there's no retaining pins to hold it in). The taper pins for the gears were #4 that I cut to size out of 3" lengths we keep in stock. One is still a little proud and needs a little more work to avoid hitting a gear when shifting. I also flushed out the whole assembly and replaced some broken oil cups. The whole machine has been greasedinside and out, but I'm being optimistic that this prevented rust and it wasn't used enough for the grease to hold grit in the ways (:o:ack2:).

I think there were 2 main reasons the headstock was apart. The quill pinion gear has about 1/2" it's teeth ripped off. I'll try to source an off the shelf gear that I can cut the hub to press onto the shaft.

And the other reason is that I think the top selector shaft had become damaged on the ************************ as someone had turned the outside end of it down and made a slip fitting soft steel bushing to fill it's place. They never finished the OD or re-drilled the taper pin hole for the knob though. I dunno if they either got stumped or distracted, but I made it work. I made the bushing press onto the shaft by dimpling the shaft with a center punch, finished turning the OD, then used the other taper pin holes and the knob to find and re-drill the knobs taper pin hole. Then I had to re-cut one of the detent grooves that had been lost with the bushing. It's a soft steel bushing on a case-hard steel shaft, so it might be an issue later, but it rides on a brass bushing and gets the machine back to work. The selector detent spring, cap, and ball bearing were also missing, so I used some fasteners to get it working (see the big hex bolt head sticking out of the casting as a place holder until I make something more permanent).
20190403_205943.jpg
20190403_205919.jpg
This machine is #1123. Dunno what that says for it's age or history. I emailed B.C. Ames, who are still in business but only make measuring tools and gages, so they might not even have records of these machines anymore.
20190403_210013.jpg
I'm working on the motor now, a 1/4 HP 110v sealed frame motor that seems age appropriate to the machine, but the shaft is seized so I'm yet to determine if it's just stuck bearings, or it's toast. The motor pulley looks like it was lost/broken and replaced with a shop made aluminum one. Still should work. I'm going to cut and lace together a 3/4" wide leather belt once the motor is running and in place again.
 
This machine is #1123. Dunno what that says for it's age or history. I emailed B.C. Ames, who are still in business but only make measuring tools and gages, so they might not even have records of these machines anymore.

That should be a later model. Mine is SER# 1059 and still has Triplex Patents Pending on the base where yours has Triplex BC Ames. If I recall correctly BC Ames bought the machine from Triplex around 1924. There's one on Tony's site with #1148 and is also stamped 1938.
 
Tony's sight also talked about later models having improved bearings, helical gears, and V-belt drive. The spindle bearing on mine appear to be tapered sleeves, and of course it has spur gears and a flat belt drive. I'll get some pictures of the base uploaded next.

There hasn't been a very clear consensus with the original spindle collet/taper system, and also some owners have updated to other systems. I have one original tool with mine in the forum of a horizontal milling arbor, which has some damage but I think it'll be serviceable. It looks like a longer version of a 3C collet. I'm thinking I'll likely make a few holders of my own once I can get clear specs on hand. I'll start a thread for that adventure later and see if I can make multiples for other owners. I may need to wait until my tool-and-cutter grinder has cylindrical grinding capabilities again, but this would give me motivation!
20190403_210026.jpg
 
Also, mine came with a driving fork for the spindle, and a threaded back 3-jaw chuck, but they used an intermediate adapter between the spindle and back plate. I need to measure what the 2 thread sizes are, but I'll likely make (if I can't buy) some back plates to thread straight onto the spindle. I'd like to get a couple of good 3 jaw chucks that can give me reversible jaws and soft jaw capabilities, as well as a good 4 jaw. Depending how the collet thing goes, I might see about getting an ER32 adapter to thread onto the spindle too.
 
B.C. Ames got back to me!

______
I can give you some history and a web site, but that is about it.


B. C. Ames split into an indicator company and a machinery company back just after WWII. We are the indicator half. The machinery half stayed in business until 1972 when the company was sold to Stark Tool. The Ames hardness tester is all that still exists of that company. It is now made by ElectroArc in Michigan. I’m not sure what happened to the drawings and records of the machinery half, but as far as I know, they are long gone.


The only place I know with information about the Ames Triplex and many other old machines is Lathes + Machine Tool Archive.


Sorry I can’t help more, but that is all the info I have on any of the Ames machines.


Regards,


Francis Gardner


B. C. Ames Inc.

1644 Concord Street

Framingham, MA 01701
 
20190404_173137.jpg
Well the motors a goner!
I was going to open up the case and check the bearings, but the case screws were seized up, so I chiseled the heads off the screws and about a quart of water squirted out! Once the motor was opened up, it looked like it had been sitting full of water for awhile. Luckily I have a good replacement on hand: an instant reversing 3/4" HP Dayton capacitor start 110v motor. I bolted it up to the machine and stitched together a new belt last night. Now I just need to get new wires and a drum switch run.
20190404_183951.jpg
I also was able to pull apart the horizontal milling arbor this morning and water piddled out from between the spacers! No rust thankfully, but I'm starting to think some of these parts may have spent some time in a water-filled bucket. OR..... given the machines location, a certain figure that goes by the name "Harvey" may have been involved. All things considered, very little rust....
 
SO, the threaded nose: I'm measuring about 1 9/32-6... I think I'll need to make my plates. I have a small Buck adjust-tru chuck that'll be a good candidate if I can find a new set of jaws for it.

The chuck that came with the machine (old 6" Cushman) has a back-plate threaded 1 5/16-8. If I can get/make appropriate back plates, does anyone know what this chuck would fit so I can pass it on to someone who can use it? It's a little bulky for this application.
 
20190404_225708.jpg
20190404_225736.jpg
The spindle and motor back in place. The clamping plate for the head is missing:(
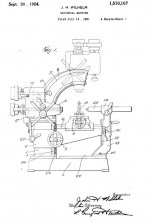
. The original owner is looking for it, but I may need to make one. I'll need to figure the dovetail angle, arc radius, and hole positions, but I'll have to make it in one of our CNC mills as I don't have any way to manually generate an arc that big (at least not practically), so I'll model it in CAD and let the machine do the work.... unless we find the old one! That's my hope.

You can also see a little vise on the table. I had put it aside to adapt for my tool-and-cutter grinder, but I think it will work better here. It needs new jaws and a new bearing cap for the screw.
20190405_190142.jpg
Here's my one and only tool holder at the moment. It has a fair amount of damage to the taper and shank. There was a pin to mate into the slot in the spindle face, but it had been cross-drilled out and I couldn't save the hole. I desided to leave it out until I can make a new arbor, among other tool holders. Another option would be to drill out and plug the hole, re-cut the taper, and then redrill the hole. The arbor seems well made, but it is softer than I'd expect. This mill is in fact a 2AM nose, so tooling's going to be very rare. I think my first step will be to getting the turning chuck back plates sorted out, and I'll make an ER32 adapter as well to thread onto the nose.
 
Haven't made a lot of progress lately. I pulled the quill pinion out of the head to see about replacing the stripped gear. Luckily I found a replacement on McMaster. It's 1/2" wide, 7/8" round, 3/4" pitch diameter, 16 pitch, and has 12 teeth. The original was machined integral with the shaft which was 1/2" round on either side of the gear.

My plan is to bring in the gear and size it for an interference fit on the shaft, which I'll cut the original gear off of. It doesn't leave me a lot to work with mating the two together, but I think if I keep a very tight tolerance and heat the gear up, the interference fit will be enough to hold the two together. Worst case I'll put a dowel pin through it too, but I'd like to avoid it if I can so I don't lose any surface area in the teeth.

I'm also working on making a new clamping plate which is a little tricky as I'm having to figure the radius of the arm with steel rules and math, rounding to the nearest nominal figure. I'm planing on cutting the dove-tail arc feature using our Bridgeport with a 2 axis Prototrak control. I'll clamp the plate to the table and nod the head to the required angle so I can use a standard end mill for the cut as we don't have a angled cutter of the right angle or surface length. Once I have the feature cut I'll check it on the machine and hopefully there won't be too much trial and error.

One thing I did get going was a better 3 jaw chuck. The one that came with it was way too bulky for the little spindle, but I had a little old 5" 3 jaw adjustable Buck chuck that fit the ticket, so I used the threaded spindle adapter that used to adapt the Cushman chuck to the spindle, and piece of 1/2" x 5" round plate to make a back plate for the Buck chuck, and it's about ready. I need to true up the plate a little more, but it much more compact and true to the "universal" nature of the Triplex, will allow quick 3 jaw operation with close tolerance adjustment when needed without needed to swap to a 4 jaw. The Buck chucks previous owner had welded extensions onto the hard jaws, which I cut off so they could be used standard again. Unfortunately I found a couple fine cracks in the chuck body (probably related to the jaw extensions and work that was too big for the chuck), but I don't see them causing problems with the light duty work it will see. At the very least, I'll have a good back-plate to use and I can find a better Buck chuck to replace the cracked one later.

I also replaced the missing tail stock quill. I worked off of pictures for design and rough dimensions, so it's just a straight shaft with a Morse 2 taper in one end and a knock-out slot cut in the end sized for a #1 drift. I used Machineries Handbook for industry standard dimensions for the taper and drift slot.

There's no provision to feed your chuck or center into the work like a normal lathe tail stock, so you would clamp the TS quill in the desired location and then use your spindle quill for any Z axis movement. Someone in another thread compared the design/usage to that of a sliding spindle screw machine. On that note, I have one of those little 6 position Morse taper mounted lathe turrets that I might keep with the lathe for simple center-drill/drill/countersink ops. I may also tool it up with a threading die adapter in the absence of the threading attachment. Both would require the spindle quill to draw forward as the work feeds into the stationary dies, and the spindle motor is an instant reversing type to back the work/spindle out.
 
geDAigpf.jpg
Made some solid progress with the more critical issues. I got the arc cut for the head clamping plate and it fits right into the dovetail :cloud9:. So if anyone ever needs to replace it: 7" radius and a 60 degree angle is what you're after. Now I just need to finish the mounting hole and alignment pins.
A6RjfFmQ.jpg
Also got the pinion gear fixed! I was about to order a blank that would have the teeth, but need to have the length and bore cut to size, but I had an "ah-ha!" moment. We had scrapped some textile gluing machines earlier in the week and had taken them apart as there was a bunch of brass and aluminum castings that we'll take to the recycler. In the process we threw a bunch of spur gears in the bin and low-n-behold, there was a good used gear exactly the size I needed. It had a .501" bore, so I turned the old gear down leaving the shaft at .504", heated the gear up to orange and pressed it into place on the shaft. Looks like it was always there and I doubt it will ever slip.

Hope to maybe make some chips on the Triplex later tonight! I'm going to post some videos too showing various set-ups and operations so we can see how the design actually performs.
 
Few days late, but I made my first chips on the Triplex last night!

Sorry that the video's a little hap-hazard and the volume's sketchy. I still need to make adjustments and there's a few little repairs to do still, but it's a fun little machine to run! I'm impressed with it's performance over-all. It's not a "full-sized" mill or lathe, but it doesn't do a bad job keeping up. The vertical travel was the biggest disapointment. I think a flatter vise and stubby drill bits will be the most helpful.

Bear in mind that it's a 1/2HP spindle with a newer 3/4HP motor, however it's still running a 3/4" wide flat belt. That said, there was a few points that my drill bit slipped in the chuck, but the belt never slipped and the motor wasn't bogging down.

My Horizontal milling set-up produced some racket, but the arbor needs straightening and it's missing a pin that keys it into the face of the spindle, so I wouldn't want to take too much heavier of a cut than a 1/4" wide, 1/16" DOC until it's a little more solid. There's no intermediate arbor supports on this machine, so that's going to limit the rigidity and I wouldn't want to use any cutters out away from the spindle.

My next step is going to be to get the lathe chuck dialed in and do a 2 collar test to adjust the table/bed. Then I'll take a long light cut over it's full travel and see how it mikes. One of the only original bits of tooling I have is a driving plate for between-centers turning, but I'll need to make a 2AM dead center in order to utilize it.

I also need to get some kind of simple end-mill holder made so we can try some vertical milling. The 2AM holders are not hard to use. They're a bit like changing out mini R8 tool holders.

Any other thoughts on tests to do or things you would like to see done on one of these machines?


Back
Top