What's new
What's new

Nichols Horizontal Mill Spindle Outer Sleeve Repair

Degull

Aluminum
Joined
Feb 3, 2014
Location
Toronto Canada
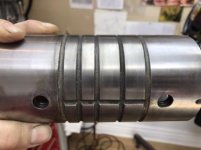
Hi everyone. I am novice looking for some advise on how to go about a thread repair on a sleeve for my Nichols Mill. I have the machine completely apart and addressing all the issues. Overall the machine is in great shape but there a couple of problems. The spindle outer sleeve has two 7/16-14 x 1/2" socket cap screws holding it inside the head of the mill. The threads in the sleeve are almost all gone, maybe one or two threads left. The stock screws not long enough anymore to reach the threads and cannot be tightened. The sleeve looks like it has been hardened and ground.
I could use longer screws but still only one thread holding the screw in. This might work because the screws only stop the outer spindle from moving much like a dowel pin. I am wondering what other options?

E303D7DC-0198-445D-A369-582263D8464E.jpg
D8FC6FB9-52B0-42F0-98BB-9263A60B15C8.jpg
41E66784-013A-48CC-A922-C88563F8200C.jpg
 
Might help - PDF page 3 and 4. Parts list (item 35) says they are flat point socket set screws - but then maybe I am not looking at the right thing

http://vintagemachinery.org/pubs/2135/3554.pdf

good luck

On Edit

If the worn out threads are in those holes in the fairly thin wall tube, I would have no problem at all - if it were mine - in spot annealing / softening as needed - until I could run a 1/2-20 tap thru - after drilling or reaming to .453 as needed

I have a newer machine but the parts look like they are the same. The outer spindle sleeve is part 76 and the socket cap is part 24 in the manual you referenced. The spindle sleeve is .308" in thickness.
I would have to mill the head to accept a larger diameter socket cap if I went up to a 1/2".
 
I keep wanting to put some TIG in the holes, drill and re-tap for the old bolts- or at least same size but a bit longer. Easy to say I don't have a TIG unit, just AC buzz and a torch. I'd be maybe a little afraid of trying to put braze in there with the torch- its a nice fit in the head as I recall.
 
I keep wanting to put some TIG in the holes, drill and re-tap for the old bolts- or at least same size but a bit longer. Easy to say I don't have a TIG unit, just AC buzz and a torch. I'd be maybe a little afraid of trying to put braze in there with the torch- its a nice fit in the head as I recall.

I thought about filling it with Tig. I have never welded a heat treated part before. I am a little afraid to try but it doesn’t look that hard.
 
I thought about filling it with Tig. I have never welded a heat treated part before. I am a little afraid to try but it doesn’t look that hard.

You might be over-thinking this? OK . they are shabby. But it took one helluva long run of years, tears, chips, and not always gentle handling for them to GET shabby. Your plan is probably going to be more attentive, careful, and considerate of OLD Iron, yah?

Might start "low tech", low effort by just forming new ones and their tip to length off longer stock screws,

Peen carefully all around a wallowed-out hole, yah can tighten it up a skosh.

Drill, make and set a rivet or "grommet" as old salts call an anal sphincter, yah have fresh material for the threads - no heat.

Well - I might be suspicious of the sailors!

:)

Then see if it is even still a problem? The Nichols' spindle. Not that of the sailors.

I took your advise and reassembled the spindle and made some longer bolts. The spindle sleeve tightened right up. There are only a couple of threads holding the bolts in but I am confident they will hold.
Thanks for the advise, I was over thinking it.
6E01129D-C0EA-4E61-8994-C7D71E8C39A3.jpg
 
I've found it handy to remove the head elevation lever and stash it on the drip pan other side of the body- I rarely use the sliding head and benefit from the walking clearance around it. Doc on this forum found a cross for the oil seal on the Master gear motor, apparently a pretty standard one- NAPA etc should have it. Mine sure needs it at some point, might be good to do yours while everything is apart.

Something about the Nichols letters on the casting makes one want to highlight them, same with the locking handles lol. I'm blue w/ white highlight & black handles...

The colours were not by choice, I repurposed some epoxy paint from another project. Doc's machine was the inspiration for my rebuild but using the same colours was a coincidence. You are right about highlighting the letters on the castings, makes the paint job come alive.

Thanks for the help!


Back
Top