What's new
What's new

Old Makino Mill Question

kolederacer

Plastic
Joined
Dec 2, 2017
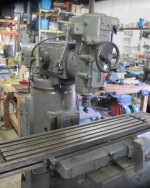
Hi, i was just wondering if anyone has any information about this mill?
Unfortunately i cannot seem to find any information about it.
I believe the model number is KGAP-70
Here is a photo

00X0X_5fVEMGpNTSZ_1200x900.jpg
 
I am considering buying it as my first mill because its cheap and im just now finishing college.
My main concerns are is this a decent machine to learn on? Is it junk and not worth it?
Any tips would be greatly appreciated. This is the first mill i have found in my budget but i dont want to waste money on junk either.
Thanks agian.

I don't know anything about that mill but rest assured Makino does not make junk. If it is in reasonable condition you will do fine with it.
 
Thanks moonlight,
im going to go check it out tomorrow if possible.
Then i just have to figure how how in the hell to get it off the trailer an into the garage.
Any suggestions?
I thought maybe put it on a pallet on the trailer then pallet jack. But i have never out a mill on a pallet so i do not really know if it can take the weight?
Thanks for the help.

Call a tow truck, stretch the boom out a bit and use it as a crane, lift it,pull the trailer out, lower it and use the wrecker boom to set it inside. If you want to move it farther in than the wrecker can just set it in some pipes and roll it where you want.
 
Be sure to look closely at the Y axis (in-out) handwheel arrangement. It looks like someone put a die-cast hardware store v-pulley and belt on there by way of Y power feed. Given the looks of the rest of that beast, I would have expected Y feed to be built in, so it might be broken. Even if not, that thing looks seriously stout. Condition, condition, condition. It looks like there there could be some serious bragging rights, if you are into that sort of thing. Just be ready to have the only KGAP-70 on your block, so to speak, so no spare parts, fixing knowledge, etc.
 
Be sure to look closely at the Y axis (in-out) handwheel arrangement. It looks like someone put a die-cast hardware store v-pulley and belt on there by way of Y power feed. Given the looks of the rest of that beast, I would have expected Y feed to be built in, so it might be broken. Even if not, that thing looks seriously stout. Condition, condition, condition. It looks like there there could be some serious bragging rights, if you are into that sort of thing. Just be ready to have the only KGAP-70 on your block, so to speak, so no spare parts, fixing knowledge, etc.

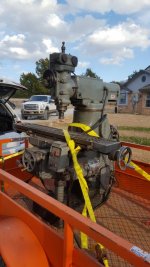
Well i bought it. All the axis were very tight on it. Yes it did have the homemade wheel but i can find one that will work or could be adapted. Worse case ill make a new one. Right now it only came with one TG100 3/4" collect. And of course the TG100 chuck and a random fly cutter. I also have a set of chineisium end mills. If any one has any tools or TG100 collects, etc that they would part with for someone just starting off at a good price that would be a huge help.
I know i am bound to do thing wrong and break tools etc no matter how much i read up and watch videos so any suggestion or tips, trick or help would greatly be appreciated.
Here are some pictures of me picking it up today.
20171203_152450_zpslrwaqikl.jpg20171203_152458_zpsuw6eow4x.jpg20171203_153531_zps8nnc53ox.jpg00y0y_fJrdkBfJtya_600x450_zpsflzvqpdy.jpg00G0G_gG5uluFnIaK_600x450_zpsz5igugjt.jpg
 
Also if anyone has any suggestions for things i should buy first or have worked well for you please share. For example buy milling vise before a rotary table for example or buy 4 flute end mills instead of 2 or 3. Just those general find of things. Also if you know of budget friendly option that are a good for the price or what i would be using them for (learning).
 
Before you go on a spending spree, start with a thorough cleaning and (proper) lubrication of the machine, and an assessment of all its operating capabilities (speed range, table travels and power feeds, etc.).

Then I'd get a good dial test indicator (like this: Interapid (312B-1 / 74.11137�) �.���5" Graduation, Hand Tool, Dial Indicator | eBay , but make sure that it works correctly before buying a used one), and a precision level like this: precision level by exact level and tool model 2�� | eBay (this isn't a Starrett, but looks close to the Master 199 level).

With the level, you can clean the table surface of any nicks and bumps by careful stoning and cleaning, then run the table in the full X-Y ranges with the level both parallel and at right angles to the table length, and "map" the errors cause by wear in the X and Y ways that can cause the table to "dip" on extremes of travel (especially excessive wear on full X left/right). This gives you a good idea of how precise it will cut longer straight surfaces.

It will also be handy for, ummm, leveling the machine itself (using shims under the base), so the machine doesn't rock and round tooling doesn't roll off the table surface - very annoying! Member Richard King has posted a lot of information on machine leveling and inspection, search for his posts.

The test indicator is used for getting other mill attachments square or parallel to table travels, or for more advanced work, setting up precision angles to axis direction. The classic example is tramming the head square to the table, and aligning a vise true to the X axis. Again, lots of posts here on how to do this.

And yes, get a good machinists vise, a 6" jaw width Kurt is sort of the "standard", but there's other options too. Don't cheap out here, a good vise is one of the best investments you'll make for your machine, a cheap vise will have you cursing every time you use it.

From there, cutting tools like endmills and drill bits, drill chucks, parallels, etc. Much money can be spent here, but again, quality pays. Watch Youtube vids on proper setup and use of endmills and drills, save yourself some cuts and broken tools.

And most critically, get (and wear!) good safety glasses. I instruct at a Cambridge technical university (small place on the river Charles, you wouldn't have heard of it ;) ), and much of my time is spent reminding students to put on the darn glasses. It's worth finding a comfortable pair, and reminding yourself to use them. One forgetful day with a broken drill bit will literally change your life, and not for the better (unless you meet a really cute nurse in the ER).
 
Thanks for the tips everyone.

I'm excited to start machining once i have this beast wired up and cleaned up. Also need to find a clamp set.

Also if anyone happens to have a manual or any Literature about the mill or even where to find it PLEASE let me know.
 
My own safety tips:

Safety tip # 1. Do not handle milling cutters, especially end mills, with your bare hands. If you try to insert or remove an end mill from a collet or end mill holder and it is a tight fit, and if you are trying to do this holding the end mill in your bare hand... chances are good you will get some bad lacerations. I always use a rag for handling end mills in and out of the collets or end mill holders.

Safety tip # 2: make sure the rag is well clear of the cutter and any other moving parts before starting the milling machine.

Safety tip # 3: Never handle the "turnings" (chips, particularly the long curly kind) barehanded. These often have razor sharp edges and will cut your hands deep and quick before you know it happened. You will then be on your way to the ER to get some sutures put in- if you are lucky you did not cut a tendon. I got a little too familiar or complacent one day a few years back. Despite (then) over 40 years around machine tools and machine work, I absentmindly grabbed onto a turning spiraling off a job as it was being machined. I wound up with 4 sutures in a finger on my right hand.

Safety tip #4: Never believe for one nanosecond that the milling machine has any feelings for you. Despite the fact you have given it a good home and doubtlessly will lavish all kinds of care upon it and study it at length, it is a cold and impersonal chunk of iron. For this reason, ALWAYS make sure of your setup before starting any cuts. Err on the side of caution and make your setups as heavy and rigid as you can without springing the workpiece. Any looseness or only slight contact between hold-down clamps and the work, and that mill will either grab the job, pull it in and maul it and maybe bust the cutter, or will throw the job at you. On this same note, ALWAYS wait until the spindle has stopped completely before taking measurements on a job or doing anything in the area of the cutter and its path. ALWAYS check the travel of your machine and the "swing" of the cutter (such as a fly cutter or boring head) by moving the table and saddle or knee by hand to be sure that at maximum travels needed for the job, nothing on your setup is going to jam into the spindle, cutter, or some other part of the mill. Put the machine "between gears" so you can turn the spindle by hand and roll it through a full revolution to be sure things like fly cutters or boring heads/boring bars will not crash into your setup hardware.

I like to say that most of machine shop work is "head work"- thinking the job through, sketching setups if needed, figuring sequence of cuts, and figuring cutting speeds and feeds. This "head work is done on scratch paper, and sketches of the job with reference surfaces noted are often quite helpful in planning the sequence of cuts and other operations. Next comes the setting up of the job, and this may include using a dial indicator to establish the centerline of the spindle concentric with some part of the job, or using an edge finder. Finally, when you have a good solid setup and have the spindle of the machine established in relation to a reference surface or starting point, then you get around to taking the actual cuts. I joke that taking the cuts is often the least part of the process.

Lastly, do not be in a big hurry to handle a job fresh out of the mill. The edges may have very sharp burrs that can slice your fingers and hand open in an instant. Never decide to check the finish on a freshly drilled or bored hole by sticking your finger into it and working it around. The edges of that hole may well have a burr, and that burr can slice and sever a tendon in a finger before you know it happened. When you take a job off the mill, use shop rags.

My other pet peeve is the growing use of gloves by people doing machine shop work. Gloves are OK if you are handling chips or mucking out a coolant sump. Around a running machine tool, gloves are a MAJOR safety hazard. Plenty of really bad accidents around machine tools have occurred due to people wearing "examining gloves"- thin nitrile or similar gloves. A pair of regular work gloves for handling chips is a good idea, but take any gloves off before you get to doing the machine work.
 
So i got the mill running after the appropriate amount of seasoning time in the shop.
Gearbox runs great, all the ways are in great shape also. None of the wear in the middle.
The only issue so far besides the missing handles is the the table feed motor is bad. being its not hooked up in the panel. But i have not had time to test it yet, hopefully can get it pulled of this weekend. I ended up going with the TICO/WH 3hp drive. Would have like to go a little large but i honestly doubt i will ever be milling something that is going to push it that hard.

Thanks for all the help everyone. Since i ended up paying about the same as a new kurt 6in for it i think it was a good deal.
 
You have a rare machine, so it would be great to see lots of photos as you work through fixing it up. It is a long way from that machine to the $0.5 million 5-axis Makinos of today.


Back
Top