What's new
What's new

Quincy 244 rebuild - bad exhaust valve

Just a Sparky

Hot Rolled
Joined
May 2, 2020
Location
Minnesota
Just posting to see if anyone else here has any advice to offer when it comes to rebuilding the usual big Quincy pumps. Got mine home and everything seems fine with it except a bum exhaust valve. I only get vacuum and intake noise on one cylinder. The other just sucks backwards through it's exhaust valve.

Any ideas of what to expect? Things to do or avoid while/before I open up the valve covers? Maybe reach out to Quincy for pump-specific documentation?

Pump is Model 244, ROC 11. 1947-48. Old original style unloader units on the intake valves, though I don't foresee needing to disturb them.
 
I call the local Quincy retailer for a quote. Then a I google the valve cartridge number and buy it online.

Retail is $250+, but they are usually $30 to $50 somewhere online.

This recent 116 degree weather we had here was hard on compressors. I had to replace an exhaust valve cartridge on a 350 that has run 10 hours a day since 1973. Only part it's ever needed.

Curious. What ruined the valve cartridge? I can see the seat or spring pocket needing attention.
 
Took the valves apart and admittedly struggled to find the problem for a while. I had to shine a flashlight underneath the culprit exhaust valve to see a tiny sliver of light between the valve ring and it's seat. Little bit 'o' rust has the two sitting proud of each other. Only by a few thou... but it's enough!

Honestly I'm surprised that such a small gap can have such a profound effect in consideration of such a big displacement. I'll go ahead and order a head tune-up kit and freshen up all the consumables.

Couple of questions;

Would it be better to try to stone the proud spots down on the valve seat or would I be better off spending the time to take a tiny little skim pass in the lathe? Try some soft white Arkansas stone and see what happens?

Also, considering the pump was made in 1947, would it be worth pulling the cylinder block and honing the cylinders? I don't have a ring compressor so I'd have to purchase that, but it would be good peace of mind having fresh rings in it.

Everything else seems solid on the unit. It builds 20lbs of oil pressure within one and a half revolutions and holds it steady. I can tell by the gauge movement it's got the old style gear pump as expected instead of the modern piston pump. Zero rod slop that I can detect.
 
Never had luck fixing the old valves myself. Must have had an easy life if you can get the cartridge apart without destroying it.

If you take the head off you may as well go through the whole thing. The old rings used lots of oil. There is an updated ring pack to fix them. Pull the crank, set the thrust clearance correctly and all new seals.

Or just replace the valve cartridge and run it.
 
Exhaust valves came apart super-duper easy. Badly rusted castings but a single knock with a dead-blow freed them up. Not sure if the newer ones are more difficult, but both the exhaust and intake cartridges on this old ROC 11 are just two piece bodies cotter-pinned or threaded together respectively. Nothing to them at all, really. But this was before Quincy added low oil shutdown. It was either hydraulic loadless starting *or* pneumatic pilot unloader... not both like you see today. That must have come later with the advent of the modern 'tower' style unloaders. These ones are just dead simple little diaphragms that act on pistons and push-rods. I could probably retrofit those, but I have zero need to. I'm a big enough boy to know to check the dip stick and oil pressure once in a while.
 
I have never needed to skim cut the valve seats on any of my Quincys. [I lost one in a fire that had the early brass unloaders like yours too]. Just clean em up on a flat plate with wet or dry paper. If you really want a seal, finish with 6-800 grit. My shop QR 325 will start less than once a day with only an 80 gallon tank under it plus lines. If you look carefully, you should be able to see the piston tops. If they are basically dry, I would hesitate to change rings. But,,, there is the satisfaction of going "right through it" and knowing that she will be good for the next 20 000+ hours.:D
 
There is a nice plentiful sheen of oil lining the cylinders and the tops of the pistons. I can see clear down inside quite easily by pulling any of the valves. Damn near fit my hand inside there even. They're BIG valve cartridges, lol. Roughly the size of those old half-height soda cans.

Not too worried about oil consumption to be honest. I'd rather have sopping wet oily cylinders that will never wear than dry ones. Just want to make sure I don't have any significant blow-by going on, you know? I guess I could check the crank case breather line for airflow once I get it running.
 
Blowby can be a PIA if you are trying to paint. Luckily all my units had "dry" cylinders, remarkable as the 325 had been used in a body shop since 1965 and the 5120 [circa 1981] had who knows how many hours. The old qr 350 that got cooked still didn't have any serious oil appetite and I have know way of knowing it's history.
 
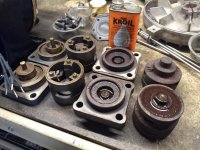
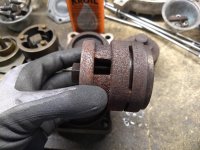
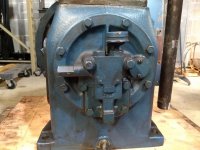
Here are some pictures for you guys.

IMG_20210815_130400804.jpgIMG_20210815_130430508.jpgIMG_20210815_130445312.jpgIMG_20210815_130500302_HDR.jpgIMG_20210815_130630983.jpg

Someone's been inside this head before, judging by the mixed-generation cartridges, gaskets and castings.

Anyone know if Quincy makes a special wrench for taking the intake cartridges apart since they appear to be threaded together?

Also, anyone got any ideas as to what all is going on with the oil pump pictured? Pressure gauge on top, small access port to the right, slotted screw in the hex body to the left. Guessing the screw is an adjustment for the pressure regulator? Seems like it's got a small accumulator somewhere inside of it too. Or maybe the system itself just has enough stretch to give that impression.
 
I suggest you locate your local Quincy service center and then swing by there and talk to the service manager. Those guys know absolutely everything.

Quincy calls those "discharge valves". They are renewed by lapping. I did some on a 244. It wasn't hard and the fix worked.

metalmagpie


Back
Top