What's new
What's new

Seeking advice planing a planer table

Sunset Machine

Aluminum
Joined
Dec 26, 2011
Location
Washington State, USA
Any tips for planing planer tables? It's an oldie from the 1850's with a table about 20" x 60", and not a lot left of it to be experimenting with.
 

Attachments

  • snapshot66.jpg
    snapshot66.jpg
    57.5 KB · Views: 605
Well, I raised the table and applied felt pen to the V in a few places, then worked the table a few inches (looks good, even wear on both V's and both sides of each V). I then mapped the table at 6 places (corners, middle) and found the center .003" low and two corners .002" high. Putting a dial on a surface gage showed .006" variances as I slid it around. It's pretty wavy.

Seems like the table needs planing.

Editing to add that oil gashing is still visible on the ways and wear patterns indicate that it ran for a time un-leveled.
 
Bolt a sacrificial plate to the table and plane away..
Then the original table is preserved and it's not a big deal to modify the plate to suite your needs.
 
I seem to remember seeing another thread on this topic on this forum some time ago .
As I recall something was said about the stresses from dropping tools and work pieces on the table over the years as well as from the pull of clamps holding the work pieces down tended to from a stressed surface on the top of the table that could be released some time after the top is planed and you may still not have a flat surface in the end particularly if the table is not thick to start with .
For that reason I would be inclined to consider a sacrificial plate as mentioned by J.S.
Maybe someone else will remember the older thread or can offer a better explanation .
Regards,
Jim
 
I planed the platen of my Putnam and had no problem. If it were mine I would take about .010" off with a round nose tool and a fine feed then take a .001 to .002 finish cut with a wide flat tool and the coarsest feed you have.

Very nice planer by the way.
 
If you look closely at a FINISHED planer table, you will see that it is done with a blunt straight tool, maybe a little Positive Rake and aprox 1.0 inches wide carbide , there may be a amall lead or chamfer stoned on the corners , But they are never noticed because the cross feed will be up close to the full tool width,,, that's right a cutting table stroke cutting maybe 0.005 deep, table reversal, tool index say 0.9 across the rail and tool ready for another cutting stroke....

LOOK at milling machine tables, Planed tables, not GROUND tables...

YOU NEED A EXPERT PLANNER OPERATOR... not someone who thinks its a woodworkers machine....

How accurate do you need it?

You have it on a GOOD FOUNDATION???

I see you are in Pennsy... where?.. I used to live in Philly area.
 
If you do intend to finish plane the table normally a flat tool is used. Say 1" wide. When we were setting up we used to put a 0.002" or 0.003" feeler under one corner of the flat tool so it gave the table a sort of pinstripe effect. The slightly raised striped areas allowed you to manoeuvre large castings around easier than if the table was perfectly flat.

Regards Tyrone.
 
I've thought on taking a cut off my shaper's table, but it only sits .005" or so above the knee it bolts to. So when the time's right (when I've gotten the galled ram ways scraped in) I'll bolt on some cold rolled stock the same width as the pads between the t-slots with some countersunk SHCS, bedded down with epoxy, and then cut that true. Until then, I just live with the wear on the machine.
 
I doubt you could get enough horsepower from that belt to take a cut 1" wide and the machine is probably not rigid enough either. I was thinking about a 1/4" wide tool.
 
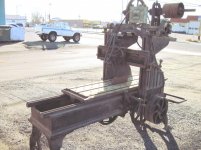
Wow, that is a beautiful planer! Quite wonderful it lasted in good shape all that time, too.

I put off planing the table on mine for years, always imagining that I would not do it until there was time and equipment (overhead hoist/rigging) to scrape the ways first.

Then I came to consider that even if wherewithal to scrape the ways accrued, it would still be most prudent to plane the top of the table first, to relieve accumulated stresses in the casting. Old books are full of stories about planer tables humping up in the middle. This is slightlly because the ends wear first, but apparently it was not uncommon for a well used planer table to rise up to where there was clearance off the ways, in some instances. This is from all the peining of the surface, and the undersides of the T-slots, from dings and such, but mostly just from constant clamping and hammering of furniture, pins, and such as a normal course of work. Jim Christie once linked me to a book where they where raising the table on cribbing and bashing down on the middle with sledge hammers against wood blocks prior to resetting it and taking a skim cut. I have read several similar suggestions and accounts.

Like yours, my planer gets used a lot for regular work. While I generally set things up on parallels and jacks to effect a level surface when needed, it became a major inconvenience for typical work. Last year I finally planed the surface, with no regrets. Unlike yours, IIRC mine was humped up in the middle perhaps .030" or so. It is unusual that the corners would be high.

Your belts look about as wide as mine (1-1/4"?) which on mine transmits 3HP. (Planer is rated in the catalog for 5 or 7 HP. Have not figured out how the belts would manage that, though) I have no doubt yours will drive a sharp 3/4" or even 1" wide spring facing tool at the typical .001" +/- depth for a finish cut. You may want to do prep work with a deeper cut and narrower step over depending on tool material. I would not use carbide. Especially without a tool lifter. Though you can stand and manually lift it. John O sent me a nice care package of some P & W tool bits, roughly equivalent to CPM M4 which is my hands down favorite planer tool material.

The biggest holder here takes 3/4" square bits, and the step-over on the planer is "comfortable" around 3/4", too. I sharpened a 3/4" bit square across the end with a slight hollow grind, on the surface grinder. (Hold bit vertical in vise on the magnet, run table in and out under the wheel to put a hollow ground straight edge on, with just a few degrees clearance). I dubbed the corners of the tool to slight rounded bevels with an india hand stone, and honed the edge sharp enough to shave hairs on my arm, on a white hard arkansas stone. These are tools for a different job, but same stone. :)

smt_Vway16.jpg


This was put in a holder that positions the bit behind the clapper pivot point.

smt_planertooling10.jpg


Then I carefully set the tool to the bed, observing with a strong light behind it. Another option is to set the tool as close as possible to the bed, then lift the clapper and lower the slide just enough so the tool sets back down at the back-clearance angle. Put a piece of 400 or 600 grit SiO paper under the tool, and slide it out frontwards, honing the tool to the bed. I did not do this, but it can remove the last sideways discrepancy, and put the faintest unavoidable touch of round on the tool which is considered desirable by some.

I set the step over at 5/8" of an inch, made several light roughing passes, re-honed the bit, and made a couple finish passes of around .001", and then one of less than that and called it done. It is worth making sure everything in the stepover mechanism and clutch(s) is working perfectly, for a uniform appearance of the tool marks.

Photographs of tool marks often look deeper than they are, these will tickle a .0001 indicator, but not much.
Overall views of the table after planing

smt_Vway33.jpg


smt_Vway43.jpg


Close ups of the finish:

smt_Vway22.jpg


smt_Vway45.jpg


A hook tool will do even better, but if the edge breaks down it will likely fail in a way that requires grinding out of the machine and resetting. Instead of honing in place.
I put an airlifter on my planer a few years ago. Let the roughing cuts inform the set up for your finish cuts, but it would not be out of line to put a lever in the clapper and manually lift it on the backstroke, for finish cuts. Both to save the tool edge, and to avoid a marred surface from the clapper bouncing along as the table reverses.

smt
 
If you do intend to finish plane the table normally a flat tool is used. Say 1" wide.

At least one old book says to plane the tables every 3 years. I had to laugh a little at that.

The current table stripes look to be 1/8" apart, as do the (original?) stripes on the crossrail. Not the wide stripes the books imply.

Gary- It's not on a good foundation. It's in my garage where cars used to park. It's a light duty machine, barely weighs 4000 lbs. I like running it. 500 hours on it now. Almost enough confidence to tackle this. Almost.

Really appreciate the advice and concerns, men. Thank you!
 
I doubt you could get enough horsepower from that belt to take a cut 1" wide and the machine is probably not rigid enough either. I was thinking about a 1/4" wide tool.

2 HP it is. I have ran a 1" bit across some cast aluminum and found that I need to let the shuddering cease before the tool enters the cut. That takes about 5" and leaves me short doing the entire table. 3/8" toolbit I think, or slow the table down.
 
Use a wide tool bit, but just don't take a wide step over.

There's also the Schlesinger/(DIN adopted)standard for planed machine tables that uses a round (true circular radius) nose on the bit and makes the "groovy" euro type machine tool finish. I don't like it because the ridges and troughs make it more delicate than a flat broadnosed finish. But the Deckel mill guys get all gaga over it. :D I can't find the specs though it is somewhere on PM in old posts. But in the standard, the diameter is a function of spacing; and hence depth.

I'd stick to broadnosing, even if a little less broad. :)

2 HP is is. I have ran a 1" bit across some cast aluminum and found that I need to let the shuddering cease before the tool enters the cut.

I would not plane the table if there is any play in the clapper. It will float, deviate and may give and attractive, but not necessarily true surface. Make sure the pin bears "everywhere" (blue it) and that neither the bore nor the pin is oval in section or bsrrel shaped along the length from wear. The clapper should also seat so well it almost sticks against the seat, and without any shake sideways. However, a "little" play in this fitment will probably work ok for flat surfacing so long as there is no up-down float whatsoever.


I found that re-scraping and fitting a wedge gib on my clapper made the most improvement for all kinds of planer work.

smt_clapperfix2.jpg


smt_clapperfix1.jpg


smt_clapperfix3.jpg


smt_clapperfix4.jpg


smt_clapperfix6.jpg


smt
 
Stephen- did you see the little bell on mine? It's to wake me up from my nap between passes.

I refurbished the clapper last fall. It's a little tight, pinky finger to open/close. The shudder comes from it sitting on legs and too fast of table travel. (30 fpm and 60 fpm in reverse)
 
The max feed on my little Putnam is only .047". My planer would also shake when reversing until I slowed the cutting speed down to about 20 FPM. Could we get some more pictures of the planer and what is the make?
 
I think it was hot-rodded, the overhead bolted to the columns with a motor. The legs are pinned to the floor or it will walk.

I've a copy of Cope's book, and in looking at the section for New Haven he shows a pretty fancy model dated 1865 on page 109. Mine's crude in comparison and apparently they were making planers since 1850, so somewhere in there. It appears there was a major crash repaired by "L.Peters" in 1876.

Here's a pic of where I found it. Main road in the fine city of Moses Lake, just happened to be taking the missus for a shopping trip and there it was, waiting for the scrap man. They threw a shaper in on the deal. Only happens in fairy tales.
 

Attachments

  • IMG_0316-2.jpg
    IMG_0316-2.jpg
    97.5 KB · Views: 289
  • IMG_0312.jpg
    IMG_0312.jpg
    97.5 KB · Views: 255


Back
Top