What's new
What's new

Single Tooth Clutch repair on Pratt Whitney 12 x 30 model B

ogesII

Aluminum
Joined
Nov 9, 2009
Location
Minnesota, USA
I dove into the single tooth clutch repair job today following the instructions from Carl in NH. Everything went well until I got the head stock on the bench and needed to remove the feed shaft to release the gear with the worn pin and the dog or clutch disc.

According to Carl's instructions I was expecting the gears to simply fall off the end of the shaft after I released the bearing OD from the housing. But that wasn't the case, the bearing seems to be pressed onto the shaft and I can't figure out how to get it off.

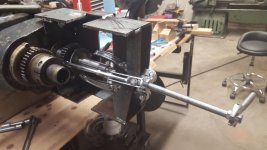
I fashioned a bracket to allow me to pull on the reverse feed clutch outside of the housing. The goal with the bracket is to remove the bearing from inside the housing and not the clutch disc I'm actually pulling on.
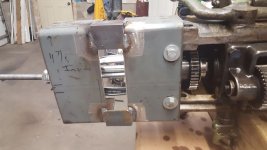
BracketBack.jpg
BracketFront.jpg

I haven't cranked on the gear puller yet because I really don't want to bend the reverse feed clutch that I'm pulling on. Does anyone have any thoughts on a) if this should be this difficult to pull off b) ideas on getting it off?

Here you can see the bearing is released from the OD already.
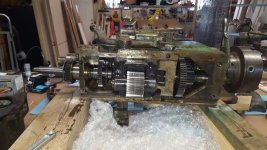
HeadStockBottom.jpg

Thanks in advance! I thought this would be a one day project but I just spent half the day stuck on one bearing. I have some threading projects coming up and I'm excited to put her back together.
 
I've put 20 lb-ft on the gear puller so far. It does turn but I don't see any movement between the end of the shaft and the bearing -- it could be that the reverse feed clutch disc is moving now but I haven't seen it move. And of course I don't need the reverse feed clutch coming off.

The gear puller teeth actually have a pretty good grip on the reverse feed clutch so I'm not too worried about bending it. I guess the only concern is pressing it off if I don't need to.

The thought crossed my mind to make a screw jack to use on the inside to press between the housing and the end of the shaft but there is barely 5/8 clearance on that end to do anything.

This is what carl_in_nh 's instructions said

I removed the feed shaft by grabbing the reverse clutch assembly on the outside of the headstock and pulling - it's just a light press fit, and the gearing and a shaft bearing will fall free. Keep the area under the headstock clean and padded with some rags - since you'll have one unshielded bearing from the end of the feed shaft drop free.

Mine doesn't seem to be a light press fit.
 
I don't understand what the welded up frame is for? If your trying to get the clutch off of the shaft would you need to press on the shaft center and not the head stock housing?
Dan

I'm pulling on the reverse feed clutch (outside of housing) to pull the shaft out of the housing. Then the gear and bearing inside the housing are pressed against the inside of the housing and hopefully pressed off the shaft.

If I didn't have the welded bracket, the gear puller would simply pull the reverse feed clutch on the outside of the housing off and the clutch on the inside would still be pressed onto the shaft. If that happens, I have no idea how I could grip the shaft to pull on it.

The shaft is not center tapped on the outside so I have to use the gear puller against the reverse feed clutch in order to pull on the shaft. I couldn't think of any other way to pull the shaft out of the hosing and hopefully releasing the bearing inside the housing.

I feel like I'm missing something obvious but I can't see any other way to press the bearing inside the housing off the shaft.
 
I've now applied 27 ft-lbs to the 1.5mm pitch thread on the gear puller. By my math that is nearly 16,000lbs of force and I can't see that the bearing has moved at all.

I've reviewed the parts breakdown from johnoder (http://www.practicalmachinist.com/v...pratt+whitney+model+lathe+single+tooth+clutch) for his 20" model B and I can't see anything else that could be holding the bearing on.

111445d1404659907-p-w-dog-clutch-repair-advice-pw-20-dog-clutch.jpg


The only other option I can think of is to begin applying heat to the forward feed clutch bearing. Everything inside the headstock is clean and well oiled. I can't imaging why this bearing is stuck unless someone used Loctite on it before.

Hopefully one of you smart people out there can give me some pointers or tell me what I'm doing wrong. I've never applied heat to a bearing I'm not replacing before. If I do that, do I need to replace it? It appears to be just a ball bearing so hopefully it's easily attainable if that is the case.
 
Is the end of the shaft internally threaded? If so, what about using a slide hammer?
Many times, a few tapping are more effective than much more force applied continuously.

Paolo
 
Then, what about making some sort of split collar to clamp around the shaft and attach to a slide hammer?

Paolo

I like that idea. The problem is I don't have a lathe to turn the collar on. I have another split collar idea that is going inside the housing to make sure I'm not damaging anything during this pounding. My mill only has an MT2 spindle so hogging out 2-1/2 IDs isn't the easiest thing. I'll draw it up and see what I can figure out.

It's funny how I lived my whole life so far without a lathe and now that I have one, it is one of the most useful tools in my shop.
 
I'd love to hear back on what finally worked. Obviously the risk is of breaking some irreplaceable part by applying pressure from the wrong place or against some key, spring clip or setscrew you weren't expecting. I guess if there is loctite holding it on you'll need 350 degrees to break the bond.
 
I like that idea. The problem is I don't have a lathe to turn the collar on. I have another split collar idea that is going inside the housing to make sure I'm not damaging anything during this pounding. My mill only has an MT2 spindle so hogging out 2-1/2 IDs isn't the easiest thing. I'll draw it up and see what I can figure out.

It's funny how I lived my whole life so far without a lathe and now that I have one, it is one of the most useful tools in my shop.

For the collar I'm suggesting, you just need to drill and ream/bore to the diameter of the shaft. Probably, the best material to use would be aluminum.

Paolo
 
For the collar I'm suggesting, you just need to drill and ream/bore to the diameter of the shaft. Probably, the best material to use would be aluminum.

Paolo

Yup, I'm thinking the same thing. I'm going to start on it tonight when I get home. The shaft is only about 1" in diameter so your collar doesn't need to be as big as the collar I have to make for the inside. There are already sleeves over the shaft internally so that collar needs to be 2-1/2 ID. But I can just cut that diameter with a hole saw or set it up on my rotary table.

I did heat the bearing to 800 degrees yesterday and applied some pressure with the puller but still no movement. Once I get the two collars made, I'll try some heat again with the slide hammer.
 
I did heat the bearing to 800 degrees yesterday and applied some pressure with the puller but still no movement. Once I get the two collars made, I'll try some heat again with the slide hammer.

800 is too much. I usually heat a bearing up to about 400 deg F max. Be careful with the heat. It is easy to get carried away with it and damage an otherwise good part.

Just my opinion based on my personal experience of heating bearings for install/removal on shafts so take it for what's it's worth.

Thanks! I'll keep 400 deg in mind next time. My thought was if the outer race is 800 the inner race is probably less since I only had access to heat at a 45* angle from the outer diameter. And that I would be replacing the bearing anyhow after all of this beating to get it off.
 
I got a jump on my two collars last night but didn't quite get them finished. I'm making the internal spacer out of mild steel. This piece will protect the forward feed gear from hitting the housing when I use the slide hammer. I figured mild steel is softer than the gear but not so soft that it will absorb too much of the shock I'm trying to introduce. The external collar that the slide hammer attaches to is aluminum to not damage the shaft.

While I'm waiting to actually finish the disassembly, I'm trying to figure out the best approach for repairing the dog on the clutch.

2017-01-29 07.20.54.jpg

It looks like there is enough material left that I can just grind a fresh corner on the dog (see the red lines in the image). Of course I would radius the bottom corner and break the edge on the top. I'm not completely sure how I am going to do this grinding. I don't have a surface grinder but I could probably get access to one. Otherwise I would be trying to do it by hand with a dremel or angle grinder.

While the parts are out I'll take dimensions so I can make replacements in the future. But for right now, I'd like to just get the lathe back together in working order. I need some time to figure out how I would machine that helix.
 
I got a jump on my two collars last night but didn't quite get them finished. I'm making the internal spacer out of mild steel. This piece will protect the forward feed gear from hitting the housing when I use the slide hammer. I figured mild steel is softer than the gear but not so soft that it will absorb too much of the shock I'm trying to introduce. The external collar that the slide hammer attaches to is aluminum to not damage the shaft.

While I'm waiting to actually finish the disassembly, I'm trying to figure out the best approach for repairing the dog on the clutch.

View attachment 190005

It looks like there is enough material left that I can just grind a fresh corner on the dog (see the red lines in the image). Of course I would radius the bottom corner and break the edge on the top. I'm not completely sure how I am going to do this grinding. I don't have a surface grinder but I could probably get access to one. Otherwise I would be trying to do it by hand with a dremel or angle grinder.

While the parts are out I'll take dimensions so I can make replacements in the future. But for right now, I'd like to just get the lathe back together in working order. I need some time to figure out how I would machine that helix.

I know nothing about your lathe but have been following this thread, please keep posting. I hope you get it sorted out. Where in Minnesota are you? My brother is a machinery repair guy based in Minnesota, although he mostly works on Makino's he has a lot of experience. If you are close to him he may be willing to stop by.
 
I know nothing about your lathe but have been following this thread, please keep posting. I hope you get it sorted out. Where in Minnesota are you? My brother is a machinery repair guy based in Minnesota, although he mostly works on Makino's he has a lot of experience. If you are close to him he may be willing to stop by.

I'm in Bloomington about a mile from the Mall of America and Airport. I need all the guidance I can get in trying not to do more damage than good :)


Back
Top