What's new
What's new

Steady Rest Modification Plan

marka12161

Stainless
Joined
Dec 23, 2016
Location
Oswego, NY USA
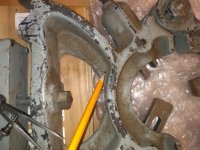
So i bought a steady rest that was close to the right dimensions for my mid 30s RP gear head lathe. Basically the "V" slot on the steady rest needs to move toward the center of the steady by about 1".

My plan is as follows:

Cut out a one inch section of the base approximately at the location indicated between the small dividers.

Cut the brace on the "V" side at the interface between the brace and the lower half circle as indicated by the pencil points.

Establish horizontal alignment of the base pieces and braze the base together on the bottom and braze the brace to the lower half circle.

This plan would provide the necessary side clearance between the base and the saddle and would register the center of the circle on the center-line of the spindle.

I'm feeling like the hardest part is going to be to establish alignment of the base and that the worst thing that i would have to deal with is to mill the bottom flat and shim it up.

Please let me know what you think.

Mark
 

Attachments

  • IMG_20210112_181646424.jpg
    IMG_20210112_181646424.jpg
    93 KB · Views: 107
  • IMG_20210112_181641323.jpg
    IMG_20210112_181641323.jpg
    95.4 KB · Views: 95
  • IMG_20210112_181617368.jpg
    IMG_20210112_181617368.jpg
    95.7 KB · Views: 105
Heating a loop-shape of cast iron to brazing temperature will usually result in the iron cracking as it cools down. I suggest you think of a solution that does not require heat.

Larry
 
find one that fits the ways, or fabricate from steel and machine it to fit. welding/brazing a casting, and thinking it has a prayer of lining up with the ways is a fools errand!
 
What if you just milled the steady base straight across the bottom flat and then made a sub-base fitted to your lathe and bolted and dowelled to the steady?

With the parting line filled and panted it would look original.
 
That's the plan for mine as someone has already hacked at it.View attachment 310462View attachment 310463

Don't over-think it. It does not "traverse". It isn't the cross slide bearing a cutting tool with cutting forces to be managed. It may have been USED just the "hacked" way it is now.

If you have a means of aligning it precisely, you could cast a filled-epoxy in that gap. Or dowel-pin in a block of shiney-wood, THEN mill the Vee. Not even "soft" solder heat on the dance-card.

The "job" of the inverted vee is to align it quickly each go without need of digging out a clan of measuring tools to manually set it.

Old Skewl hand wouldn't even bother - just start snugging the tips and checking alignment for "feel" of a comfortable balance. Clamp 'er. Touch up the tip positions. Make chips.

Once you activate the under-ways clamp, there should be PLENTY of resistance to unwanted movement.

Adjust the tips correctly, even if their "frame" is not perfectly centered, it just SITS where you clamped it, rotating stock sliding or rolling with minimal argument.
 
Like said before Mill the bottem flat and ad a subplate Or better prehaps Mill a groove and bolt a block with a V to it
Even if the steady ends up a bit high it does not matter to much

Peter
 
With having access to a surface grinder and the ability to dress angles to a wheel for the V notch angles the subplate would be an easy task with fitting it to the lathe bed, finish grind it to height, and then just scribe it to centering the steady to mark it as it holds a slug in the lathe chuck, and bolt it in that place.. no fancy measuring needed.

Yes, cutting the subplate V notch could be done on the mill or by using a vise on the lathe with it having an end mill cutter in the spindle.
 
Thank you to all who responded to this thread. I've decided to cut my losses and return this to the ebay seller. I'll take it in the shorts on shipping but so be it. After some thought, this thing would take a bunch of work to get the required side clearance and the net result would be to reduce by one the world wide inventory of antique steady rests and a one bodged up one.
 
I think you are making this harder than it is. As long as it is square to the spindle and somewhat centered on "Y and Z" it will do it's job admirably. 2 or 4 screws to hold your new "foot" to the existing legs [could even allow for some adjustment or fine shimming there] and your done. Curious. Since we both have the same rest, do you know the maker? My query came up empty.
 
find one that fits the ways, or fabricate from steel and machine it to fit. welding/brazing a casting, and thinking it has a prayer of lining up with the ways is a fools errand!

I had to 'shrink' a tailstock from a 9" southbend, to make it fit an older Potter lathe, which I had bought sans tailstock. Key here was to drill two holes up from the underside before cuting the piece out of the risers. Dowel pins in the holes brought it into perfect alignment during brazing. Nothing cracked.
 
I think you are making this harder than it is. As long as it is square to the spindle and somewhat centered on "Y and Z" it will do it's job admirably. 2 or 4 screws to hold your new "foot" to the existing legs [could even allow for some adjustment or fine shimming there] and your done. Curious. Since we both have the same rest, do you know the maker? My query came up empty.

I don't think so. I'm not all that worried about alignment. The problem is the base is too wide so the time i hack it up to get the proper side clearance, putting humpty-dumpty back together again will be a bit of a pia. Easier to just send it back rather than screw around with it.
 
Thats why I prefer to modify a steady that is on the low side for the intended lathe Just mill some flats on the underside and bolt on a subplate
And if the total wide is about the same as original it even looks good

Peter
 
Or just make one. It's not hard... For my Graziano SAG12, piece of 1.5 inch thick mystery aluminum I found in the shop (it cut like 6061.) Some half-inch bolts
with bearing bronze caps pressed onto the ends. Works just fine...
Bill

Steady Rest 003.jpg


Back
Top