What's new
What's new

Macgregor Gourlay lathe (was The struggle is real)

mega arc 5040dd

Aluminum
Joined
Apr 17, 2012
Location
Saskatchewan, Canada
After letting my lathe project sit for the last couple years I figured now was a good time to get going on it again. It is a Macgregor Gourlay lathe from 1885-1910. Where I stopped a couple years ago was trying to figure out how I wanted to repair the cross feed nut. The nut is a cast iron piece that bolts on the side of the cross slide for easy removal. The catch is the original threads were poured babbitt and had long since given up the ghost. the bit of babbitt that remained just slid in and out of the cast iron piece.

The first solution I had the last time I worked on it was to save the babbitt and try and get some more to add to it. So I put the babbitt piece somewhere safe and life went on. Fast forward to 2 weeks ago and I am picking up where I left off and wouldn't you know it after a year or two that babbitt is still in a safe place. So safe that even after ripping my shop apart I can't find it. So then it was time to come up with a plan B. Given that everything is shut down for who knows how long sourcing some locally just wasn't an option. And after looking online neither was that. So I started thinking what else could I do. What happened over the fallowing couple weeks turned out to be the most round about way one could possibly take to get to a solution.

Plan B
This is where my logic and train of thoughts goes out the window. I have a piece of ductile cast iron laying around so figured I would make a new nut. except for two problems 1) The piece of cast iron is only big enough for the threaded portion and would have to be attached to the lest of the mounting bracket I figured either by fasteners or brazing. Ok that problem is easy enough in theory. 2) The cross feed screw is 11/16', square thread, 6 threads per inch, left hand. and being over 100 years old a bit worn in parts though to be honest for the age its not as bad as I would have expected.Now this is where my thinking takes turn and takes me on a trip. I don't know how I am going to thread it and I don't have very much cast iron. Maybe enough for two attempts. since it's 11/16" I decide my only shot it to tap the threads but as you can imagine finding that tap was impossible. I can find on ebay 5/8" left hand acme and so I start to think maybe I can just make a new cross feed screw as well. That's it! It's a great idea. So that's what I thought I would set out to do.But since I don't know how well its going to pan out and given the state of the world I don't want to spend much.

I start looking around and was able to find a piece of 3/4" 4140 locally that was within my tiny budget. Then onto ebay where I just couldn't bring my self to spend that kind of money on a tap that I will use once. And that's when great idea number to comes to me and the land slide of events begins. Why can't I just make my own tap? I've seen videos on youtube. I can thread on my little 10" lathe and really that looks like the hardest part. I don't have any tool steel but I have extra 4140. I know that's a bad choice of material but it's what I have and it's only tapping one hole in cast iron. I'm sure there is a flaw here but my logic was I should do the male thread first since I can measure it easier and then make the tap to fit. I was forgetting that the treads on the tap were external also. Had i remembered things may have gone differently. I go to start making the new cross feed screw and realised it was to long for my 10" lathe. This is when I get yet another bright idea. If I could temporarily fix the cross feed nut on the big lath I could use it to turn its own new screw.

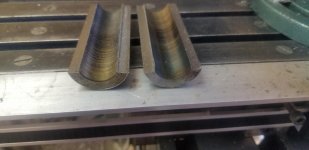
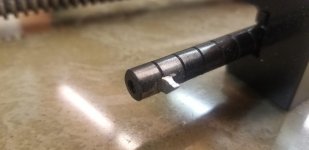
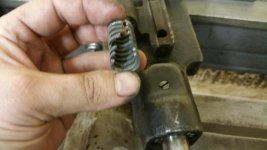
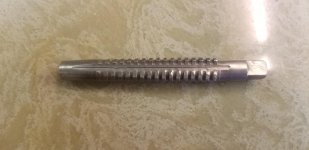
Now that I am full 180 back to trying to fix the original cross feed nut completely forgetting that I abandoned that idea before for a reason. Now how to fix it:scratchchin: I know! I can make a tap foe the square threads after all that's how I was solving the self made problem for the acme thread. But before I do that since material is so limited (by this point I think I am allotting the same material over and over again) I should do a practice run. I know I have a 7/8" grade 5 bolt, I can make a practice tap out of that and I can tap some treads into some aluminium. So I start machining the bolt. I found a HSS toll bit in my collection that needed just a little clearance ground onto it and then it was perfect. I then took it to the mill and used an end mill to put a square drive end on it and then a ball nose end mill to put in the flutes and then back to the lathe to taper it. I tapered it at 2degrees not knowing that I should have spread it out over multiple taps if I actually wanted it to work. I then heated it with the torch and then quenched it. success it was harder than my files. I then heated it and tempered it. This is when perfection became the enemy of good enough. something I am bad for is never know when good enough is good enough. I wasn't happy with the temper and thought it was softer than I would have liked. No biggy I though I will just harden it again and then temper it again. But the second time around it developed a case of banana envy and decided to develop a nice healthy curve to it as well as a good sized crack because why stop at just a curve when striving for prefection. I decided to temper it anyway and sharpen it up and at least see it it would cut aluminium. much to my demise I learned that a thread that big and coarse when doen with a single tap is just a different looking reamer:bawling::bawling: Ok a tap isn't quit as easy as cutting a thread and a few flutes.

Not to be discouraged I went straight back to the drawing board to come up with plan C...or is it D now, maybe I'm on F. Anyways I will put that in part 2.
 

Attachments

  • 20160714_194853.jpg
    20160714_194853.jpg
    87.3 KB · Views: 154
  • 20160714_194845.jpg
    20160714_194845.jpg
    87.3 KB · Views: 149
  • 20200328_165408.jpg
    20200328_165408.jpg
    91.3 KB · Views: 144
  • 20200329_132322.jpg
    20200329_132322.jpg
    93.1 KB · Views: 136
  • 20200329_132328.jpg
    20200329_132328.jpg
    91.4 KB · Views: 124
You could do like I did, buy a piece of leadscrew and bronze nut and turn it down to fit. No single use taps, guaranteed backlash/fit and since the screw is rolled instead of threaded, smooooovvve!
 
A few years ago I began to wonder why something like Wood's Metal wouldn't work for an application like this.

Yes, I can see problems with an actual bearing, where heat is generated and just slightly too much would lead to a catastrophe, but what about a slow-speed application like a leadscrew nut?

I'm sure you could find a putty of some sort that could be used to make dams, you'd only have to preheat the parts to a bit better than lukewarm, and the metal can, of course, be melted over a pot of hot water, or a light propane torch flame.

In this case, you'd want to roughen/key the inside of the iron casting, and you'd need to set it up in place and yet still be accessible to pour, but other than that, I'm not sure why it wouldn't work.

Doc.
 
I agree with Mike:

Repour the babbitt. The fact that has to be faced is the thread on the cross feed screw was cut with a form tool eons ago, and then a century (give or take a few years) of wear from use/questionable lubrication. The result is the threads on the cross feed screw are worn, probably with heavier wear on the threads in the area of the screw where the cross feed nut "did the most work". Trying to make a new nut is not impossible, but you'd find the new nut went on tight on some portions of the cross feed screw and had a lot of slop in other portions of the screw.

The babbitting lets you pour a set of threads to match the profile of what's there. Using a softer lead-based babbitt will allow the babbitted threads to cold-form to run on the tighter areas of the cross feed screw. My suggestion is to place the existing nut in the area of most wear on the cross feed screw, and that is where I'd babbitt the nut.

You will need to center the screw within the nut before you pour any babbitt. I've babbitted some bearings in my life, and been around babbitting, so here are a few hints:

1. make some kind of fixture to hold the cross feed screw so it is centered in the nut. Build this fixture so you can pour the babbitt in from one end of the nut.
The fixture can be made of anything that works handily: wood, hose clamps, aluminum scrap, etc.

2. The idea here is to pour the nut vertically, since I doubt there is any kind of "pour hole" in the side of the cast iron nut body.

3. You will need to "dam" or "stop" the babbitt at the bottom end of the nut, as well as create some kind of pouring basin or funnel around the screw at the top end of the nut when it is in the fixture. We normally use a kind of putty for this made specifically for babbitting work. I forget the name of it, but babbitting suppliers usually will have this putty. The twist is you wind up buying a 5 or 10 lb block of it. If you can get hold of some "duct seal" (known in the trades as "monkey shit"), this stuff will work quite well for the purpose.

4. Once you have made your fixture and can center the screw in the nut and hold it soldily, it is time to get things ready for babbitting. To prevent the babbitt from sticking to the screw, you will need to "smoke" the screw. Lampblack or carbon soot from a kerosene lamp flame, or from an oxyacetylene torch burning just acetylene (gives a luminous orange-yellow flame with plenty of soot) is what is commonly used. The coating of soot on the screw will prevent the babbitt sticking to the screw.

5. As for the nut, you will need to clean it well, and get rid of any remaining old babbitt and any oil and grease. Heating the nut to a dull red heat in dim light will do the trick, and will burn out any remaining oil, grease, or old babbitt. After the heating, let the nut slow cool. You mention that the old babbitt "slid in and out". This should not have been the case. To prevent this happening with the new babbitt, drilling a couple of 1/4" diameter holes cross-wise thru the iron nut body into the space for the screw will provide positive thrust "keying" for the new babbitt. It was common practice on many of the old cast iron babbitted bearings to drill shallow holes or thru holes to "key" the babbitt positively to the bearing shell or body. Otherwise, the only thing that will hold the babbitt in place is the bond between the babbitt and the cast iron nut body. This bond relies on what is known as "tinning" (the metallurgical term is "wetting"), where the babbitt adhered to the iron, same as solder does to copper or similar metals. Unless you are prepared to "tin" the nut body with tinning compound prior to babbitting, this bond will likely not be there. The other cause for a lack of bond between the babbitt and the nut body is pouring the babbitt against a "cold" nut body, or the presence of dirt, oil, or other film on the iron at the bond surface.

6. If you can get the nut body glass bead blasted, so much the better. Try to avoid blasting the machined surfaces which locate the nut in the cross slide saddle of your lathe. Sometime, taking a light skim cut using coarse feed (to leave a rougher surface finish) is done to prepare iron or steel parts to receive babbitting.
However you prepare the surface of the bore in the nut body, you need to have "white metal", free from scale, oil, grease, and other films or dirt. Pickling in muriatic acid followed by a hot water rinsing is a good idea. After the rinsing, apply heat from a torch to the cast iron nut body to dry it off. ANY water, even a few droplets, present in areas being babbitted will produce a mini explosion, with the molten babbitt blown out and around for some distance, often catching the guy pouring the babbitt.

7. Prior to babbitting, preheat the cast iron nut body and the cross feed screw with a torch flame. How hot is a matter of debate and whether you have an instrument to measure the temperature of the nut body and feed screw. The oldtimers heated until "their spit danced" on the heated surfaces, and then kept on until they figured things were "hot enough". Similarly, they checked the temperature of lead-based babbitt by touching and slightly immersing the end of a pine stick (a piece of shelving board or furring is fine) in the babbitt. If the wood charred but did not flame up, the babbitt was hot enough. If the wood flamed up, the babbitt was too hot and there was a good chance some of the alloying elements were "burned out" of it.

8. Pouring needs to be done in a continuous flow, not that you will need a large ladle for pouring a cross feed nut. I usually keep the torch flame playing on the cast iron bearing shell (or in your case, the nut body) right up to the moment we pour the babbitt. Pouring against cold metal will produce voids or seams in the babbitt and probably not much of a bond with the cast iron. Pouring against cold metal causes the babbitt to "pull away", which is what I suspect you found with the the old babbitt.

9. Once the babbitt is poured, you sit back and wait for things to cool. Then, you can turn the screw out of the nut and file off the excess babbitt. I use an old "hoof rasp" (used by farriers to dress off horse's hooves for shoeing). A bastard cut file will work, but soft babbitt tends to "load up" a file. Chalking the file helps.

10. Reassemble the cross slide with the rebabbitted nut and screw and put plenty of oil on things. Start cranking the cross feed up and back, a little at a time to let the nut cold-form to the less worn areas of the screw. You need to pour the babbitt with the nut positioned so it is at the most worn area (where the cross slide was most often at work) for the babbitting. If you poured with the nut at the least worn areas of the screw, you'd likely find enough clearance between the screw and nut threads in the worn areas to "throw a cat through".

It's common sense and taking the time to do each step properly so when the babbitt is poured you do not have a Niagara Falls of molten babbitt running out the bottom of the nut body. Preheating and drilling some anchoring holes will prevent the new babbitt pulling away from the cast iron nut body. Some lead based babbitt ought to do you just fine.
 
Good stuff, Joe.
The voice of experience.

I forget who I bought my box of Damtite babbit putty from, but, they were no longer in business a few years ago.

Ah, I see it is still available

United American Metals

But the internet shows lots of different putties to use.

I think the problem with availability came about when they outlawed asbestos.

McMaster Carr stopped selling babbit a few years ago, but, it looks like they carry it again, along with the tinning paste.
I don't see the putty, though.

McMaster-Carr

Mike
 
That is all good advice except it doesn't address the problem of both my very small budget and not being able to get babbitt especial at any reasonable price. The web site that was linked to in one of the first replies is not shipping right now and I'm not sure if they shipped to Canada even if they were.

The cast piece actual does have a fill hole in the side. Well technically the bottom once it is installed but that's where it was originally filled.

Now on to part 2 of the struggle :D

After my epic failure that was doomed to fail from the start I began to formulate plan D? Why did I need a tap? Why couldn't I just cut an internal thread on the 10" lathe. And for that matter if there is enough room to pour babbitt to make threads why couldn't I turn a piece and slide it in the same way the original slid out after all those years and then I could attach it some how. Yes this seemed like my best idea yet. So many complicated parts to it how could it possibly fail :scratchchin: I fianly had the perfect plan even if most of the actual details I still at the time had no clue about. No need to solve them all first I will just solve them in the order that they present them selves so as not to destroy all my optimism that I have no idea how I still have any at this point.

My new plan was starting to take shape. I had found a small scrap of brass that I thought would work even better than the ductile iron I was planning to use before. But I didn't have much so I better do a proof of concept first. So I grabbed a scrap piece of aluminium and set to work with new found excitement. I consulted the machinery's hand book that I have (28th edition) to learn everything I could about square cut threads and how to make them. I must say I was very surprised how easy to understand and well laid out it was for a complete novice like my self. Even someone as green at machining as me could understand that one single paragraph stating that no one uses square cut threads any more and that a acme thread is better. And here I was worried that they we going to have complicated formulas for pitch and lead and other fancy terms I wouldn't know what to do with. So I decided to wing it I mean its not like its a tap right how hard could it be.

So I grabbed my dial calipers and roughly tried to measure the end of the cross feed screw to figure out out a minor diameter to drill/bore my test piece to. After I did that I decided to try to measure the thread depth so I knew how deep my tool would need to cut and therefore how far out of the bar the bit would have to stick. The hole was bored to I think about .518"-.520" or something like that and i needed a thread depth of about .075" plus a bit for clearance. Well that didn't leave me with a very big boring bare to thread with. In fact it was .400" diameter and used 3/16" round bits. Square bits I can grind they sit flat and you can easily rotate them to each side and know they are square. well this was going to be problem number one I was sure. Since it was so small I clamped it into a pair of vice-grips and wouldn't you know it that bit ground up to perfect size and shape in no time. I thought well if that was the part I was worried about this will be a cake walk and be done in no time.

I start threading my first internal thread on the lathe in 20 years. It just happened to also be left handed and square :crazy: I could only take .002"-.003" at per cut and then about 5 spring passes after every time I adjusted the cut deeper. I lost count of how many passes before i was at depth but it was hours of threading, and not all at once it had to break it up over several sessions. And then it was the moment of truth all i had to do was move the tool and thread in the screw and it would be proven a success. Stories about my small bore threading would ring out through the ages. I would go on the tell generations that it was easy just needed patients. Nope dam tail stock is in the way. Ok remove that and then I'm all set. Nope notta not even starting :scratchchin: It's ok I can figure this out. Either my minor diameter was a bit to small or the threads are to wide. I took a look and though it looks to tight on the minor diamter. No biggy, just pop in the boring bare and open it up a little. I think I did a .010" cut. try it again and nothing. I figured then that if I took .010" off the bore then my threads aren't deep enough anymore. Thought about it and the logic seamed sound so I cut them a bit deeper. Still nothing so I went a tiny bit deeper and then though clearly they are to wide and so backed out the compound and did some more passes. finally I said enough is enough and decided to cut the test piece in half so i could hold it up to the screw and see what was actually my problem instead of guessing so much that I could never hope to repeat the results on the good piece.

turns out the minor diameter was to big and the threads way to deep and to wide. Armed with that new knowledge and feeling like I have know solved the most technical problem known to man I went on to test piece number 2. 3 if you want to count the tap that started this train wreck.I started over and after several hours again this time it screwed in and to my mas shock there was no forward and back backlash at all. But side to side slop well that was like throwing a hot dog down a hallway. Ok cut it apart and start measuring.

It was at this turning point I realized a few thing 1) I have a pair of hinges I made years ago that have a 3/4" brass bushing pressed into a steel bar with a 1/2" hole in the center. And the are long enough to get 2 pieces each from if I can release the brass from its current home. 2) The big realization that the cast iron bore this needs to go into is .025" larger than the major diameter of the screw. and Since it was poured babbitt before there was no need for the screw to do perfectly through the center of the cast iron bore.

So I drilled an 11/16" hole on a piece of aluminium and then very carefully turned down the outside until it just wasted to fit in the cast iron piece and then left a small shoulder and parted it off. I then pressed it in gently with the vice, bolted it onto the machine and installed the cross feed screw. I then moved the cross feed by hand through its full range of motion to make sure there was no binding and it worked the screw does go through the center of the bore. Now I am in business.

Next up was to fee the brass from it's current home encased in steel. I put it into the mill vice and then touched off with the cutter until I had a flat spot the width of the cutter then lined it up buy eye and started to cut a slot down to the brass center. Flip the piece and repeat. Upon later measuring of the two steel haves I One piece was .005" thicker than the other so the cutter was on;y off center by .0025". I smiled for because of that. I know the pros can probably get it a lot closer by eye but I was still a proud amateur. After that happy distraction it was back to the insanity.

I cut my newly discovered brass stock down so I had just enough extra to hold onto when it was time to turn down the outside so I only had to thread the least amount absolutely necessary. I then chucked it into the 3 jaw and left it away from the back of the chuck enough to see the threading bar clear the back side of the part. I know I should have used a 4 jaw but that would have taken an extra five minutes to switch it over and indicate the part in and for what? There was no way this crazy idea was going to work out. It was going to fail like every other idea but hopefully give me a new idea along the way.

The center bore was just small enough that i need ed to open it up about .020" and that trued to the bore with the chuck. I then started threading, and threading, and threading :crazy: 2 1/2 hours later I was to depth. Then it was time to slowly start backing out the compound slide and thinning down the thread a little. I took one or two to many spring passes so the fit wasn't quite super tight but I figure that the tiny tiny little bit of play would ensure that there was no binding after it was all installed. That's how mistakes are turned into necessary tolerances:D I turned down a small portion of the OD then took a marker and marked the piece in relation to the 3 jaw so I could slide it out enough to turn down the outside. I then indicated the piece on the turned portion until it was back to running true with the chuck in hopes of keeping the OD as concentric as possible with the bore. Since the chuck was holding so little of the part and it was going to be turned so very thin I spent an hour taking .005" cuts just to be careful that the tool pressure didn't push the part out at all. I left a small shoulder on the part and parted it off once it would just slide into the cast part.

Then the final problem or maybe less of a problem and more of a choice. How to secure it to the cast iron part. I came up with a list of ideas. Silver solder, lead solder, loctite, braze, or epoxy. Given the current pandemic unfortunately some of those ideas just weren't an option right now. I thought silver solder would be the best idea but I don't have any and can't get any right now. Next was brazing. I have brazing rods but the brass is so paper thin I think it would melt before the the brazing rod and the cast iron would take a fair bit to get up to temperature. I didn't like the idea of melting away 4 hours of work.I decided on lead solder for a couple reason. if it failed I could always silver solder it later when I can get some or I could loctite or epoxy it easy enough after. I couldn't loctite it right now because I don't have any and if I were to epoxy it first if it fails it would be a pain to clean up enough to solder after.

I fluxed up both pieces with plumbing flux because that's what I had (common theme here). I used plumbing solder (again one of my few choices on hand). I started with the propane torch but it seamed to take forever to get the casting hot so I impatiently switched to the oxy/act torch :nutter: 
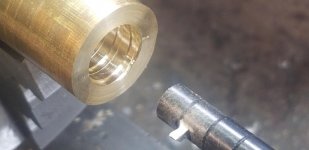
well by the time the thick plumbing solder was melting I managed to meld a small hole in the side of the brass where the original babbitt fill hole was :bawling: So I let it all cool down so I could then assess just how bad the damage was and if I was starting over...again. I took it apart and cleaned up the bit of solder that dripped into the threads and low and behold the treads were fine and it was just a small hole in the .012" thick brass side. I applied flux again and turn the par 180 so the hole was less likely to get solder into it and tied again. This time only with the propane torch and some electrical solder. It was thinner than the plumbing solder but it was cheap stuff so it was still really thick for electrical solder. And if that failed I had some really thing .030" electrical solder to try the next time.

:eek: 
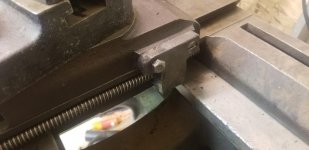
it actually worked on the second go around its locked it in there really good. I cleaned it up with a wire brushing and then bolted it on the machine. The cross slide moves by cranking the handle for the first time in years. I rand the cross feed all the way in until the nut hits the back of the sadle (it's on the side not underneath) and then tried to see if I could turn the handle and pop the threaded insert loose but it was a no go. It's in there nice and strong.

The amount of backlash is far less than I expected especially since there is signs of wear in the threads of the screw. And there is no slop in the threads with it all but together, had I gotten it as snug as I first wanted when cutting the threads I don't think it would have full travel until the new nut wore in a bit.

Now originally that was all just so I could turn a new screw with a 5/8" acme thread. to both give me the better acme profile of the thread ans the slightly smaller diameter would allow just a little more meet on the nut. I'm sure that won't happen for years to come or until this developed problem. after all you know what they say about temporary fixes. Sadly I can't make any test cuts until my motor switch arrives from amazon some time in the next 4 weeks :rolleyes5:
 

Attachments

  • 20200330_193924.jpg
    20200330_193924.jpg
    89.9 KB · Views: 69
  • 20200330_200637.jpg
    20200330_200637.jpg
    93.7 KB · Views: 68
  • 20200402_144300.jpg
    20200402_144300.jpg
    91.1 KB · Views: 69
  • 20200330_194338.jpg
    20200330_194338.jpg
    87.8 KB · Views: 62
  • 20200402_144319.jpg
    20200402_144319.jpg
    91 KB · Views: 77
And the rest of the pics.
 

Attachments

  • 20200403_201047.jpg
    20200403_201047.jpg
    89.7 KB · Views: 79
  • 20200401_192419.jpg
    20200401_192419.jpg
    102.5 KB · Views: 98
  • 20200402_144307.jpg
    20200402_144307.jpg
    99.9 KB · Views: 80
  • 20200403_163751.jpg
    20200403_163751.jpg
    92.3 KB · Views: 73
  • 20200403_163458.jpg
    20200403_163458.jpg
    90.7 KB · Views: 76
One of the "big name" US lathe makers used babbit nuts poured round the screw.,both for the cross feed and the half nuts.There is a technique for doing this ,well described in many old fitting and machinery repair. books.
 
One of the "big name" US lathe makers used babbit nuts poured round the screw.,both for the cross feed and the half nuts.There is a technique for doing this ,well described in many old fitting and machinery repair. books.

Op stated "no money for babbit"....But seems to have money for a camera and internet connection.

Nothing for writing a good title either though....:skep:
 
Op stated "no money for babbit"....But seems to have money for a camera and internet connection.

Nothing for writing a good title either though....:skep:

Well if I had to choose between owning a cell phone and an internet connection or investing in babbitt for a one time hobby repair:scratchchin: Not to mention That babbitt cost more than I have into the entire project. That makes it so much more harder for me to justify the expense especially in this unprecedented time of job loss and then there is the previously stated fact that with everything shut down there is nowhere to buy babbitt unless I am willing to pay a fortune and wait weeks and weeks for shipping. Kind of defeats the entire point of working on the project right now for something to do:cheers:

But that's also just me some people might think investing in lead is a good idea right now and more useful in day to day life than a cell phone/camera and the internet:rolleyes5:

As for not being able to write a good tittle that I will admit to as you can clearly see form my strings of rambling through out this entire thread I am very clearly no a writer:D But I am a man with a camera and an internet connection so world beware, look out here I come:cheers:
 
This Covid-19 pandemic has affected nearly everyone's lives, and mostly not in good ways. Without getting off on a tangent about that, being retired, I am in a different position than many people. I still get engineering jobs, mostly structural design work, and I am catching up on overdue projects for our home. I find myself wondering how many people have been laid off as a result of the pandemic, and know that at least here in NY State, getting unemployment benefits is almost impossible due to the overload of new claims. It is easy enough to point a finger at someone like the OP and second-guess his choices of buying a camera or cell phone vs buying babbitt. In these times, we need to be ever more mindful of what the next guy is dealing with.

There is an old saying: "Necessity is the Mother of Invention". If the OP can't buy babbitt, then he has found another way to address the problem. In the process, he is developing shop skills many people never try even under ideal circumstances. From his posts, he has been learning a great deal about thread cutting, and is DOING it with what he has at hand. My hat is off to him for it.

As for the re-babbitting, I've seen small ingots or "cakes" of babbitt for sale on ebay, often for small money. A job like rebabbiting that cross feed nut would use well under a pound of babbitt, so a small ingot or cake would do the job. But, even a small cake of babbitt would run 15 dollars or so. That could be some groceries, pet food, or other essential items at a time when no paycheck is coming in due to the pandemic.

Another thought is to try using old automotive wheel weights. Not sure what alloy is being used for cast wheel weights nowadays, but if you can get hold of some old ones, they are a lead alloy. Some of the newer wheel weights may be a non-lead alloy, so no telling what is in them. As a kid, I used to find wheel weights in the streets along the curbs where people might have cramped their auto wheels too hard. I also asked for old wheel weights at the local garages. I used to save them, and one fine day, melted them in a coffee can (back when coffee cans were steel). I poured the melted wheel weights (minus the steel clips which had dropped out of them when they melted) into a mold for a soft hammer. I used a cardboard tube as the form, set in sand from a fire-bucket (which we had in the basement near the oil fired heating boiler). I used a piece of 1/2" steel pipe drilled for a cross-bolt, stuck thru the side of the cardboard tube and held in place by the sand. I used that soft hammer for years. I remember thinking that the wheel weight alloy was a bit harder and somewhat less ductile than pure lead. This thread brought back the memory of it.


The main thing is that the OP is persevering and prevailing in the matter of getting his lathe into usable condition. The bigger thing is that the OP is tackling shop work that many people would avoid (buying a chunk of new Acme threaded material and a bronze nut for it). I am sure the OP will get the use of his lathe and someday, down the road, if he needs to address that cross feed nut again, he will be in a position to cut a whole new cross feed screw and re-babbitt the nut, making his lathe a nice tight machine.

I am glad the OP has come to our forum, and glad his availing himself of his camera and the internet. It reminds me of stories my late mother used to tell me, living on a farm in the 20's. They were poor, and lived on a farm on a back road. Mom told me how, on cold, clear winter nights she would lay in bed and hear train whistles way off in the distance and know there was a whole big world out there. She also told me how her older brother built a crystal radio receiver. Suddenly, they could pick up radio programs from that larger world off in the distance. Mom said at night, she and her brother would split the set of headphones, so each had an ear-piece and listen to the faint voices or music coming from that wider world. That was their connection to the larger world. In these times, many of us are self-isolating, many of us are laid off from jobs we depended upon, and many of us may be a bit scared or depressed by the pandemic. The OP brings up a good point about "internet connection, so world beware". It is a time for us to use that internet connection to be there for each other more than we might have previously been. With nothing but time on our hands in many cases, and grim news, we need to pass the time in ways which are good for our spirits, and shop work which gives a sense of accomplishment and being a "connected" to this community are two such ways.

To the OP: write all you like. I tend to ramble in my own posts here. Avoid politics and religion and mentions of A***s lathes and you will be fine here.
 
To the OP: write all you like. I tend to ramble in my own posts here. Avoid politics and religion and mentions of A***s lathes and you will be fine here.

I would never dream of mentioning the "A" word on this forum:D They are nothing but paper weights. Speaking of paper weights please don't look to closely at the 3rd picture in my last post I wouldn't want people thinking I did this with one of those lathes that shall not be named :nono:

This project was about killing time and having fun and most importantly working with what I had on hand. A new, or rather old, mind set that I am sure will become more and more popular again as time goes on. I did have to buy a motor switch because that wasn't something I could just do with what I had on hand.:scratchchin: well not without most likely burning the shop down in the end. Hmm I do have lots of scrap steel laying around:scratchchin:
 
Joe, I like your post. There is a lot to be said for just "getting it done with what you have". I have enjoyed reading the Echos From Oil Country series of books about old time machinists/mechanics 100 years ago and how they often devised some method or technique to get a job done.
 
Can Anyone tell me how or why the tittle of this thread was changed?

I am aware that one person did not like it however they never said why? I can understand moderators changing it if it was offensive in some way but if that was the case then I would hope that the OP would have been notified to exactly what was offensive about it so as to avoid that in the future. Or have I broken some strange arbitrary rule of this forum and should know exactly what I have done wrong and therefore should not have to be told?:rolleyes5:
 
That's fare. Thank you for answering my question I now know for the future.

I'm sure it's to late now but in that case should it not have been retitled to something about threading square cut threads since that's what all but one sentence is about? Anyone looking for information on Macgregor Gourlay lathe is going to be disappointed reading this compared to someone looking for options on making a small bore internal square thread. Trust me on this I have searched for both on here:D


Back
Top