What's new
What's new

2 granite references printing opposite

lowCountryCamo

Stainless
Joined
Jan 1, 2012
Location
Savannah, Georgia, USA
I have a Collins micro flat 6 by 18 by 3 square/straight edge combination and a Chinese B 9 by 18 plate that are contradicting each other. The micro flat is printing convex and plate concave. The plate is supported at 3 points. The mico flat was calibrated in 1989 and considering the shape was probably not used much accept for a square, hence maybe worn much. I guess it is my fault for not buying a better plate. I have another Chinese gem, a level with .0005 resolution. Is it possible the map out the error with a level like this? Thanks.
 
I have a Collins micro flat 6 by 18 by 3 square/straight edge combination and a Chinese B 9 by 18 plate that are contradicting each other. The micro flat is printing convex and plate concave. The plate is supported at 3 points. The mico flat was calibrated in 1989 and considering the shape was probably not used much accept for a square, hence maybe worn much. I guess it is my fault for not buying a better plate. I have another Chinese gem, a level with .0005 resolution. Is it possible the map out the error with a level like this? Thanks.
id say yes if your level is small enough, have you run a surface gauge over it yet?
 
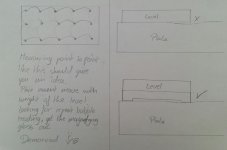
Im no expert, but have played around with it. The general gist of how I see it for testing global flatness below.
20140621_171332-1.jpg
The main things i found were:-
i) The plate must be solidly mounted so it doesnt move when youre mooching the level around. Easy to test, just stick the level in the corner and move a heavier weight around the plate, the level shouldnt budge.
ii) Measuring point to point, look for the same bubble reading as you as you had the previous reading. Doesnt have to be dead level etc. A magnifying glass helps.
iii) Try and keep it as point to point as possible.

Think thats about it. The repeat you can leave for the surface gauge.
 
Im no expert, but have played around with it. The general gist of how I see it for testing global flatness below.
View attachment 110140
The main things i found were:-
i) The plate must be solidly mounted so it doesnt move when youre mooching the level around. Easy to test, just stick the level in the corner and move a heavier weight around the plate, the level shouldnt budge.
ii) Measuring point to point, look for the same bubble reading as you as you had the previous reading. Doesnt have to be dead level etc. A magnifying glass helps.
iii) Try and keep it as point to point as possible.

Think thats about it. The repeat you can leave for the surface gauge.

Thanks Demon73, your process makes it easy to map and understand what I have.


Back
Top