What's new
What's new

Scraping Practice

charalson

Aluminum
Joined
Mar 31, 2015
Location
Tucson
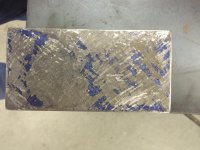
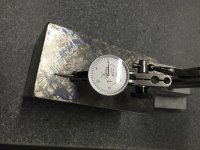
Here's a practice piece I scraped not too long ago. It's the bottom surface of a v-block, just because it was handy. Included is one picture near the beginning, one in the middle, and then the final surface. There were about 30 cycles from start to finish. This was the first piece I've tried to scrape and one of the mistakes I made was I started spotting way too early. Does anyone have any other criticisms or advice they could lend? Even in the final picture, I know there are still some areas to the right of the picture that could be improved on, but like I said it was just a piece to get some practice on. In the third picture, you can see some scratches, I think that was due to my deburring stone loading up. How about the thickness of the spotting ink? It seems like I was using too thick at times, even though it seemed I could see the plate through the ink. Oh and I measured the difference between high and low spots and it seemed to average 0.0002 to 0.0004 inches. Equipment used were an Anderson bros carbide tipped scraper, 36x48 grade A plate, dykem ink, medium grit india stone, and a speedball brayer. I was sharpening my scraper to 5* negative using a diamond wheel on a baldor carbide grinder, followed by a light lap with a 1200 grit diamond file. I had the radius way too tight for the majority of the process. And I have also since changed out the handle on my scraper from the typical rounded file handle to a flattened piece of wood so I can push the scraper along with my chest/belly the way Richard King shows in his video. I can really shovel the chips off like that when roughing. But I'm still a novice and still finding my technique that works best for me. All comments are appreciated.


477.jpg488.jpg498.jpg480.jpg474.jpg
 
yes I have a criticism, that floor next to your milling machine is far too clean...:) Just kidding, thanks for sharing and good luck with your scraping project.

Charles
 
Yup, you need more mess and disorganization.

Seriously, sucessive images of your practice piece and description of process is just abut optimum. I tought basic scraping for a while. Students who brought me work like yours for comment would be heaped with praise.

My only negative comment would point out the rolled-off edge: the band free of bearing indications seen in your second and third photo. Ideally the print would appear to continue pasr the edge of the work as though on to a larger area - an ideal almost impossible to attain, more of a receding goal. The opposite is a "margin" where the edge is an almost continuous band of blue indicating an area you feared to scrape.

Somewhere in the middle...

Anyway you done good. In your image sequence you first see the early blotchy distributions, the mid-process "checkerboard," and in the third, the mature randomized but uniformly distributed indications. In the fourth, your indicator flutter is just about optimum for general precision scraping. I call this flutter "texture" proposing it to be deeper in fully housed slide and shallower on exposed way bearings where way wipers run

This texture has multiple functions: randomised bearing so the load is shared over non sequential bearing points, reservoirs for lubricant, wear indicator, and in some cases esthetic effect. Geometry control is a given. Texture is one of the several variables under the scraper hand's control he consciously manipulates to empahsize service characteristics.
 
Thanks for the comments y'all. And no joke on the too clean comments, that should be rectified once I find an electrician to get the phase converter/motor of the Bridgeport straightened out. Forrest, I think I got a little too carried with the file breaking the edge, I guess I was paranoid about leaving a burr. My next project will be a busch 24" parallel type straight edge. This first project was to practice getting a flat surface, the next is to get two flat planes that are parallel.
 
I would say if that's your first try you did good too. You know scraping doesn't have an on or off switch, it takes lots of practice with the right tools. A learning curve so to speak. I have said "Sownen sun chow" or and over for years...oops that Taiwanese...but that means in English "Practice Makes Perfect". One great thing about the DVD is I shot that after teaching what's on the DVD hundreds if not thousands of time to students, so I show the professional way. You and everyone learning need to experiment with different tools, blade radius's a sharp blade, leaning to stone just enough so you only stone off the burr. Be sure to wipe everything off with your hand; the plate before bluing, the bluing after it's rolled on, that's why I like the Canode because when you wipe off the Dykem your hand gets stained, Wipe off the stone before stoning, wipe off the part before bluing it up. Care must be taken to where you lay the stone, so it isn't laying on the table getting dirty.

After you scrape the part, brush or vacuum off the part with alcohol, Dykem cleaner for Dykem blue or Windex for Canode to remove any missed bluing before stoning or your stone will load up with bluing.

I like to run my fingers over the scrape marks and feel for burrs, stone lightly and stone again if needed. One should use a small stone when stoning small parts as stones are not flat. Lay the stone on the plate and hinge it as 90% of all stones are high in the middle on one side and high on the ends when you flip it over. Rich
 
Thanks everyone. Does anyone think that the blue is too thick in the last picture of the v-block? Also, when you put the work on the blued up plate, should you be able to feel any stickiness when you move the part back and forth? Or should moving the part on the blued and un-blued plate feel the exact same?
 
Thanks everyone. Does anyone think that the blue is too thick in the last picture of the v-block? Also, when you put the work on the blued up plate, should you be able to feel any stickiness when you move the part back and forth? Or should moving the part on the blued and un-blued plate feel the exact same?

It depends on the intended use of the surface. For a V block it should be OK. For a sliding surface you would want less bluing and for a surface plate you would want a very thin layer. I read that when a surface was scraped down to millionths of an inch a film of evaporated alcohol was used for spotting.
 
Well the v-block was just a handy piece of cast iron to practice on. What if that particular surface was a straight edge, does it look to thick and splotchy for that? And if it was a way surface for a mill? Thanks guys, still learning here!
 
Something you need to do to improve your checkerboard is to remember the 4 RULES of SCRAPING (my rules)

1. "Individual scrape marks"
Scrape sideways and each scrape has to be separated from the next scrape mark. So if your hand scraping or power
scraping if your scrape mark is 1/8" wide and say 1/4" long the gap to the next scrape mark should be 1/8" wide.

2 "Individual scrape lines"
As above you scrape 1/8" wide scrape mark and 1/4" long, your next line has a gap between the line you scraped previously
at a minimum of 1/8" to 1/4" long.

3. "Depth of the scrape mark" Measure the depth of the mark with a tenth indicator and it should be on average .0003" deep.
Not less then .0002" and not more then .0005" deep. The way I do it, is I set the surface gage on the part I am scraping
and not the way your doing it on the plate, as your not parallel to the table.

4. "Hinge the part" . This means you push and pull the part alternatively with your right hand and left hand and look here it
pivots. I should pivot or hinge at 30% from each end.

Your last print shows how you did not get rule one. You have long openings where the scrape marks touched. You said you have my DVD, so go look at it again, especially part 3 where I show scraping 40 PPI.

As far as the thickness of the blue, for a beginner it is a bit thick, but not that bad. When I go for 40 PPI or more then 20 I rub the highlighter on the part first and then wipe it dry so it only stays in the pours of the iron. I use the Canode Yellow thinned with Windex. that is shown in the DVD too. You can also wipe with your hand a no blue area next to your blued area and then pick up the V block and rub it on the clean spot to "Shine up the high spots"

I also teach there are 4 colors of the blue; 1) no blue means it is low and not touching; 2) same color as the blue your using, this high spot is the lowest of the high spots; 3) Black is wear the blue is hitting slightly harder, maybe .00005" ; 4) Shinny like a Mirror as this is the highest of the high spots.

After you scrape a while and follow the rules and scrape the high ones you will get the idea. It is so hard to try to explain it here. Another simple tip when scraping super precision is to take a lead pencil and after you have blued up your part, draw 1" x 1" square boxes on the part. I call it "Graphing the part". Then you look inside each square and scrape the black and shinny ones and leave the blue ones alone. If you go to Youtube and type my name, you will see the video Mathis shot in the Swedish class and after my silly interview some of the guys really explain this. Rich

PS: You can click on my name and look at my profile photo albums where I have pictures showing the checkerboard.
 
Thanks, Rich. Tomorrow I'm going to see about having my parallel straight edge machined, then I'll start on it and hopefully apply these lessons successfully. I've been using the dykem hi spot and, from my limited experience, it seems to work ok, but it's true what everyone says about it staining your fingers. I'm going to call up Volk Corp tomorrow to see about ordering some canode yellow and blue. I was thinking of getting 16 oz bottles of each. Hopefully that will prevent me from looking like a blue man group reject!
 
Rich I think we may have overestimated the amount of people who are interested in the Tucson class, the other thread hasn't had a single response yet. Maybe in a couple months I'll float the idea again.
 
A lot of people have stumbled over just how much blue to put on the plate. My preferred place to start is 40 millionths. This produces a vivid transparant color but it's a bit thin for rough scraping. But it's a good place to start.

So how do you get 40 millionths? Use your math; numbers don't lie until they are cherry picked statistics. Measure out the area on the plate where you intend to apply blue. Calculate the area in square inchs and multiply by 40 millionths - for a 12 x 12 are this works out to be 144 square inches times 40 millionths = 0.0058 cubic inches.

The amount of goo issued from a tube is called a "nerdle" no matter what the goo is. I procede on the basis of a nerdle 1/8" in dia which equals 0.0123 square inches. The diameter on the nerdle depends on how you stretch it as you squeeze the tube. Lay a clean bit of 1/8" dia rod or wire on the plate for eyeball comparison. If you stretch the length of the nerdle so it lays down at 1/8 dia (no big trick with a little bit of practice) you have the basis of quantifying the the amount of blue you apply to the plate. 0.0058 / 0.0124 = roughly a 1/2" long nerdle. Spread that out uniformly and you have your 40 millioths film.

Metricoids: it works in meters too. Apply the appropiate conversions. 40 millionths is very close to 1 micron. In the above example, you seek a 3mm dia nerdle 14 mm long that when spread uniormly applies a 1 micron film to a 300 x 300 mm square.

YMMV depending in the film thickness you desire and the absorbancy of your preferred means of spreading it. A roller "absorbs" only the film on its circumference. On the other end of the spectrum, a cloth dauber may absorb a good share of the first spread but less as the dauber saturates with successive re-applications.

If you use a roller, spread the blue working in two directions in rapid swipes. Lift the roller at the end of each stroke so it spins to randomise any blotches on its circumference. Get a little practice and you can re-apply blue to a 2ft x 3 ft plate in less than a minute.
 
Last edited:
That's funny because I did ponder working out the volume of the blue like that but I thought I was overthinking it. And I use the exact technique you describe with the brayer; two directions, lifting it off at the ends to "randomize" it, otherwise it would be like a gear mesh, where the same surface of the brayer stays in contact with the plate at all times. Thanks guys!
 
I wrote a description of bluing thickness a few years ago, I suppose i could look for it in the archives, but to be honest no one has ever asked about thickness. I believe it comes with practice to recognize the color of the blue and the depth of the cut. One can tell if it is a thick glob and looks smeared. I came up with the term "if you can see through the bluing" as it is rubbed on the plate it's the right thickness. I use the term in the 25+ years ago on the original 1/2 Video and now the DVD. I also have had great luck with a Japanese made bearing ink that's red and is used a lot in Taiwan. It doesn't stain the hands as the Dykem. I'll write my friends over there and see if I can get a name brand. Bottom line is The 4 Rules and Practice makes perfect! Rich

PS: I thought I had linked the You Tube show the Swede's did when i taught them last summer.
just type Richard King Scraping on you tube and you will see how i teach applying the ink. i also tell folks to apply it on another are of the plate to spread it out like a paint pan and a paint roller before rolling it on the wall.
So spread it evenly on the other area and then roll it evenly on the plate where your going to blue up your part or before you roll it on your straight-edge or master machine part.
 
Last edited:
You are not cutting but scratching, you can get bearing this way and contact points but you should attend a class on hand scraping and sharpening scrapers. Scraping is hard to learn from a video because people who have done it for years make it look easy.
 
I wrote a description of bluing thickness a few years ago, I suppose i could look for it in the archives, but to be honest no one has ever asked about thickness. I believe it comes with practice to recognize the color of the blue and the depth of the cut. One can tell if it is a stick glub and looks smeared. I came up with the term "if you can see through the bluing" as it is rubbed on the plate it's the right thickness. I use the term in the 25+ years ago on the original 1/2 Video and now the DVD. I also have had great luck with a Japanese made bearing ink that's red and is used a lot in Taiwan. It doesn't stain the hands as the Dykem. I'll write my friends over there and see if I can get a name brand. Bottom line is The 4 Rules and Practice makes perfect! Rich

PS: I thought I had linked the You Tube show the Swede's did when i taught them last summer.
just type Richard King Scraping on you tube and you will see how i teach applying the ink. i also tell folks to apply it on another are of the plate to spread it out like a paint pan and a paint roller before rolling it on the wall.
So spread it evenly on the other area and then roll it evenly on the plate where your going to blue up your part or before you roll it on your straight-edge or master machine part.

here you go


Back
Top