What's new
What's new

mb66vb tool change procedure

deadlykitten

Banned
Joined
Aug 5, 2016
hello, i just finished my 1st tool change procedure for the mill ; i did not attached it to a G code ( macro ) yet :)

actually, i do not know how :)

availabes syntaxes :

CALL OCHG VC190=active tool VC191=next tool
CALL OCHG VC190=active tool
CALL OCHG VC191=next tool
CALL OCHG

... it moves spindle to right if above senzor
... after "next tool" is prepared, M64 comes in, to avoid magazine "lift up" during cutting
... it handles EMPTY values, in case a variable gets "nill" ? or how would you call it ? kindly !

Code:
OCHG

 ( ~ ~ ~ ~ ~ ~ ~ ~ ~ ~ ~ ~ ~ ~ ~ ~ ~ ~ ~ ~ ~ ~ ~ ~ ~ ~ ~ ~ ~ ~ ~ ~ ~ ~ ~  )
                                                           ( 0 to EMPTY's )
 ( ~ ~ ~ ~ ~ ~ ~ ~ ~ ~ ~ ~ ~ ~ ~ ~ ~ ~ ~ ~ ~ ~ ~ ~ ~ ~ ~ ~ ~ ~ ~ ~ ~ ~ ~  )


    IF [ VC190 NE EMPTY ] N1
         VC190 = 0
                          N1

    IF [ VC191 NE EMPTY ] N2
         VC191 = 0
                          N2


 ( ~ ~ ~ ~ ~ ~ ~ ~ ~ ~ ~ ~ ~ ~ ~ ~ ~ ~ ~ ~ ~ ~ ~ ~ ~ ~ ~ ~ ~ ~ ~ ~ ~ ~ ~  )
                                                            ( active tool )
 ( ~ ~ ~ ~ ~ ~ ~ ~ ~ ~ ~ ~ ~ ~ ~ ~ ~ ~ ~ ~ ~ ~ ~ ~ ~ ~ ~ ~ ~ ~ ~ ~ ~ ~ ~  )


    IF [ VC190 EQ VTLCN ] NA1 ( if "desired tool" is allready in spindle  )

    IF [ VC190 NE     0 ] NA2 ( if empty spindle is not desired           )

    IF [ VTLNN EQ     0 ] NA3 ( if there is no "next tool"                )
        M64                   ( lift down                                 )
        NA3 M63               ( find an empty pot                         )
            M6                ( switch > empty spindle                    )
            GOTO NA1

        NA2

                              ( if "desired tool" is allready prepared,or )
                              ( if there is no "next tool"                )
    IF [ [ [ VC190 EQ VTLNN ] OR [ VTLNN EQ     0 ] ] EQ 1 ] NA4
        M64                   ( lift down                                 )
        NA4 T = VC190 M6      ( switch > "desired tool"                   )

    NA1


 ( ~ ~ ~ ~ ~ ~ ~ ~ ~ ~ ~ ~ ~ ~ ~ ~ ~ ~ ~ ~ ~ ~ ~ ~ ~ ~ ~ ~ ~ ~ ~ ~ ~ ~ ~  )
                                                               ( go play  )
 ( ~ ~ ~ ~ ~ ~ ~ ~ ~ ~ ~ ~ ~ ~ ~ ~ ~ ~ ~ ~ ~ ~ ~ ~ ~ ~ ~ ~ ~ ~ ~ ~ ~ ~ ~  )


    IF [ VTLCN EQ 0 ] NA4
        G56 HA DA
    NA4


 ( ~ ~ ~ ~ ~ ~ ~ ~ ~ ~ ~ ~ ~ ~ ~ ~ ~ ~ ~ ~ ~ ~ ~ ~ ~ ~ ~ ~ ~ ~ ~ ~ ~ ~ ~  )
                                                       ( spindle to right )
 ( ~ ~ ~ ~ ~ ~ ~ ~ ~ ~ ~ ~ ~ ~ ~ ~ ~ ~ ~ ~ ~ ~ ~ ~ ~ ~ ~ ~ ~ ~ ~ ~ ~ ~ ~  )


    CALL ORGHT


 ( ~ ~ ~ ~ ~ ~ ~ ~ ~ ~ ~ ~ ~ ~ ~ ~ ~ ~ ~ ~ ~ ~ ~ ~ ~ ~ ~ ~ ~ ~ ~ ~ ~ ~ ~  )
                                                              ( next tool )
 ( ~ ~ ~ ~ ~ ~ ~ ~ ~ ~ ~ ~ ~ ~ ~ ~ ~ ~ ~ ~ ~ ~ ~ ~ ~ ~ ~ ~ ~ ~ ~ ~ ~ ~ ~  )


    IF [ VC191 EQ VTLNN ] NN1 ( if "desired next tool" allready prepared  )

    IF [ VTLNN EQ     0 ] NN2 ( if there is no "next tool"                )
        M64                   ( lift down                                 )
        NN2

    IF [ VC191 EQ     0 ] NN1 ( if no "next tool" is desired              )
        T = VC191             ( "desired next tool" gets prepared         )
        M64                   ( lifting during cutting should be avoided  )

    NN1


 ( ~ ~ ~ ~ ~ ~ ~ ~ ~ ~ ~ ~ ~ ~ ~ ~ ~ ~ ~ ~ ~ ~ ~ ~ ~ ~ ~ ~ ~ ~ ~ ~ ~ ~ ~  )
                                                           ( master reset )
 ( ~ ~ ~ ~ ~ ~ ~ ~ ~ ~ ~ ~ ~ ~ ~ ~ ~ ~ ~ ~ ~ ~ ~ ~ ~ ~ ~ ~ ~ ~ ~ ~ ~ ~ ~  )


    VC190 = 0    VC191 = 0


RTS

Code:
ORGHT

    IF [ VTLCN EQ 0 ] GOTO N1
                      GOTO N2

        N1 MOVE = 200
           GOTO N3

        N2 MOVE = 200 + VTOFD [ VTLCN ] / 2
           GOTO N3

        N3

    IF [ VWKAX + VZOFX [ VACOD ] GE - 751 + MOVE ] NSKIP
    IF [ VWKAY + VZOFY [ VACOD ] LE + 331 - MOVE ] NSKIP

    G00 Z9999
    G00 X - 751 + MOVE - VZOFX [ VACOD ]
  ( G00 Y + 331 - MOVE - VZOFY [ VACOD ] )

NSKIP

RTS
 
Last edited:
Good work on the macro. What control does your MB66 have? If its an E-100 control or later, did you know that rather than using a CALL statement that you can alias this macro routing to a G or M code. G/M Code aliasing is found in Parameters. For tool change macros, most Okuma users use G116.
 
Good work on the macro

thank you :)

What control does your MB66 have?

osp-p300m

If its an E-100 control or later, did you know that rather than using a CALL statement that you can alias this macro routing to a G or M code. G/M Code aliasing is found in Parameters. For tool change macros, most Okuma users use G116

i will attach it to a macro .... i have never used macros before, and i wish to document about macros, *.lib, etc ...

... it moves spindle to right if above senzor

i wish to explain this a bit : if you cut a single part, than this is not necessary, because, in general, spindle is up, moves @ xy, and after that it lowers :)

on multiples parts, there is no need to raise the spindle to max, but only above the fixtures, and so, "above the fixtures" may be pretty closed to "senzor height", and in this case, such a behaviour, makes things safer :)

ps : i did not learned it the hard way :)
 
Macro looks good. What sensor are you referring to? I may need to create a tool change macro as well so that I can automatically handle the through spindle air blow and spindle nose air blow before changing to the next tool.

I'll have to look at the manual again, but I think there are even some M codes to control the magazine (i.e. go to pot X), which would be neat for making everything happen at once. We have a side mount 48 pot tool changer, so it can take awhile if for some reason the next tool is on the other side of the magazine.
 
Macro looks good

thx :)

What sensor are you referring to?

senzor for measuring tools, located in top-left corner; mine works only for Z :) it has a surface of 100x110mm2, and, by code, i move away from that area :)

so that I can automatically handle the through spindle air blow and spindle nose air blow before changing to the next tool.


i understand through spindle air blow, but why also spindle nose air blow ?

also, i am working on "blows" :)

good luck with yours :)
 
Last edited:
i understand through spindle air blow, but why also spindle nose air blow ?
Our machine uses CAT50 big plus tooling, which has spindle taper contact and flange contact. There is an air nozzle oriented right at the spindle nose so that chips, etc. are cleared before a tool change. We actually have more regular CAT50 tooling than we do big plus, so it's not too big of an issue.
 
Also deadlykitten, if you want to save up on your precious few common variables (I only have 200), you can change up your code to pass arguments to your OCHG macro. I can't quite remember the format, so you'll have to refer to your manual, but I think it would look something like this:

CALL OCHG T20 Q21
-or-
G116 T20 N21

Then your macro would use PT (active tool) and PN (next tool), thus freeing up two of your common variables. Here is Edster's macro for reference:
http://www.practicalmachinist.com/vb/cnc-machining/okuma-mill-program-263659/#post2011985
 
hello Jefflikesbagels :)

Also deadlykitten, if you want to save up on your precious few common variables (I only have 200)

i also have 200 ; don't you think 200 is enough ? :) do you need more ?

...you can change up your code to pass arguments to your OCHG macro

i will "macro" this soon ... :)


i looked at all examples from that forum ; actually, i received a few time ago a macro from somenone, and i did not understand it at 1st; only after i wrote mine, i was able to understand the exemple that i was given ; that example looked pretty much the same as the one from the link you send me.

Our machine uses CAT50 big plus tooling, which has spindle taper contact and flange contact. There is an air nozzle oriented right at the spindle nose so that chips, etc. are cleared before a tool change. We actually have more regular CAT50 tooling than we do big plus, so it's not too big of an issue.

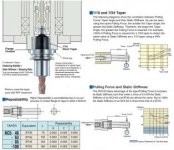
"1lock" : taper
"2lock" : "1lock" + flange
"3lock" : "2lock" + taper expanding

[ advantages ]

"1lock" : what can i say ; is used in most cases
"2lock" : reduces radial play, thus less deviation between cone axis and spindle axis; a bit more stabble cutting
"3lock" : "2lock" + taper expanding : less torque required when cutting; thus more stability

[ 1lock ] pull stud is raised so, all pull force clamps the taper ( pull force = taper clamp )

[ 2lock ] pull stud is raised until flange contact appears; in this moment, the taper should be clamped, but with less force than in "1lock" ( pull force = taper clamp + flange contact) ; thus, there is a specific moment, where the taper gets close to plastic deformation(d*), but it not reaches it, because flange contact appears; d*, the distance until plastic defformation point is always the same, being taken into consideration when such cones are developed :)

for things to work well, "taper clamp force" / "flange contact force" = specific_value, which means in reality :
... machine clamping force should not increase over time; otherwise, spindle may get deformed, bit by bit, with each clamp
... machine clamping force should not decrease over time; otherwise, there will be only taper contact, and less flange contact
... "2lock" cone craft tolerance is lower than a "1lock", thus shanks provider must be trustfull :) if you buy '1lock' cones, with different craft tolerances:
...... same angle, but the cone is larger or smaller, machine will always clamp it the same, if you wish at a specific nominal circle : thus, if a smaller '1lock' cone appears, machine will pull it a bit more; also, if a bigger '1lock' cone appears, machine will pull it a bit less ... so, in time, spindle contact surface stays the same
...... different angle, than machine will clamp :
......... near smaller diameter : lower stability when cutting
......... near bigger diameter : same stability when cutting, but spindle gets deformed

so, always buy from same provider, or, verify each cone after purchase !

if a machine works a lot with '1lock', and suddenly a '2 lock' appears, than there is a risk to clamp it more on the flange, and less on the taper :) because spindle cone has a "bed" where all your '1lock' are sitting ok, but this bed may not be ok for the '2lock' ... '1lock' is not crafted at such tolerances as a '2lock', thus spindle gets different wear/'bed' on 1lock for a long time, comparing to a 2lock for a long time .... in the oppossite, if '2lock' is used a lot, than there should be no worries when going to '1lock'

so, using alternatively 1lock and 2lock will ruine the spindle :) 2lock requires much more caution :)

a machine only for '2lock' should not be used for '1lock'
a machine only for finishing should not be used for roughing

if you wish to take this matter in your own hands, than take a spindle that has wear on it, and refresh it, to be like new; craft your own 2 lock cones :
... use materials that are stable over time
... use quality heat treatment
... grinding accuracies to the best ... and you will have your own cones, at least for collets, or face mills; 2lock with hidraulics, shrink fit, etc, are harder to build by normal humans :)

in my opinion, a 2lock may fail overtime, because taper is long, so you may get to a point where contact is at smaller diameter or at bigger diameter; thus :
... i just find at nikken an alternative with a shorter cone; i guess it costs a lot :)
... i am waiting for a system that delivers clamping in 2 steps :
...... clamp the taper
...... after, clamp the flange with another mechanism > such a construction is harder to achieve, but will eliminate all disadvanteges that a 2lock has :)

[ 3lock ] is special : it allows your machine to be more stable at heavy cutting; in my opinion, just use smaller tools, so to avoid all efforts delivered by bigger tools :) be gentle with the machine :) smaller rough tools, with many teeth, high rpm, 80..90% normal feed, coolant all over the place :)

ps : is it a limit when uploading images ? images contain infos, and they have their resolution decreased ; also, i can not upload archives ... why ?
 

Attachments

  • 01.jpg
    01.jpg
    14.2 KB · Views: 162
  • 02.jpg
    02.jpg
    11.6 KB · Views: 169
  • 03.jpg
    03.jpg
    21.7 KB · Views: 198
  • 04.jpg
    04.jpg
    19.5 KB · Views: 253
Last edited:
in my opinion, a 2lock may fail overtime ...

i just find out that somewhere this did happen on machine where were used '2lock' for rough milling ... because of wear, taper contact reduced, and thus, to remediate it, they reduced flange width on all holders :) nice move ...
 
Last edited:
Interesting stuff, I didn't know about Lyndex Nikken's different locking methods, I've only ever seen Big Kaiser's system. Thanks for the info!
 
hello :) i just discovered the VTPNO [ tool_numer ], which returns the pot that contains the tool " tool_number " :)

please, when such a variable is needed ? are there some cases ? if not, than i think i will forget it ... kindly !
 
You can use VTPNO for several uses. One would be to see if a tool exists in the ATC matrix. If VC100 = VTPNO[20] is returned as a zero (0), then that tool is not present in the ATC.
 
You can use VTPNO for several uses. One would be to see if a tool exists in the ATC matrix. If VC100 = VTPNO[20] is returned as a zero (0), then that tool is not present in the ATC

yup, the tool may be in the pot, but not declared in virtual setup :) please, is there another reason ?


Back
Top