metron9
Aluminum
- Joined
- Oct 29, 2009
- Location
- Minnesota U.S.A.
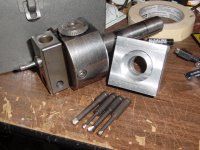
I picked up the Bridgeport Boring head saturday, picture attached.
Questions on the boring head and the bars that came with it.
It only had one 5/8 shaft boring bar that came with it so I used that and did my first boring job. I started with 1/4 inch drill, then 5/8 drill then 3/4 endmill (not a center cut bit but I assume with a 5/6 hole that would not matter correct me if wrong)
Boring out .050 on each run at about 140 RPM with the spindle drive set at 1 1/2 (center position not shure what feed rates down,middle, and up are yet)
Since the boring bar was so short I could not go all the way through so I flipped the part, recentered it and did the other side. First I had to bore out the 1.5 inch pocket for the nema23 motor and to actually get deep enough with the small bar. Looks like I nailed the alignment but not the size as the size did not matter just needs to be big enough for the aluminu, adaptor.
The other boring bars shown in the picture are not 5/8 and there is no adaptor for it. I am not shure what the adaptor would look like perhaps another set screw and 5/8 shank and that would go into the boring head, can I buy one of these adaptors somewhere or do i have to make it, I am shure I would not use aluminum 6061 but what material should I use if I do make one and what kind of drill bit and tap would I need.
Or should I just forget about the bars that came with it and order a carbide tipped set of 5/8 bars like the other picture.
When I did the 1.5" recess I noticed a tiny bit of chatter started and realizing the larger the diameter the faster the bit spins at the cutting point i reduced speed to 100 rpm.
Should I be able to do this alot faster on future boring jobs with my 1.5hp Bridgport with this boring head and a different boring bar, perhaps 5/8 all the way to the tip instead of narrowing down to 1/8. Was I in the ballpark on this for feed and speed?
Links or comments welcome. By the way, I really like the VFD especially when I want to turn the boring head 1/2 way around in low gear.
Attachments

Last edited:
