What's new
What's new

Dismantle early vari-speed cone pulleys

Peter.

Titanium
Joined
Mar 28, 2007
Location
England UK
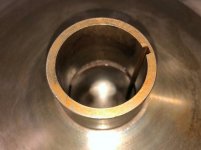
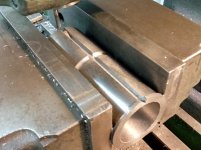
I'm servicing the vari-speed pulleys and speed adjuster on my HLV and I thought I'd put up some pics. I have two problems, one is that the centre sheave is a bit loose so rattles as it rocks every revolution, the other is that the screw jack adjuster had slightly worn threads and the cross pin is also a little loose in the hole, allowing the frame to jump about a bit so I intend to make a new cross pin and ream the hold slightly bigger.

First the sheaves. When I stripped the bearings out (which were actually pretty good) to fit new ones I dumped the whole lot in some brake cleaner because the sliding action of the middle sheave was a bit 'gummy' and it let out a whole mess of dark red sludge - too 'red' to be rust so I imagine that it's evidence of wear from some kind of bush inside. The middle sheave does have a bit of rock to it as I said.

varispindle1.jpg

Since I pulled the bearings I'm a little confounded as to how to strip the rest apart. It seems like the end sheaves are brazed or silver soldered to the shaft. I did a search of old threads and found one where the ends were threaded on & secured with a roll pin, and another where they had been brazed as part of a 'repair'. Here is mine.

varispindle2.jpg

varispindle3.jpg

varispindle4.jpg

And there are two cross-drilled holes in the shaft which I'll find out the purpose of later.

varispindle5.jpg

Since I can't find any pics of the internal parts of the sheaves I am a bit lost as to how to approach this. If the wear is commonly in the shaft I could turn that out and make a new one. If I knew that the brazing was only a shallow groove filled with braze I could try to carefully turn that out. If anyone has any experience or constructive input I'd really like to hear it before I take the plunge.

Pete.
 
Welcome to the club :(.

I have not rebuilt the Reeves drive on my HLV yet because I had not worked out how to get it apart either. I was expecting that I would need to machine away the weld/braze and then make a completely new sleeve for the centre sheave to slide on, this would also allow me to clean make everything fit properly again.

As I said, I haven't done it yet, but the time is approaching when I will need to, because it's more noisy than it should be.

This is one of the many things that Hardinge got right on the second try...

Here's hoping that someone can chime in who actually done the job.

Haven't.

Did do different ones, sheet-offset printing press power, 1970 or so. When we could still "just buy" the wearing internal parts. Or the whole unit, exact fit.

And "different" applies. Someone who knows where Hardinge bought the ones they used, has drawings, or knows where they are published.

Ex: I was able to find the tech sheets on the "Roto-Cone" variant used in my Quartet mill:

http://www.northfieldwoodworking.com/repairparts/surfacerparts/gerbing pulleys/GerbingPulleys.pdf

The several other OEM makers that still exist may have new corporate owners, some of whom market SEVERAL of the original clans and tribes of different design & name, same web pages:

Motion Control | Variable Speed Drives | TB Wood's

There are more. Europeans, too.

Hopefully, a "Hardinge-specific" PM member will have the exact prints for this ONE drive.

Until then, proceed with care. Make few/no assumptions. I did say "different"?

Who'd a thunk Roto-Cone would have shoehorned a rack & pinion into their drive's hub? VERY glad I saw that before heading-off to take it apart, not after.
 
Well, wonder no more...

I popped a little hole in the brazing and found it to be only about 2.5mm deep.

varispindle6.jpg

So I made a thin tool and cut a face groove to turn it out.

varispindle7.jpg

Then I drifted the end sheave off the spindle using the sliding sheave as a hammer. It gave up quite easily. Turns out the red mess was in fact rust, probably from the fine cast iron dust worn off the sliding sheave bore. The 1/8" square key was also heavily worn. The OD is good, consistent to half a thou along it's length and it's nicely burnished so I'm leaving it alone.

varispindle8.jpg

Even after all the flushing there was still a lot of crud left in the clearance gap.

varispindle9.jpg

This is where all the wear is. One end is worn 7 thou the other 9 thou. Doesn't sound like a lot but it lets the sheave rock about and you can see the wear pattern from it on the key strip above.

varispindle10.jpg

Peter Colman said here that he bored the pulley and used a bronze sleeve to repair the bore. I'd like to hear how much wear his pulley had and how he dealt with the full length key slot in the sleeve he fitted.
 
Thank you for being brave/proactive.

You have given me encouragement to tackle the job when I get done with the current to-do list.

I don't know if my slotting head can quite manage the length of cut needed, but a trick that I used to make a keyed pulley before I had any slotting capability was to turn a bush to fit the bore with a thickness equal to the desired key slot height. Then mill (actually, shape) the slot all the way through the bush, then Loctite the bush into the bore, which had been made to fit the OD of the bush. That could be used here. That bodge has given 15 years of service and is probably permanent.


PS:- It's a shame that Hardinge machines were so shoddily built that they need an overhaul after a mere 65 years or so!
 

In later models the bearings are supported on the pulley bracket and held with rings that are removed with a pin wrench.
The pulley shaft is just pressed into the center of the hubs.

I got as far as unscrewing those two caps but was afraid that I would ruin something if I tried to press the shaft from the pulley assembly.
 
Thank you for being brave/proactive.

You have given me encouragement to tackle the job when I get done with the current to-do list.
Ah... well... PM's "standard cop-out number two" [1], yah?

If it moves at a velocity anything like my RTWL (Round Tuit Wish List..)... Iron itself will be obsolete...

:(

[1] "I'd buy it if it was closer!" is standard cop-out number one.
 
Turns out that the slop in the jack screw thread didn't need addressing. I removed the pin and peered into the threaded hole to find this:

varispeed11.JPG

It had been so long since I dismantled it that I had forgotten that there was a brass plug in there. Looking through my tray of parts I found these, which looked like they should fit so I loaded the spring and plug into the hole and all the lash in the thread has disappeared.

varispeed12.JPG

varispeed13.JPG

Now I don't remember if the spring came out of there and there are no witness marks to suggest it did, but it fits and it works and I can't find a locking plug for the one in the plug, so until I find myself short of a spring later in the rebuild (unlikely since it's only the slides and feed electricsleft to do) that's where it's staying.
 
Machine is back together and running a million times smoother. I worried over how to fix the bore and in the end decided on this:

I bored the pulley out by about 40 thou and turned a chunk of grey cast iron for a slip fit inside the bore then milled a keyway in the OD and cut the central grease groove. The ID I bored out leaving enough to keep it all one piece for fixing in place and I left a step in the end for ease of fitting.

HLV pulley sleeve.jpg

Then I fitted the sleeve with bearing fit and left it over night.

HLV sleeve fitted.jpg

Next day I just bored it through which cut into the keyway and formed the central groove. I made a new key and fitted it up, and so far it's running very nice. End fitted back on with loctite.

I do admit to some trepidation as to whether those sleeves are going to remain in place in the long term now that they are two split sleeves just bonded in with loctite. If they don't I will have to bore the sliding pulley even more and fit a one-piece sleeve with a full keyway cut in it, but that would leave the walls very thin.
 
Well, wonder no more...

I popped a little hole in the brazing and found it to be only about 2.5mm deep.

View attachment 261435

So I made a thin tool and cut a face groove to turn it out.

View attachment 261436

Then I drifted the end sheave off the spindle using the sliding sheave as a hammer. It gave up quite easily. Turns out the red mess was in fact rust, probably from the fine cast iron dust worn off the sliding sheave bore. The 1/8" square key was also heavily worn.
First thanks Peter for this post.
This was the only post I found from an internet search.

I have the same brazed ends, I turned out the bazing on one end so I could get the badly varnish oil that was stopping variable drive to not work. I was able to cut a shoulder and a 1/8 keyway slot.
 

Attachments

  • IMG_20230629_143615512.jpg
    IMG_20230629_143615512.jpg
    2.5 MB · Views: 1
  • IMG_20230629_143640990.jpg
    IMG_20230629_143640990.jpg
    2.3 MB · Views: 1
I had play in the pulleys in the keyway due to a worn or undersized keyway .121. By replacing it with an oversized keyway .127 fixed it. To reattach the pulley end I turned a 1/8 slot and retaining ring slot t in the shaft.
 

Attachments

  • IMG_20230629_143715722.jpg
    IMG_20230629_143715722.jpg
    2.3 MB · Views: 2
  • IMG_20230629_143926773.jpg
    IMG_20230629_143926773.jpg
    2.2 MB · Views: 2
After finishing cleaning and greasing the shaft I installed the modified retaining ring.
 

Attachments

  • IMG_20230629_171150297.jpg
    IMG_20230629_171150297.jpg
    2.5 MB · Views: 3


Back
Top