What's new
What's new

Holding a 16x20x8 box to table.

rons

Diamond
Joined
Mar 5, 2009
Location
California, USA
Box is 16W 20H and 8D, W - width, H - height, D - depth

The steel is 0.075 thick. I want to cut slots on the sides. The box would have to laid on it's opposite side.
The issue is the 16" height. I am thinking of using these cam locks I made a few years ago.
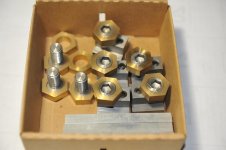
DSC_0872.jpg

DSC_0871.jpg

Experience says that the top panel of the box will be free enough to cause chatter. I dread the thought of doing these slots by hand.
The drill press I own is really for wood and the slowest speed can burn up a large cobalt drill bit. I have a spare 3 HP VFD and a 1 Hp 3 phase motor
that I can alter the drill press with but I would rather not do that yet. Even if that worked there would be a lot of filing.

Ideal situation is to lower a 1/2" cutter into the sheet and go 3" and turn 90 degrees, keep doing this until start position. Want to do this 4 per side.
 
Last edited:
Trying to cut slots with a drill press? I don’t know that it can be done. At least not without destroying the drill press in the process. And the workpiece too. If you don’t have the proper equipment, find a local machine shop that is willing to do it. It will be money well spent.
 
Torch it, then clean up with burr, etc., if it doesn't have to be to precise. You don't mention a mill, but I assume your referring to mill table (maybe not) these with concerns of chatter? If thats the case you could use screw jacks with a sheet of wood underneath the cut (1/2" or thicker) to support it and absorb some of that vibration.
 
If you don't have a mill or torch, or skill/confidence to drill the holes and finish the slots I second taking it to a machine shop, that is after all what were here for.
 
Box is 16W 20H and 8D, W - width, H - height, D - depth

The steel is 0.300 thick. I want to cut slots on the sides. The box would have to laid on it's opposite side.
The issue is the 16" height. I am thinking of using these cam locks I made a few years ago.

View attachment 261008

View attachment 261009

Experience says that the top panel of the box will be free enough to cause chatter. I dread the thought of doing these slots by hand.
The drill press I own is really for wood and the slowest speed can burn up a large cobalt drill bit. I have a spare 3 HP VFD and a 1 Hp 3 phase motor
that I can alter the drill press with but I would rather not do that yet. Even if that worked there would be a lot of filing.

Ideal situation is to lower a 1/2" cutter into the sheet and go 3" and turn 90 degrees, keep doing this until start position. Want to do this 4 per side.

Good grief, Ron! This is a case where you actually need to "think INSIDE the box" instead of "outside of the box".

All you need to do is rough-together a wooden buck to go inside the silly box so force is fully countered and your Drill Press won't KNOW it is pushing against a flexible surface, because it will NO LONGER be a flexible surface.

Not a lot of precision required. No need of camlocks or screw-jacks. Packets of ignorant wedges sold for setting pre-hung doors are your friend.

A welcome byproduct is cleaner "breakthrough", each hole or cut. Yah, it kinda mess-up the wood. BFD. Trees grow.

The frame built inside of the box makes it easier to clamp the f****r, too, BTW. Ordinary Cee clamps should reach. One is allowed to have more than one size.

Just hang a bedsheet over yer Engineering Degree and have at it as if you were an Iowa farm boy that quit school at seventh grade while he still knew everything.

:)
 
#2 to what Thermite said.

Did similar years ago by wedging 4 sections of chipboard (ex-kitchen cabinet carcass side) into the box to support each side and another one to hold up the middle of the the side being worked on. I found it needful to clamp the current top side to the box with two large toolmakers clamps as well to stop things vibrating and moving. But the box material was pretty thin. Maybe 10 gauge or so. Was pleased that I didn't have to put external sheets on to sandwich the metal.

Clive
 
pleased that I didn't have to put external sheets on to sandwich the metal.

Put thin plywood or micarta onto even thin Copper, brass - Stainless.. yadda yadda - practically foil - with a skinny coat of ignorant shellac, (Alcohol soluble, especially if heated, for later removal) and one can drill, hole-saw, or fret-saw the most challengingly intricate of shapes. "printed" circuits have also been panto-milled for Donkey's Years for example, long before lasers & such.

This box is simple. It wants just 2 pair of pieces. two lengths, four total - plus a few wedges.

One calculates one "Pi" or double "H" shape where the longer two can be wedged by the shorter two at positions similar to Aery points to support the long-axis. Then the reverse for the short-axis.

The only "farm boy trick" is to keep in mind that neither set having to go 100% into the corners gives you the wiggle-room to make it come good, each length box-axis less twice the thickness of the stock.

Not that you have to be that stingy on the wood. It need not be Lignum Vitae, purchased by the ounce, after all.

:)
 
No one bothered to say if the box is OPEN or not. The corrugated paper board one in the photo is not - after all - the victim

Well.... we already knew it had a detachable cover from Rons other long-running thread about putting a VFD INTO it.

VFD in a enclosure. Other ways than this?

But there you have a more interesting challenge..

Having to hand-solder a VFD from components inside a closed box with tweezers worked through a knockout - as with the classical model sailing ship in a glass bottle - would make it far more worthy of PM's attention...

:)

Notorious cheat that I am, Office Depot contributed a "Neatlife FileBox-Silver" in 14 3/8 in. X 13
1/8 in X 10 5/8 in. There are other sizes. Here's one:

Neat Life Mesh Storage Box Large Black - Office Depot

The closer coupling being permissable given it is made of wire frame and fine expanded steel mesh on five sides, ignorant air where the panel it serves as a cover for goes.

No "too difficult" holes needed - just use the hand-lift crescents already there and a bit of more easily worked flat plate as bracket, strain-relief and cover.
 
Torch it, then clean up with burr, etc., if it doesn't have to be to precise. You don't mention a mill, but I assume your referring to mill table (maybe not) these with concerns of chatter? If thats the case you could use screw jacks with a sheet of wood underneath the cut (1/2" or thicker) to support it and absorb some of that vibration.

I assumed that readers would think I have a mill if the post is in the BP mill section. The table I refer to is a 42" BP table.
 
No one bothered to say if the box is OPEN or not. The corrugated paper board one in the photo is not - after all - the victim

The box is a electrical enclosure with a door. There needs to be square holes cut below the louver plates. Maybe a 2.75" x 2.75" square hole at the top and a 2.75" x 11" square hole at the bottom.

DSC_1015.jpg
 
Is that thickness dim. Correct or off by a decimal point? If thin I would consider using a cutting disc or jigsaw against a guide then cleanup the edges.

On edit: after further reading I see SAF already suggested such in a previous thread.
 
Is that thickness dim. Correct or off by a decimal point? If thin I would consider using a cutting disc or jigsaw against a guide then cleanup the edges.

On edit: after further reading I see SAF already suggested such in a previous thread.

My mistake. The thickness is 0.075.

In the old days I would drill a hole in each corner and make saw cuts from hole to hole, trying to follow a straight line from the outside edges of each circle. :ack2:
 
My mistake. The thickness is 0.075.

In the old days I would drill a hole in each corner and make saw cuts from hole to hole, trying to follow a straight line from the outside edges of each circle. :ack2:

Some of us cheat and just used round holes. Easer to make, done in one go w/o further hand labor.

Add stock screened, louvered, even filtered snap-in vent plugs - as many holes and plugs as yah need, and done-done, all while still under NEMA's broad umbrella.

https://www.heyco.com/Brochures/Hole_Plugs_broch.pdf
 
The BP table idea isn't going to work without a riser. Need another couple of inches.

Nah.. Not funny enough.

You want to prove stubborn enough keep THIS crowd amused?

You should acquire a right-angle head for your BirdPort Box Butcher.

Or get REALLY creative. A dividing head!

Just "divide" the large box into four smaller boxes and each one will fit under the tool with no need of a riser, yah?

TiG weld them back together after you have made the holes, and move-on to use of the surface grinder to make the seams vanish, Bondo won't do. Has to be seamless metal or the plating won't adhere when you set up to hard-chrome it.

After all, you have waaay too much effort into this project to slack-off, cheap-out, and just powder coat it.
 
I have found that the quickest and easiest way to what you want is a hand held grinder with a cutoff disk. Just wear ear plugs.

Tom

I resisted the grinder idea because of the noise and dust. But I broke down and went to the supply house and bought a couple of metal cutoff wheels. The operation is done and the box is in the recovery room. The next operation is hand filing the edges straight and rounding the inside corners. Thanks.


Back
Top