What's new
What's new

Recommended Tools for Bridgeport Part 2

AdamC

Cast Iron
Joined
Jun 16, 2011
Location
SE PA
I wanted to post what I learned from this thread and my experience with my mill.

As we always say here, the cost of the machinery is often not the majority of the cost of setting up a machine shop. Our common “required tools" lists typically include the stuff an apprentice would bring to work. The list below attempts to identify all the tools one would need for a new milling machine. It includes tools the apprentice would expect to find on his first day. Viewed as a whole, this could easily be $10,000 of tools.

My advice is to start with the inspection tools and buy second hand. Inspect what you buy, new and old. Inspection should not be an after thought. Its an important skill. If you leave yourself enough time, you can often find what you need locally for pennies on the dollar.

I've tried to divide the tools into categories that I hope will be helpful. I'm looking forward to your comments, especially anything you think I missed.

Inspection tools:

  • Surface plate- buy the biggest you can afford or move. Big plates are sometimes surprisingly cheap second hand, maybe because amateurs don't want to move them and pros want recent calibrations. A 18X24 is about 150lbs and can be moved by 2 working men. The next size up, 24X36 is over 3X heavier.
  • Master square – could be a cylinder square, Starrett #20, granite square, angle plate or just a trustworthy 123 block.
218236d1516368123-how-measure-scraped-surfaces-012.jpg
(I'm using an old Starrett #57 gage to hold a pretty modern digital indicator to measure the depth of flaking on a BP column. Surface gages are useful tools for a wide array of applications.)

  • Surface gage (or height gage) for marking and to mount a Dial Test Indicator (DTI) on to check parallelism against the surface block.
  • Matched Vee blocks - for round pieces
  • Thick parallels to elevate parts above the surface plate. Matched 123 blocks can be used. Real inspectors often use cylindrical gage blocks that they almost always call “jo blocks”. (Jo refers to Johansson, a brand of gage blocks). These are also often used in conjunction with a sine plate.
20976d1268283864-interapid-0001-0-4-0-test-indicator-img_5163.jpg
(Pros on PM generally prefer Interapid DTIs with their unique slanted faces and integrated stems.)
54-562-777_1024x1024@2x.jpg
​(I have one of these, which technically could serve as both a tenths (.0001") and a thousandths (.001") reading indicator, eliminating a set up change between rough tramming and final tramming. One thoughtful feature is that when you touch it to zero, the device delays the actual reset to allow you to get your hand away. As cool as this tool is, I don't find I use it that much.)
big_FA1500_prd_img.jpg
(The Noga fine adjustment head's dovetail holder (right hand side) doesn't fit Chinese indicators I've seen. More, the clamp holes are 3/8", 8mm, and 6mm. Chinese indicators frustratingly ship with 10mm and 4mm stems. So just be aware when choosing an indicator that it will work with all of your other tools. Interapid also uses a 4mm stem, but at least its dovetails are standard.)

  • Dial Test Indicators (DTI) 0-30-0 X.001” and 0-5-0X.0001” or metric equivs. Buy Japanese, US or Swiss to ensure compatibility with most indicator attachments (like Noga).
  • Micrometer(s)- lots of advice on PM
  • Caliper -lots of advice on PM
  • Gage Block Set- doesn't need to be highest grade, may not even need complete set
  • Machinist’s level – can be used to detect twist in a part, not just for leveling machines
  • T-slot, Hole gages, Radius gages, Feeler and Thread gages
 
Last edited:
Tool holding:

115237d1408670363-how-mount-r8-collet-rack-bridgeport-mill-bprack-001.jpg
​(Typical array of BP collets and other mill specific tooling. This holder is designed to mount to the side of the BP column, but is here cleverly attached to a metal cart.)

  • R8 Collets – esp 3/8”, ½”, 5/8” ¾”. Collets are not expensive and you don’t need a large set. Buy only the finest quality collets with low T.I.R. (total indicated runout – basically a measure of how concentric the ID and OD are with each other.) I also have a 5/16” (8mm) for my Noga spindle arm.)
  • Drill Chuck with R8 arbor – lots of advice about these on PM. I prefer a R8 arbor rather than a 1/2” shank and a tool holder to save work space.
85527d1378585561-looking-flycutter-dscn0094.jpg
(Fly Cutters are simple tools that do a great job. This beautiful example was made by PM member Rustytool. Nice Job Rusty!)


  • Fly Cutter Arbor- I use my fly cutter frequently and can produce a very fine surface with it in many different materials.
  • Boring Bar Head – US made Criterion are twice as sensitive as the Chinese copies, but also twice the money.
  • Slitting Saw Arbor? Maybe unique to my work. Use it all the time.
  • Optional: Toolholders – I have several with different end mills in them for convenience. Not always easy to store. Sharp end mills are deadly.
  • Optional: Shell/face mill- these are expensive, I don‘t have one. I use a roughing mill and follow up with a fly cutter. A face mill could probably do this with a single set up.

U]Work Holding:[/U]
  • Machinist’s vise- This is probably the most used and useful work holding device for a mill.
  • Clamping kit- for a Bridgeport you typically want 5/8” tee nuts with ½-13 threads. I prefer US kits. Note that the tee nuts are NOT threaded through. This is to prevent you from jacking the tee nuts up from the bottom of the slots and damaging your table as a result. The screws must bottom out in the tee-nuts (hand tight is good enough). Be aware when you are torquing the top nut that your aren't threading the shank through the Tee nut!
413zU8fsdaL.jpg
(Edge clamps like these Mitee Bites are cleverly simple tools that work great.)


  • Edge clamps (mitee bites)
  • Angle plate
  • Sine plate
  • Parallels- I think it’s a good idea to measure the depth of your vise jaws and have parallels 1/16”, 1/8”, ¼, ½” shorter than the vise. I find the short parallels less useful.
  • Machinist’s jack/adjustable parallels- useful for supporting long stock.
  • 123, 246 blocks- matched pairs are useful (more so for inspection) Individuals can be bolted together or to the table. The Chinese copies typically aren’t made right (unthreaded holes are not clearance holes) and you can’t trust that they will be square, matched. Absolutely essential to inspect them. Look for Moore or Suburban blocks instead. These are really useful tools.
  • Machinist’s clamps- I find these cheap second hand. You can also make them.


big_NF1015_prd_imgSecond.jpg
(Noga NF1015 centering arm is mounted in a 5/16" collet)

6601507987_bf254d1cf4_z.jpg
(One advantage of an Indicol style mount is that you can leave the cutter in place. The tool clamps around the quill shaft.)


  • Noga Spindle Arm/Indicol - tools used to hold (typically) dial test indicators to "tram" or make perpendicular, the mill's head to the table. See the DTIs recommended above.
  • Noga Arm with Mag base - To set the vise parallel to the x axis, I think its better to have a Noga arm with a fixable mag base. I use the same 2 DTIs for that.
  • Edge Finder / Wiggler set for locating the workpiece relative to the table cranks/DRO
  • Soft faced Hammer(s)
 
Last edited:
U]Layout tools:[/U] There are a couple different ways to use a manual mill. You can use the dials/DRO to make accurate moves that reflect the engineering drawing, or you can layout the drawing on the workpiece and work to the lines visually, or you can do both. I do both. At a minimum you’ll need:
  • Dykem, Sharpies, and alcohol wipes to remove dye
  • Scribe(s) – carbide is not always best because its hard to sharpen. Some folks shape the points into tiny blades making HSS more desirable.
  • Center punches locate hole centers and give drill bits a place to start.
  • Prick punches - pointy so they can be used to find scribed lines by feel. I don't think you need a whole set. And you can grind a center punch for this purpose.
Layout_tools_sm.jpg
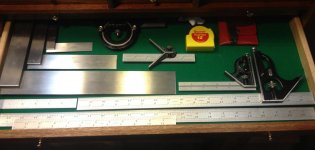
(There are a myriad of helpful layout tools, many very inexpensive second hand. I like to have a few different sizes of double squares for quick jobs on the mill and off. I feel like the days of hand layouts are coming to an end with so much CNC use.)

combo_sm.jpg
(Starrett's venerable combination square set is still a must have tool. A variety of different length blades fit the heads for convenience. A tiny diemaker's square set (with the additional blades) is upper right. At left are Starrett #20 master squares. Starrett now makes similar looking and named squares in China for their global customers to a much lower spec. Know what #20 squares your are getting. Here's a hint: if you think the price is reasonable, you are getting the Chinese squares. The US made squares are true masters: good to .0001"/6" and are therefore thumping expensive.)


  • Combination square - Starrett invented this tool and probably makes the best quality. Starrett also uses the thickest blades (slotted rules) meaning a Starrett combo can use cheaper PEC or Mitutoyo blades/rules/scales, but the other manufacturers' can't use Starrett rules.
  • Bevel
dividers_sm.jpg
(My dividers, share a drawer with inside and outside calipers, tee-slot and hole gages, feelers and mic standards.)

  • Dividers
  • 6” rule (called a “scale” by all machinists I know)
  • Tape measure

Mill Maintenance tools:
  • Allen keys
  • ¾” combination wrench
  • Oil
  • Abrasive hone(s) for deburring cast iron surfaces
  • Acid brush for applying oil to tools/work pieces
  • Soft bristle brush for removing chips
  • T-slot cleaner
 
Cutting Tools you will need right away:
  • End mills - 2 flute X 40deg for aluminum, 4 flute X 30degree for steel. Start with inexpensive HSS, then switch for M42 cobalt and solid carbide. You'll want a couple sizes of each and I like the roughing versions for their chip breaking. I don’t need drawers full of dull end mills so don’t buy these second hand in bulk. A few “silver bullet” mills will win the day.
  • Drill bit set – I would spring for US made M42 Cobalt bits.
  • Tap and Drill set- this can be a convenient and inexpensive way to get a lot of capability.
6332451-23.jpg
(These are center drills which I believe are used specifically to create a feature for a lathe center. They are sometimes called "center and countersinking drills", but these aren't the right angle for a normal screw head. I really don't think these are interchangeable with spotting drills or proper countersinks. More info about this contentious issue here on PM)


7133224-24.jpg
(Spotting Drill, used to help locate a normal 135 or 118 degree drill.)

  • Spotting drill(s) (i.e. not a center drill)
  • Left handed lathe tools for fly cutter
0254540B-11.jpg
(Countersinks are essential mill tools. I like these 0 flute designs. You can sharpen them easily if they get a little ragged. Just know that c'sink screw heads come in different angles. Get the angle wrong and you can bust the head off the screw tightening it.)


  • 0 flute Weldon Counter Sink set, 82 degrees for std US spec hardware
  • Counter bore set for ¼” -3/8” cap head screws at least
  • Deburring tool

514bKFtN2ZL._SX347_BO1,204,203,200_.jpg
(I didn't list it as a tool, but maybe I should have. "Machinery's Handbook" is an absolutely essential Bridgeport Tool. Although it has about 10 million pages, it has an awesome index and you can usually find exactly what you are looking for in no time at all. Don't rule out buying one second hand. The older editions are not obsolete.)


Back
Top