What's new
What's new

Anyone fitted a True Trace copy attachment to a Hardinge HLVH?

jeffers

Cast Iron
Joined
Aug 24, 2007
Location
Rhode Island
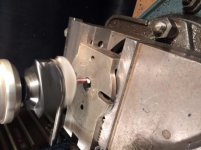
Picked up a Trie trace hydraulic copy attachment over the weekend, looks as if it is in good condition. Model 0A
It has the Generic two bolt down arrangement.
Has anyone fitted one to a Hardinge HLVH?
I see two options for the tool post holder - front or rear mount. Front will need the hole underneath noted out and a hole made for the eccentric lock down bolt. Rear mount would just need two holes drilled and tapped - I don’t like drilling holes in vintage lathes!
I will need to modify the template bracket from v ways to the dovetail bed for the front mount, I could maybe use the taper attachment slot for rear mount.
If on the front I would need to demount all the time, rear I could leave it in place like Keith Fenner does, but I guess it would need to be protected from chips.
Looking forward to using it and seeing what it is capable of.
It would be good to know what someone else has done.
I have the full manual if any one needs a copy. IMG_3329.JPG
Also got a great deal on a surface grinder in great condition, but they are heavy for their size, had break it down to handle !IMG_3325.JPGIMG_3328.JPG


Sent from my iPhone using Tapatalk
 
Did you see working? If you didn't see working, check it out before doing any more work. They are notorious for the stylus to quit and extremely expensive to repair.
JR

Yes it is running and trimming in and out, looks in very good conditionIMG_3332.JPG
Hardinge boss is 3/4” TT is smaller, I also need to replace the pilot ring on the compound, anyone made one of these? Hardinge want $94 for it


Sent from my iPhone using Tapatalk
 
Ok, so I decided to bite the bullet and make some progress fitting the attachment.
I decided to drill and bore out the cross slide boss hole.
I first stoned the casting to remove burs and dings with some precision ground flat stones I was lucky enough to find from a retired machinist selling his tooling for a great price.
I set the casting on some parallels to pick up on the slideways.
 

Attachments

  • IMG_3443-1.jpg
    IMG_3443-1.jpg
    39 KB · Views: 77
  • IMG_3444.jpg
    IMG_3444.jpg
    40.3 KB · Views: 71
  • IMG_3446.jpg
    IMG_3446.jpg
    37.6 KB · Views: 81
  • IMG_3445.jpg
    IMG_3445.jpg
    36.3 KB · Views: 79
The hardinge boss has a woodruff key fitted, one option was to take it out but I thought there then was a risk of the eccentric bolt becoming miss aligned.
I decided to jig up a key way broach from a Craftsman hole cutter shank and grinding a piece of 1/8" hss blank.
I advanced .001 each cut after aligning with the centre of the hole. The keyway had to be .75" deep. I started out deeper as I could not figure out how to cut a groove at the bottom of the hole with my mill and I did not want to take it out of the vise and chuck it on the lathe. I "used up" 0.02" by the time the slot was cut but I started over depth to compensate.
It worked easier than I expected.
 

Attachments

  • IMG_3447.jpg
    IMG_3447.jpg
    39.5 KB · Views: 75
  • IMG_3448.JPG
    IMG_3448.JPG
    93.5 KB · Views: 60
The slide fitted great!
I have not decided to machine for a centering ring yet, I will wait to see if it is necessary, I made the fit snugger than the hardinge compound slide and it seems firm. I will probably only use the tracer for lighter cuts on this lathe.
It is easy to take on and off with just the eccentric bolt to remove.
not sure why all my pictures display 90 degrees counter clockwise, they display upright on my computer.
 

Attachments

  • IMG_3450.jpg
    IMG_3450.jpg
    41.3 KB · Views: 62
  • IMG_3449.jpg
    IMG_3449.jpg
    42.1 KB · Views: 75
Next step which I was a bit nervous about was to drill and ream for the eccentric bolt, I decided to stray from the hardinge location on the side of the slide because on the tracer attachment slide there are two cutouts for the two t nut bolts that mount it to a conventional cross slide. The front location however beached two dowel pin holes so I was concerned about drill/reamer breakage.
I marked everything carefully on my surface plate and indicated the slide vertical.
I then checked the center and offset positions with an edge finder and the dro.
 

Attachments

  • IMG_3453.jpg
    IMG_3453.jpg
    16.8 KB · Views: 62
  • IMG_3452.jpg
    IMG_3452.jpg
    42.4 KB · Views: 57
I drilled a centre hole and followed it with the first smaller diameter to full depth, reamed to size for the small end of the eccentric drill and then opened the first part up to the larger diameter and reamed that.
The slide casting cut like butter, a testament to the quality of manufacture then, that's why I have a weakness for tools that match my age!
I finished up with an end mill to produce a counter bore for the head of the eccentric.
I will need to make another bolt slightly longer, this one works for now but it will need to be a bit longer because of the front entry.
 

Attachments

  • IMG_3454.JPG
    IMG_3454.JPG
    93 KB · Views: 55
  • IMG_3455.jpg
    IMG_3455.jpg
    35.9 KB · Views: 65
All fitted up and it seems secure!

Next job is to make a bed fitting for the template holder as the one I have is for a V way.
I have ordered a chunk of 6061 from onlinemetals.com to make one for the dovetail bed.
I clamped the template holder to the indicator clamp I have for a test run and everything works smoothly and correctly.
I took some manual cuts in brass round to see how rigid the tool post is and it seemed to be fine.
Now the wait for the 6061 to arrive!
I guess I have some time to ponder what to template for the first trial in the meantime.
 

Attachments

  • IMG_3460.jpg
    IMG_3460.jpg
    53.3 KB · Views: 81
  • IMG_3459.jpg
    IMG_3459.jpg
    43.3 KB · Views: 91
  • IMG_3458.jpg
    IMG_3458.jpg
    53.6 KB · Views: 88
  • IMG_3457.jpg
    IMG_3457.jpg
    46.7 KB · Views: 92
  • IMG_3456.jpg
    IMG_3456.jpg
    41.9 KB · Views: 136
The copy attachment is working out well, here are some items made, very pleased I took the gamble on it:
525b3c7591e245ebc5ebf09376bfe080.jpg
7bc11d0a647a937ccf04f1ce81d5570a.jpg
3b8838bfbd6cbc5ff48ecb966b7f630a.jpg
eda0f3b377dd58801ff70fa9f9ef09a3.jpg
3815d8c8c1b7095e6a77958e3802d12e.jpg


Sent from my iPhone using Tapatalk
 
DSC01007.jpgDSC02216.jpgDSC02198.jpgDSC02219.jpg

I have the same exact tracer attachment. I bought it from a widow whose husband bought it new for a project, and died without using it. I paid $900 for it about 25 years ago. I have it mounted on a South Bend 16 inch lathe. It came with a complete template mounting system that clamps to the V ways of the lathe. I used it to machine about 300 stairway spindles and newell posts for my lake home. Have had no problems with it other than having to replace leaking hydraulic hoses.
 
View attachment 254177View attachment 254188View attachment 254189View attachment 254190

I have the same exact tracer attachment. I bought it from a widow whose husband bought it new for a project, and died without using it. I paid $900 for it about 25 years ago. I have it mounted on a South Bend 16 inch lathe. It came with a complete template mounting system that clamps to the V ways of the lathe. I used it to machine about 300 stairway spindles and newell posts for my lake home. Have had no problems with it other than having to replace leaking hydraulic hoses.

I bought it with a v way attachment and this fits my Precision Mathews lathe nicely also, I picked mine up a year ago or so for $300 but value it much higher, the copy attachments for HLVH's start at a $1500 and up second hand on ebay and are beyond what I can justify. This does a much better job and I think is easier to use. I guess cnc has hit this sector of attachment but for the home shop machinist they are great.


Back
Top