What's new
What's new

Anodizing color consistency question

Matt@RFR

Titanium
Joined
May 26, 2004
Location
Paradise, Ca
Do you guys fight color consistency from your anodizer? Or do all your parts come back the same exact color no matter what?

Our anodizer has been great over the years, mostly doing black type II and clear alodine for us, but now that we are getting in to multiple colors and especially products that have multiple parts of the same color bolted together, I want to make sure we're doing everything we can to have consistent results.

All parts in this discussion are 6061, and all parts are made in batches consisting of the same mill, either Kaiser or Service Center. All parts are washed in 5% simple green / RO water, then rinsed in straight RO water, dried and placed in custom foam inserts for the ride to/from the plater. The plating itself is very good quality (no scratches, bubbles, finger prints, etc.), it's just the color I'm wanting to tighten up.

In other words, how the hell do you put a tolerance on a color? I've started a conversation with our plater but wanted to see what you guys do (or what you expect) as well.

20201023_102646.jpg

20201023_123640.jpg
 
would they take a sample pc and hold that as the tolerance?
you could request part b,c,and N (the assembly) are dunked together to stay consistent.
I've never fussed wit it as I anodize my own small batch's. you def. need to be consistent with each step or you get variations.
more or less oxide growth allows more die, different die concentrations or dunk times, poor rinse, color bleed during sealing. lots of places to make mistakes. though you would hope a "professional" shop would have it dialed
 
We struggle with it all the time. We have tried seemingly every anodizer in our area. We give them a sample of the color we want with every batch. Sometimes they get it right, sometimes they don't. It's so hard to get consistent results. Like Stirling said, there are a lot of variables. Any corners cut can give very different results- parts left in too long, taken out too soon, tanks not cleaned often enough, chemicals not checked enough, etc. I wish I had a solution for you. We just live kind of live with it.
 
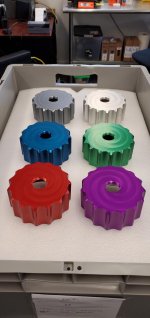
Thanks guys. We have packaged the entire order now, and all other colors (red, green, purple, grey and clear) were very consistent. We have always had excellent results from this shop in other colors and processes.

The owner of the place is not happy with the mismatch and thinks they may have had a grounding issue with the light blue parts. He offered to re-plate for free, but the change in finish after a heavy etch will scrap the parts anyway. He also said they struggle with blue more than any other color for consistency, and he's not lied to me in 10 years so I don't see why he'd start now.

Looks like we'll have to deal with it.
 
the 2 blue ones look like different dies or different materials, if the anodizer swears it is the same dye, I'd guess that one of those parts isn't 6061, if you anodize 6000 together with either 2000 or 7000 parts on the same rack, you can get differences like these, 7000 oxide comes out porous due to zinc dissolution, which makes it absorb much more dye, 2000 is similar in that respect, with addition that it carries more current so the oxide may come out thicker, which again will make light dies look darker shade than 6000 part on the same rack

I have 2 different blue dies that each look very similar to the ones you have there in that photo
 
just zoomed in in that photo and it seems that the machined thread in the center and corners look much more like the other part, did you do something special to the lighter parts face that didn't dye properly? sanding, polishing? was the stock round or plate? in case of plate, could it be that the lighter part had less material taken off of that face compared to the darker one?
 
the 2 blue ones look like different dies or different materials, if the anodizer swears it is the same dye, I'd guess that one of those parts isn't 6061
The answer to all of your questions is "no". We cut the blanks out of several bars of Kaiser round bar, all 6061, all machined in the same batch on the same machine with the same..... well, everything. The anodizer only has one tank of each color, so it's not like they ran the parts on two different lines or anything.

Following. I can't even get consistent black color from any of the anodizers I've used.
That sucks. These guys have done an excellent job for us for years. I know I'm lucky, and I make sure they know I appreciate the work they do.
 
Some colors are more difficult than others. Red often ends up maroon, IME.

We provide a physical sample that goes out with each batch. It helps, but there's always some variation.

We'll probably bring the process in house eventually but not anytime soon.
 
Matt,
if it is the same bar they were cut out of and were on the same rack, then the difference is in thickness, the lighter part will have less oxide thickness, darker one - more, and it might be due to poor contact for the lighter part, I looked again at that photo and it seems they were racked where the red arrows point - on a threaded hole, it is always risky due to anodic layer growing perpendicularly into the material, so a 60 degree wedge shape, if the rack is touching it on the peak, will eventually have oxide grow below it and the part will lose electrical contact which will stop the oxide growth (and the thickness there was will reduce slightly due to sulfuric acid eating it away).
rack-marks.jpg

Electrolite in the bath is agitated with air or other means of mixing it to make sure the heat generated by the current flowing through the part is carried away and extracted via chiller, if not done properly, and the tank is deep enough, you may get that the top of the rack is anodizing in a warmer electrolite than the bottom of the rack - this again will affect the density of the oxide and consequently the dye absorbtion (and leakage during sealing), other issue with agitation is that poorly racked (not securely held) parts (especially if they are larger) may loose contact to the rack due to the part being moved around with the agitated electrolite, this might be your case if they racked those parts only on that short/small thread there.

there are really too many factors that can have big effect on how the dyed work comes out at the end, and without knowing more about the process there would be too much speculation to figure out what went wrong exactly

Here is a picture showing what I'm seeing lately - the undyed parts are supposedly all from the same batch of 6082, notice the yellowish hue to the few parts on the left, and there was no loss of contact or anything like that - it is clearly different material stock (if it even is indeed 6082), and this showed only coming out of the anodizing bath because I went for max thickness (28-30 micron in my case) for best durability, and all of them dyed charcoal black without any difference at all, but if it was some light dye - there might have been differences, not as great as with the 2 blue parts, but still.
6082-yellow.jpg

Orange Vise, good luck with bringing the process in house and have it run reliably... unless you get someone with a LOT of experience, you'll run into the same problems sooner or later, anodizing is a very simple thing on paper, making 10 or even 50 parts look the same is quite trivial, making 500 with less that couple percent failure rate and then making another 500 look the same few months later - much more complicated, even if you control all the regular variables in your anodizing line, you'll still be subject to differences in the material batch that you just recently bought, and there can be quite significant effects even from getting material that is within specification of the alloy, but the alloying elements just happened to be in the minimum range for one batch and maximum for the other - and you'll get those gray and yellow parts I showed previously - there are ways of dealing with this though - that is where the experience will come in

edit:
here is another one defect that everyone will try to attribute to anodizing - it is sometimes called "bar end defect", when extruder doesn't cut out the start/trail end of a billed being extruded and just sells you all of it as the same material:
bar-end-defect.jpg

the red arrow points to hint - the "spot" in the center of the part, you can follow this "spot" through the part - this part happened to be hollow from the bottom and one could clearly see how this "spot" grows into the "ring" visible on the part at the top of the picture, I could actually line them up in the order they were cut from the bar... and this section of the extruded bar also anodizes to a visibly darker shade of gray - that difference between the 2 parts at the bottom is not an "illusion" - the left one is quite a bit more grayer that the right (the photo actually didn't show it as well as if you held them in hand next to each other)
 
Last edited:
......even if you control all the regular variables in your anodizing line, you'll still be subject to differences in the material batch that you just recently bought, and there can be quite significant effects even from getting material that is within specification of the alloy, but the alloying elements just happened to be in the minimum range for one batch and maximum for the other - and you'll get those gray and yellow parts I showed previously - there are ways of dealing with this though - that is where the experience will come in........

Here is a good example of how material difference will eff up the color results. In this image....

downpedal2_anodized.jpg

Notice the leftmost part of the assembly is kind of pinkish relative to the other parts. Originally all the parts were cut from a single piece of 6061-T651 plate. I scrapped the leftmost piece with a setup error and had to order another piece of plate from the same supplier. I hoped it would come from the same plate that the original piece came from, but obviously it did not. The anodize shop racked all the parts on a common rack so they would be processed identically. Ultimately the customer had the parts stripped and re-done in black. Then they all came out uniform.
 
I had a job where the customer wanted to color match anodized parts to a powder coated assembly. It took some trial and error.

I worked with Pioneer on that job because they had the grey dye I needed. (They do the anodizing for Leupold)

We did a series of tests with different soak times, and documented each sample. When we got the shade we were after, we made that the standard. They created a process sheet that they could follow from batch to batch.

It worked pretty well, but the dyes do change over time and you have to adjust the times to compensate. And you have to look at it in natural light- what you see under florescents is a different color than what you see outside.

Is Pioneer a good shop to work with? I have been using Apex in portland and lets just say I am not as happy as i was a few years back ,,, half the time there type II red is brown and there black is dark gray .
 
For those of you that had to strip and re-anodize, did you find that the dimensions changed a lot? We've had parts that were redone get eaten away pretty dramatically and was wondering if this was typical.
 
There are special stripping baths that will dissolve just the oxide and will not touch the bare aluminum, shops that use aluminum racks may have these, but most likely a regular caustic soda (usually with additives) will used, and it will dissolve the oxide and continue dissolving the base material for the time you leave it in.

So minimum - you lose the oxide thickness, maximum - you have no part left

And remember that oxide grows (under ideal conditions) 50% into the part and 50% of it will add to the dimensions, so if it was anodized to 20 micron thickness, the part will grow 10 micron on all surfaces, if you strip this coating, it will be 10 micron under, if you again anodize it to 20 micron thickness, you're back to your original - machines dimensions. In real world it doesn't quite work like that, depending on the conditions the growth will not be 50% but less, and when you strip the part, you want to make sure all oxide is gone before reanodizing, which means you'll slightly over etch the part, so in reality - the after the 2nd time it will get anodized, it will be slightly under the original as machined size, and with noticeable matte texture to it, and grain direction may also be more visible.
 
Is Pioneer a good shop to work with? I have been using Apex in portland and lets just say I am not as happy as i was a few years back ,,, half the time there type II red is brown and there black is dark gray .

I've not had any luck with Apex. Major issues in multiple jobs... only used them because they were NADCAP but not again...
 
Is Pioneer a good shop to work with? I have been using Apex in portland and lets just say I am not as happy as i was a few years back ,,, half the time there type II red is brown and there black is dark gray .
I send my clear and black to Electro-Chem. That job was the only time I used Pioneer, they are a little farther away.

They were really good. Leupold is fussy, that helps. I went down there 2 or 3 times getting it dialed in, and I only ran the job a couple times afterwards, so I don't have a whole bunch of experience with them.

It was really more about finding someone with the exact dye I was looking for, I think it was Grey HLN.

You might call Electro-Chem and ask if they do red. In 15 years, I've only had one issue, there was a problem with not enough clearance when they racked the parts. It was a tiny spot on a part that was hidden anyway, and I had 3 or 4 parts that I had to touch up with a sharpie. ;)
 
For those asking about stripping and re anodizing, my experience is parts will come back .0004" or so smaller, and much less shiny.

Re-plate on left

20200625_162538.jpg
 
Absolutely excellent answers jz79!
Save me a lot of typing!!!

Ive only got a basic 5 gallon pails setup. But it works.
Biggest challange I had was racking.
Played with hanging in a wire and such. Works. Bit such bs. Bump it wrong and loose contact your totally f'd. Then there is no depth to get the dye into and it's super light.

Found a guy (no affiliation, just a very happy customer) that makes titanium racking systems for 5 gallon pails at good price and have not f'd any up anymore.
Racking is a big challange with high parts mix
I use caswell chemicals and Anodizing supply Canada's racks.
Shop - Anodizing Supply Canada

He sells a few different styles. I like using the 4 leg bottom stand vs hanging them on the pail.

I think in total I spend under $2000cad for everything in my small system, can make a part and anodize the same day. Handy, but for volume I would farm it out or upgrade the system for sure.

I've been meaning to do a YouTube vid to help others. Most of the vids suck online


Back
Top