How to install the app on iOS
Follow along with the video below to see how to install our site as a web app on your home screen.
Note: This feature may not be available in some browsers.
Largest Manufacturing Technology Community on the Web
Stay Connected:
You are using an out of date browser. It may not display this or other websites correctly.
You should upgrade or use an alternative browser.
You should upgrade or use an alternative browser.
manaul lathe jaw spacers...
- Thread starter cimber
- Start date
- Replies 24
- Views 4,471
moonlight machine
Diamond
- Joined
- Nov 19, 2007
- Location
- marysville ohio
At work today I borrowed a guys spacers for a manual lathe. They were .375x.5x 2.0" long. They had a hole thru the 3 piece set with wire to keep it attached to the jaws. Anyone know where I can find these. Or did he make these himself?
thanks!
Spacers for what? Boring soft jaws? Or what?
I don't use them, but if you want something that is all around, figuratively and literally a good tool..
follow the link;http://www.usshoptools.com/prod_page_level_3_pdf.asp?mm_level_3_code= 101010_1
R
follow the link;http://www.usshoptools.com/prod_page_level_3_pdf.asp?mm_level_3_code= 101010_1
R
deadlykitten
Banned
- Joined
- Aug 5, 2016
hy ") this type of spacers + chuck wear may lead to a situation where only 2 jaws are in contact
this type of spacers + chuck wear may lead to a situation where only 2 jaws are in contact
even if the chuck is new, force distribution among the jaws is not equal
however, this is the way that had been used, and generally may deliver good precision for the required purpose
also you can craft such parts ... arround here we call them "cats"
such things are generic, and they may not allow you to machine the jaws in some position ... at this point, you may need to craft your own
now is ok to have a friend near you with cnc capabilities ... craft a few sets, with scale increments : 100 , 120 , 140 %
if you care about jaws tilting and repetability, than you may consider to avoid boring rings for finishing operations kindly !
this type of spacers + chuck wear may lead to a situation where only 2 jaws are in contacteven if the chuck is new, force distribution among the jaws is not equal
however, this is the way that had been used, and generally may deliver good precision for the required purpose
also you can craft such parts ... arround here we call them "cats"
such things are generic, and they may not allow you to machine the jaws in some position ... at this point, you may need to craft your own
now is ok to have a friend near you with cnc capabilities ... craft a few sets, with scale increments : 100 , 120 , 140 %
if you care about jaws tilting and repetability, than you may consider to avoid boring rings for finishing operations
kindly !
Last edited:
Booze Daily
Titanium
- Joined
- Sep 18, 2015
- Location
- Ohio
I've always called them "spiders" too.
I made mine out of a hex nut with 3 tapped holes. Every other flat on the OD.
Three cap screws in the tapped holes. Adjust to whatever size you need.
Doesn't work very well on CNC hydraulic chucks though.
I made mine out of a hex nut with 3 tapped holes. Every other flat on the OD.
Three cap screws in the tapped holes. Adjust to whatever size you need.
Doesn't work very well on CNC hydraulic chucks though.

michiganbuck
Diamond
- Joined
- Jun 28, 2012
- Location
- Mt Clemens, Michigan 48035
I've always called them "spiders" too.
I made mine out of a hex nut with 3 tapped holes. Every other flat on the OD.
Three cap screws in the tapped holes. Adjust to whatever size you need.
Doesn't work very well on CNC hydraulic chucks though.
Hex nut with tapped holes also makes a very nice driving dog for for turning or grinding small parts.
Same (hex nut driver) can be used may be used to rubber band hold a part to head stock end center, with having a drive dog at the head end (perhaps off a face plate or off chuck jaws), a few rubber bands to the hex out on the part perhaps off the chuck or face plart,,, and the out end held in a steady.
Nice stuff at US tools.., thank Rob(post #6).
But has the Op's Jaw Spacer been found...They were .375x.5x 2.0" long? Climber come back and tell if item was found...(Perhaps add Di. any time describing diameter any time a something is round may help.)....many would think .375x.5x 2.0" long was like a set of three flat bars IMHO.
Zahnrad Kopf
Diamond
- Joined
- Apr 5, 2010
- Location
- Tropic of Milwaukee
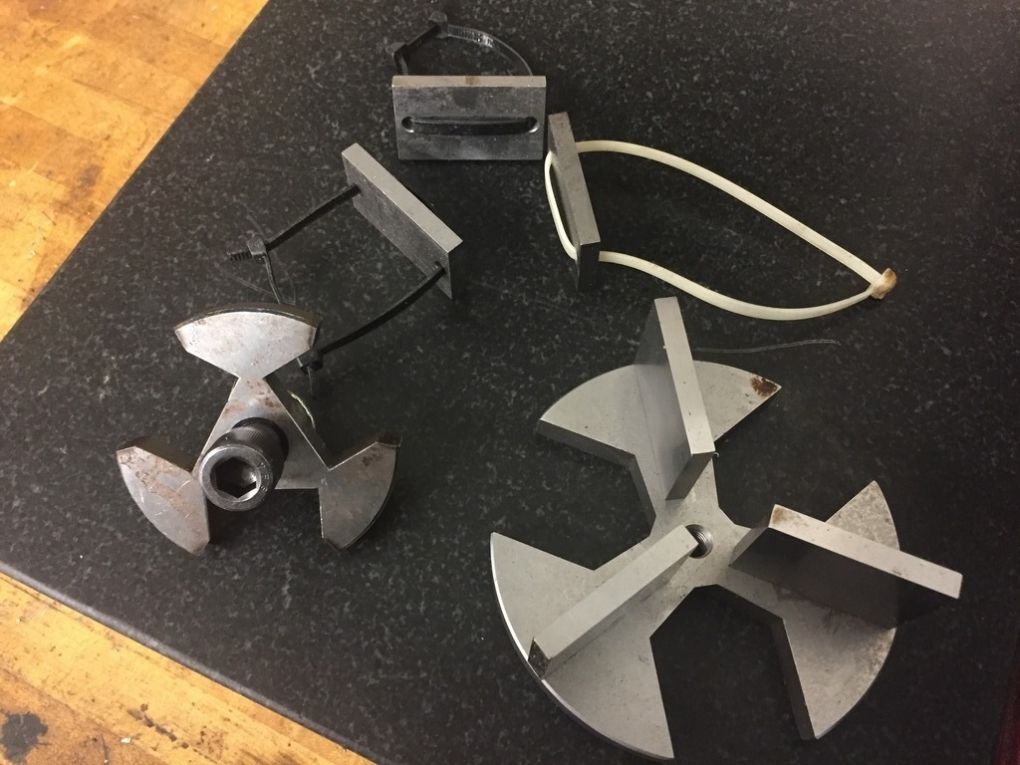
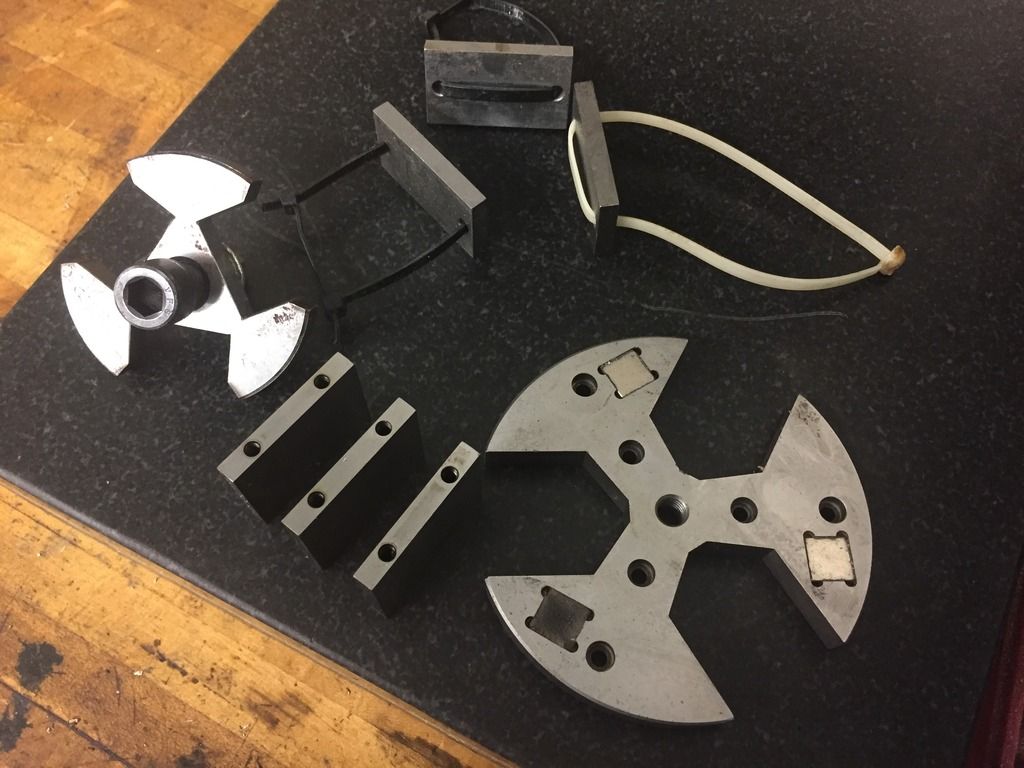
No wire, but I immediately thought of these doohickeys that I made years ago.
Magnets mounted in the back face hold them in place.


Magnets mounted in the back face hold them in place.
deadlykitten
Banned
- Joined
- Aug 5, 2016
No wire, but ...
hy Zahnrad Kopf
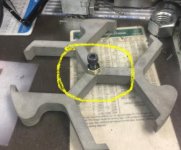
what is the purpose of your part outside the yellow circle ?there are 6 segments outside of the circle :
... 3 of them have magnets ?
... and the other 3 ? kindy !
Attachments
Captdave
Titanium
- Joined
- Sep 24, 2006
- Location
- Atlanta, GA
The bolt and lock nut makes the Z length adjustable.
Kyle Smith
Stainless
- Joined
- Apr 25, 2008
- Location
- Helmer, Indiana, USA
I made a similar contraption to Zahnrad. I think I saw a commercial one for sale and said, "Wait, I can make something that will cost me twice as much in time and effort". I took it a step further and made it more complicated by adding the ability to bolt parallels of various heights to it. My motto is; Anything worth doing, is worth overdoing. After all that work the original blocks with the zip ties worked just as well, but I was too classy for zip ties.


deadlykitten
Banned
- Joined
- Aug 5, 2016
The bolt and lock nut makes the Z length adjustable.
hoil sir captain
maybe i am wrong, but if you replied at my question, i must say that the bolt + nut are inside the yellow circlei dont understand the purpose of those arms that are outside the yellow circle ... also why are not simetrical ?
kindly !
Zahnrad Kopf
Diamond
- Joined
- Apr 5, 2010
- Location
- Tropic of Milwaukee
hoil sir captain
i dont understand the purpose of those arms that are outside the yellow circle ... also why are not simetrical ?
kindly !
Sorry Kittycat, I missed your post. The "arms" are to give the whole affair more "purchase" on the face of the chuck in effort to maintain flatness. They also serve to keep it from moving around or flying out during use. The reason that they are asymmetrical is that the larger areas ( or the "blobs" ) are where I placed the magnets into them. So I increased the area there to allow for some "meat" around the magnet to make it a slight press fit.
Clear as mud?
Oldwrench
Titanium
- Joined
- May 21, 2009
- Location
- Wyoming, USA
... also why are not simetrical ?
But they are symmetrical about the center, which is what matters.
deadlykitten
Banned
- Joined
- Aug 5, 2016
They also serve to keep it from moving around or flying out during use
hy / why would it move or fly out ?
... move : pushed by tool ?
... fly out : jaws are not tightened enough ? thus small grip ? or ? ...
The reason that they are asymmetrical is that the larger areas ( or the "blobs" ) are where I placed the magnets into them.
it is a nice idea
but i think that the chuck must have the tendency to pull the part inside ... if it has the tendency to spit the part out, than this may generate a greater force than the magnets ... well, just saying in the end, you know how it behaves Clear as mud?
deadlykitten
Banned
- Joined
- Aug 5, 2016
I made a similar contraption to Zahnrad. I think I saw a commercial one for sale and said, "Wait, I can make something that will cost me twice as much in time and effort". I took it a step further and made it more complicated by adding the ability to bolt parallels of various heights to it. My motto is; Anything worth doing, is worth overdoing. After all that work the original blocks with the zip ties worked just as well, but I was too classy for zip ties.
hy kyle
that big star with blocks on it may lead to a case when 1 jaw is in less tension; still, it may deliver ...the little star seems to me pretty similar to what Zahnrad has shared ... and if this is true, than i just have an idea : hey Zahnrad, you can eliminate the magnets, thus you may reduce the size of your part, and use the tailstock to push the star into the chuck when clamping
after that, you retreat the tailstock and start turning ... this may work kindly !Similar threads
- Replies
- 4
- Views
- 156
- Replies
- 3
- Views
- 1K
- Replies
- 4
- Views
- 606
- Replies
- 7
- Views
- 394