What's new
What's new

Fixturing and machining. How the hell?

Houndogforever

Hot Rolled
Joined
Oct 20, 2015
Location
Boring
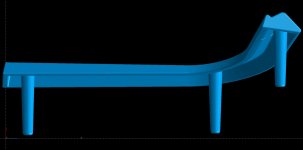
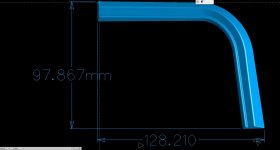
I have a part. There are actually two of these, mirror images of each other.

The tapered pins on the back were the original die cast pins. I can replace them with a tapped hole, or just a threaded stud.

This is a Chrome highlight on a 1967 Skylark quarter panel extension.

I just have no idea how to hold and machine this part.


Screenshot 2021-05-25 081503.jpg

Screenshot 2021-05-25 081610.jpg

Screenshot 2021-05-25 081639.jpg

Screenshot 2021-05-25 081840.jpg
 
I don't know if this of any help,

I kinda forgot these things exist.

.


.


or,

Get crafty with Epoxy putties and machined forms and 1/2 mangled / cheap 1-2-3 gauge blocks; 3d printing and machine back.


________

correction: Ahhhh I thought you had a rough original part / casting that you have to hold and machine ~ not the whole item from scratch. ?
 
Machine the bottom first. Drill and tap your holes then bolt to a fixture and machine the top.
I would probably drill and tap a bunch of holes that won't be used afterwards, just so the part doesn't chatter.
 
Machine the bottom first. Drill and tap your holes then bolt to a fixture and machine the top.
I would probably drill and tap a bunch of holes that won't be used afterwards, just so the part doesn't chatter.


Yup exactly

It's really quite straight forward.
 
That looks like fun, how do you go about getting jobs like that?

I don't. It's for my car I am restoring and these are not available reproduced and since they are the furtherest back of anything save the bumper, they are always smashed and dinged up.

If I can make them, I might have a market for 10-20 to other Buick idiots. Buick parts are hard to find. 1967 Buick Skylark parts are a one year only setup. The Frame and chassis are identical to other A-bodies, but the body, trim and interior are unique.
 
I don't know if this of any help,

I kinda forgot these things exist.

.


.


or,

Get crafty with Epoxy putties and machined forms and 1/2 mangled / cheap 1-2-3 gauge blocks; 3d printing and machine back.


________

correction: Ahhhh I thought you had a rough original part / casting that you have to hold and machine ~ not the whole item from scratch. ?

No sadly, I just have some dinged up ones that I paid a couple hundred bucks to have scanned and smoothed out.
It should be made from Stainless so it can be polished. Maybe aluminum and then chrome plated but I think that may actually be more expensive then making from stainless.
 
3d printer could help. Prints don't experience any sort of pressure when being printed, so you can make some flimsy parts. Use a good type of filament to endure weathering, not just any old crap.
 
When I am doing projects like this I remember why I got interested in machining. Making a couple of bucks is why I stayed...but this is the sort of thing that got me interested.
 
You can get a thick plate piece of stock that is slightly taller than the bounding box and wider/longer to allow a picture frame margin around it. face the stock to be orthogonal and of known size. drill holes to bolt it down, set origin from a known corner of the stock and machine each side leaving tabs until the last perimeter cut. lots of excess stock, but fairly straightforward programming, tabs that reach that sloped perimeter are probably the trickiest feature .
 
Iffn' I was making that part, I'd turn the three posts into 2-pc setups, with a tapped boss flush with the bottom of the main section, and a tapped tapered rod that screwed to the boss with an epoxied set screw.

Should be an easy modification and save a bunch of stock and machine time.
 
I used to do a bunch of this kind of stuff in a former life. Booze nailed it!
You will never make money doing this shit. But, for yourself? Its kinda fun.
 
Hi Houndogforever:
My landlords have a classic and vintage car restoration business, and they make stuff like this all the time.
Two things:
1) They always use free machining brass.
2) They never make replacement trim hollow.

I'd just buy a brass plate big enough to make both, (they're not very big...4" x 5") drill and tap the backside as others have recommended, and then bolt the brass plate to a bigger aluminum one.
Stuff it in the VMC, 3D surface the top and you're done.
Might as well mill them both at the same time.
Thread or silver solder the posts from the back.
Polish and chrome the whole works.
Ignore the fact it'll weigh a bit more than the original.

Cheers

Marcus
Implant Mechanix • Design & Innovation > HOME
Vancouver Wire EDM -- Wire EDM Machining
 
Brass is a great idea. Thanks.
I have a solid back with threaded holes model now too so I will just put a threaded stud into the part when it is all done.
 
A skilled jewelry model maker could hand carve those in carving “wax” in a few hours.

If you have a 3D model, you can get it printed in burnout wax and cast in brass, (add a few (?)percent for casting and polishing loss).

The casting will probably have the better match to the original surface than a machined part.

If it fits in a jewelry casting flask that will make it easier. More casters, better turn around, cheaper.

Obviously polish and plate to finish. You can get a mold made and do quantity.
 
Drill and tap blind holes for the tapered pins. Include a couple of locating through-holes past the ends to help locate on CNC.

Cut to oversize shape on bandsaw.

Fasten to tooling plate using blind holes.

Machine to shape.

Don't forget that on originals they are usually mounted with spring steel clips that bite into the pins so don't use too hard of a material for the pins.

Just my three cents worth (increased from two cents due to inflation).


Back
Top