What's new
What's new

How does a table probe stay accurate when its hit by chips...ect

Speedie

Stainless
Joined
Feb 24, 2009
Location
Midwestern MN/Wi USA
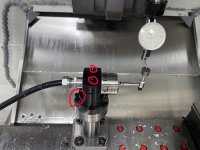
So working with a table probe I noticed it was tilted a few degrees. Looks like it got hit by a chunk of steel and tilted the probe head. It is a wireless tool touch probe. How can these stay accurate when you can fairly easily push and pull them out of position. I know they cannot stay accurate but how does one re center the 90 degeee probe tip?? This is on a 50 taper haas vf5
 
There were instructions in the manual I had, when I ran a haas. Also we had a cover that went over the tool setter.

Sent from my SM-G950U using Tapatalk
 
You can clock along the top of the touch point to bring it back to centre and flat, then run a calibration cycle.

Calibration cycles should be run frequently on the workpiece probe and tool probe to maintain accuracy. They aren’t difficult and if doing them enough, can become second nature.

Swarf alone shouldn’t damage the probe unless your cutting chips like bullets.
 
Periodic calibration is the most reliable way to ensure accuracy. Moving your probe to a safe, out of the way location will help reduce the need for frequent calibration
 
So working with a table probe I noticed it was tilted a few degrees. Looks like it got hit by a chunk of steel and tilted the probe head. It is a wireless tool touch probe. How can these stay accurate when you can fairly easily push and pull them out of position. I know they cannot stay accurate but how does one re center the 90 degeee probe tip?? This is on a 50 taper haas vf5
On the Renishaw tool setter, the anvil holder is designed to break if anything tries to push past its range of motion. Same with the touch probe where that ceramic shaft becomes a sacrificial element if the probe gets pushed past it limit. That protects the probe, but also makes it unlikely that the probe gets pushed out of calibration. In the case of the tool setter, the screws that hold the anvil need to be tight for the sacrificial link to break rather than move out of calibration.
 
Far from your comment "cannot stay accurate" once set up ours stays dialed in for months unless something really bangs into it (not a chip.) We calibrate often just as a matter of process, but rarely need to adjust anvil. Do you use the non-center cutting setting macros? Spinning tools, coming in from both sides, etc. Everything needs to be tight or your tools would be moving the anvil and not repeating.

Renishaw tool setters came with tools so you can properly tighten the anvil screws without torquing on the on the actual toolsetter mechanism (basically small allen keys) - if these aren't tight, or the break stem is not tight to the toolsetter body, you can easily knock it out of adjustment, which my guess is your problem. Use the set screws on the toolsetter mount to properly clock the anvil, not any of the other screws.

Note, Frank makes a really nice tool for calibrating - CAT40 Tool Probe Calibrator - Made in USA MariTool. Highly recommend. With that and Renishaw calibration macro it takes about 1 minute and you are done.
 
You're supposed to re-calibrate about every 3-4 months. That's why Renishaw and Bluhm want you to have a qualified tool in a case, to do it.

When I worked for a MTB this was part of the courses I used to teach.
 
Is there a flat on the anvil? I cannot see how this can be accurately calibrated in any way shape or form without conforming geometry. If the top of the probe cannot be held flat how in earth can it be trusted to touch off tools of different geometry? It looks like the anvil is just a round part with threads. Is that true?
 
Is there a flat on the anvil? I cannot see how this can be accurately calibrated in any way shape or form without conforming geometry. If the top of the probe cannot be held flat how in earth can it be trusted to touch off tools of different geometry? It looks like the anvil is just a round part with threads. Is that true?


Yes, there is a flat but that will not make it level. You make the anvil flat by adjusting the leveling screws for the whole unit. The anvil should be flat within a tenth or better. And the screws need to be tight enough to keep it from moving under vibration and use. It does work. I have installed a lot of these and really not had any issues. The tool setters are impervious to chips for the most part. But it should be checked periodically just like every precision instrument. I have seen tool setters installed and never moved for years, they just keep on chugging along.
 
Speedie - hope this picture helps. We can indicate the top ("flat") of the anvil to a tenth or less consistently when dialed in. The set screws on the top of the body, and the small bolts on the base are how you adjust for true. Everything else is tight and a tool or bump doesn't knock it out of alignment. Good luck!

TS27r.jpg
 
Renishaw has a decent website with destructions of how to physically level the anvil etc.

Haas has decent literature as well on how to calibrate the tool setter. I think they even have a "Haas Tip of the Day" on the subject.

BTW....I recommend the tip of the day even for veteran machinist' sand those not running a Haas. Many of the concepts are universal.


Back
Top