What's new
What's new

How To...very deep face groove

Kineng

Plastic
Joined
Jul 19, 2016
Hey there guys, I have been a long time reader but never posted as I typically find the information I need just by searching! Now however I have a part that I'm struggling with for a long time customer of ours.Needle.jpg

Basically I'm trying to figure out how to do that deep "face groove" that runs axially down the part. The problem seems to be that its narrow and very deep. Dimensions are: Minor Dia: 0.305" Major Dia: 0.455" Depth from end of part: 1.821". I have been thinking about trying to make a custom annular style cutter as I only need to make one for now but if they go into production that may not be the best way. Any one have any ideas other than trying to find a 2" long 0.0625" EM and praying it doesn't break? Really it would be nice to use something like ThinBit's face groove insert cutter for production but I can't get anywhere near the depth with anything like that I have been able to find.

Thanks in advance!
 
Or cast, or Metal-Injection-Mold...

Does this have to look "cosmetically perfect?" If not, do all the work beforehand, and then use a hole-saw to get the face-grooves to depth? If they make hole-saws the correct diameter that is...

Otherwise, custom annular cutter for sure.
 
I will save you time, a 1/16 end mill 2.0 long will not work. Dont even try it. 12:1 is hit or miss. This cutter would be @ 32:1. A custom trepan , possibly.
 
Save everyone a lot of aggravation and call up your favorite EDM shop, especially if it's a low quantity run.

A custom annular cutter could work but dealing with a thin walled cutter, questionable chip evac and possible part distortion pinching the cutter would prevent me from seriously entertaining that idea.

If it's a production part, see if the designer is willing to do a shrink fit of two components. This is an often overlooked strategy with turned parts. It's relatively simple and inexpensive, and more importantly can be performed entirely in a typical machine shop, which eliminates costs and delays from outside processing.

This is one of my ideas as well. Its part of a movie prop replica so all that's important is that it looks the same, really no tolerance levels or functionality to be concerned with here. To help with chip evac I was going to do the cut outs that form the flat sections of the part first so the chips can fall out and aren't loading up in the bottom of the hole/teeth of cutter. But I am working with the customer to see if we can make this into two parts! I'm all for a challenge but...
 
I will save you time, a 1/16 end mill 2.0 long will not work. Dont even try it. 12:1 is hit or miss. This cutter would be @ 32:1. A custom trepan , possibly.

Was never really an option, didn't try it, wasn't going to try it! You would need some kind of miracle to keep that cutter together.

BTW, I'm loving my MariTool holders in my lathe!
 
Can you drill the bore in the front of the part and then do the groove from top or bottom using a collet block in a mill? You'll still need a thin end mill, but not 2" long.

I'm aware this slightly changes the geometry, but will that affect fit/function or be visible when the prop is assembled?


Sent from my iPhone using Tapatalk
 
Someone else mentioned braze welding, thus two separate parts. Could you drill and tap the outer part and screw on the inner part? Since its a movie prop replica, it doesn't have to be perfect right?

Edit: didn't thoroughly read your reply about trying to make it in 2 pieces. Day late...
 
Thanks everyone for the ideas. I ended up making a very rough and quick hole saw style tool. Worked perfectly so I will have one professionally made for production runs. Chip evac didn't seem to be an issue since the cylinder is cut on two sides allowing all the chips to fly out of there.

Thanks again!!
 
Here's one for you guys: I have a part that has a face groove 3.25 deep and ID of 3.00 and od of 5.75 inches. I have no idea how to machine this into the part. Also, it is 10.75" long, so standing up on the mill won't fit. Any suggestions
 
Ductile iron face groove

Here's one for you guys: I have a part that has a face groove 3.25 deep and ID of 3.00 and od of 5.75 inches. I have no idea how to machine this into the part. Also, it is 10.75" long, so standing up on the mill won't fit. Any suggestions?
 
Look at using a Kennametal Ranger Face grooving tool- it wont go that deep, but you may be able to use it at max depth and then go back in, and finish the
OD to depth and finish up the ID with a boring bar. The Ranger tools are not cheap, but they do work well. These were originally made by Manchester Tool and then taken over by Kennametal.
 
Here's one for you guys: I have a part that has a face groove 3.25 deep and ID of 3.00 and od of 5.75 inches. I have no idea how to machine this into the part. Also, it is 10.75" long, so standing up on the mill won't fit. Any suggestions?

Are you saying it won't fit because your machine is small? or that it will be sticking out of a normal vise on a table over 8"?

Because if the latter is the issue, you simply need to raise a suitable vise or chuck high enough off the table with risers so that you're clamping near the end where you are cutting.

Make a big set of v-jaws big enough to hold your diameter (assuming it is about 6 or 7") and put your vise on its side. If your vise doesn't have flat sides, you can mount it to an angle plate.

Another, possibly better idea would be to get yourself a big V-block that you can stand up on end and clamp it to that. We have several that can do 10"+ diameters and are about 8" long that could do your part.

I am not necessarily suggesting that the mill would be the best place for it, certainly turn it if you can. Just suggesting that if you have enough Z travel, the length is no longer the limiting factor to what you can do on a mill.


(if you had a Horizontal machining center, it would be even easier)
 
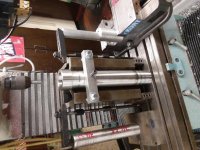
Here is a picture of a part similar size to yours that needed end features.
20190801_144652.jpg
Edit: picture is sideways, that is a vertical mill :crazy:


Back
Top