What's new
What's new

On Machine Inspection

lspotts38

Aluminum
Joined
Mar 7, 2012
Location
Northcentral Pennsylvania
I was posed the question today "The CNC's have probes in them, if we could get them certified, could we use them for inspection?". Simplification of the conversation, but pretty much covers the context of the question. I'm familiar with probing on the machines, use them a lot for setup, correct loading confirmation, and in process verification of machined features. Writing the cycles and outputting the results wouldn't be an issue. My initial thought was no way would I ever want to machine and inspect with the same machine, thought being that if the issue arose that there was a problem with machining, the possibility also exists that it could inspect it incorrectly as well. I overall don't think it is a good idea, but also am not ignorant to the machining movement would likely never be the same as the inspection movement, and the likelihood that the probing wouldn't show an issue that arose is probably small-ish. Consider also that the parts are fairly complex five axis pieces, with fairly tight positional/diameter tolerances. I don't particularly care for the concept, but don't want to be ignorant to the state of the art that I do not know about. Anybody out there inspecting on the machine tool?
 
Cnc machine tools are not measuring machines. Miles different in design and capability.
In machine probes are great at holding a size.
Only a fool would trust the machine to probe and inspect a part it cut.
If the machine off by 0.100 it would still check good. The machine has no way to know things are wrong.
Get down in real numbers and why are cmms not made like machine tools? It would be cheaper.
Talk to me about pitch, yaw, roll and abbe in a machine tool probing.
Bob
 
You can use the Renishaw inspection plus to inspect parts as you machine them, but this is more just to verify parts before removing them from the machine. Would never trust it for a first off or final inspection.
 
Went through the same argument with our management half a dozen years ago. Our MD got fed some bullshit by an idiot salesman from the MTB. It got heated, and I had to resort to ultimatum, but he gave in and we got a CMM instead.

The process is called "On Machine Verification" for a reason. It is not a final inspection process.
 
On-machine probing can never be as accurate as a CMM, but it has its own advantages:
(1) Based on probing results, offsets can be suitably adjusted so as to obtain correct dimensions. This process can be automated by running a probing routine at regular intervals. In most cases, 100% part inspection may not be needed.
(2) Inspection results are immediately available. If the part is sent to a CMM, and it is found to be unacceptable, there would be more scraps by the time this information is received.

As regards the confidence level in inspection results, one may probe a standard test-piece occasionally for verification.
 
Also, if rework is needed, the possibility of success would be higher if it is done in the same setup.
 
We have Renishaw probes on most of our machines with Inspection plus software on them. a few years ago we checked into getting an upgrade to the next level of Renishaw software(Productivity Plus I believe was the name) and the cost was almost enough to buy a stand alone CMM or at least put a good down payment on one. Not sure if that is still the case or not.
 
I am going to have to say, NEW modern cnc machines have positional accuracy and repeatability to just a few microns, in many cases "close" enough for on machine checking. I do it all the time and it's compared to the cmm we have. We usually get around .0002 conflicting errors, fine for our work.
 
I am going to have to say, NEW modern cnc machines have positional accuracy and repeatability to just a few microns, in many cases "close" enough for on machine checking. I do it all the time and it's compared to the cmm we have. We usually get around .0002 conflicting errors, fine for our work.

Absolutely, it works well and is a very useful tool. I use it pretty regularly too. Just not as a final inspection process.
 
I was posed the question today "The CNC's have probes in them, if we could get them certified, could we use them for inspection?". Simplification of the conversation, but pretty much covers the context of the question. I'm familiar with probing on the machines, use them a lot for setup, correct loading confirmation, and in process verification of machined features. Writing the cycles and outputting the results wouldn't be an issue. My initial thought was no way would I ever want to machine and inspect with the same machine, thought being that if the issue arose that there was a problem with machining, the possibility also exists that it could inspect it incorrectly as well. I overall don't think it is a good idea, but also am not ignorant to the machining movement would likely never be the same as the inspection movement, and the likelihood that the probing wouldn't show an issue that arose is probably small-ish. Consider also that the parts are fairly complex five axis pieces, with fairly tight positional/diameter tolerances. I don't particularly care for the concept, but don't want to be ignorant to the state of the art that I do not know about. Anybody out there inspecting on the machine tool?
.
.
make part and get it as close to what machine says is perfect
.
have inspection measure part and say which way its off and how much
.
compensate for error on next part made. have inspection confirm error compensation is ok.
.
i do it all the time. i wouldnt trust CNC alone anymore i would trust a micrometer with out checking it to a gage block to confirm calibration ok. i always have 2nd confirming measurement. no different than micrometer reading .0005" bigger than gage block and compensating for the .0005"
 

Attachments

  • ErrorCompensation.jpg
    ErrorCompensation.jpg
    90.8 KB · Views: 251
Yeah, in machine inspection is not the best tool for final inspection. Instead, think of it as a tool for reducing sampling rates for final inspection by reducing the risk of bad parts making it to final inspection. It can also inform you that you need to increase sampling rates if you see data points bouncing around instead of trending in systematic and controllable ways.

For low risk (from a safety and $$ perspective) applications you may be able to do a lot of in machine inspection with very low rates of final inspection. I would want to be checking at least one part on at separate piece of equipment though.

Really think about what sort of defects you are checking for with in machine inspection. It can be good for checking tooling deflection, wear, breakage, and bad clamping. It is not going to be so good motion errors, although this can work, and you are totally blind to most machine thermal growth issues.
 
in machine inspection is a tool same as checking grid shift. do you make a part and not measure it at all but just send to inspection ?
.
there is normally some measuring at machine AND at a separate inspection and inspection is a tool to confirm in machine inspection is ok. obviously any large grid shift change could easily effect parts made.
.
i can measure one end of part as .0005" higher than the other end cause spindle is warming up and cutting tool getting longer lower. i can compensate by just running spindle for 5 minutes to give time to warmup. if i dont look for it in machine, outside inspection will find it easily.
.
always a mix of in machine inspection and outside inspection
 
other thing is rechuck. many a part measures perfect on machine and loosen clamp bolts or chuck or vise and it warps and will measure different
.
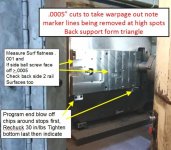
part shown always warps when unbolted. like .001 to .003 per 20" on the last 50 parts made. not really anything to do with machine more to do with part internal stress
 

Attachments

  • WarpageRemovingflat.jpg
    WarpageRemovingflat.jpg
    68.8 KB · Views: 170
...... Instead, think of it as a tool for reducing sampling rates for final inspection by reducing the risk of bad parts making it to final inspection. It can also inform you that you need to increase sampling rates if you see data points bouncing around instead of trending in systematic and controllable ways.
.....

Here is where in machine checking shines.
Anything that reduces the amount of inspection is a great idea.

But, and a big but sometimes is that your machine tool spindle is now not making chips. Basically downtime in the manufacturing process. You get less parts out the door.
Does that lost time cost justify outside checking fixtures or a measuring machine?
Some people buy tool preseters so that machine time is not lost to touch offs or sizing in.
That lost time applies here also and every place will have a different optimal answer.

Once you start to do a lot of probing your time in cut goes downhill. Most of the time measuring can be done while the machine is cycling the next part(s) if you have some reasonable control over the process.

I've seen places get probing and over use it in production applications. Check every single part and feature since the machine now can.
Cycle time goes to poop when in reality they could check every 10th or 50th part and still be golden.

Absolutely a great tool but must be applied with some common sense and a understanding of your particular variations.
You can not inspect quality into a process, the goal is to eliminate or limit the amount of inspection needed.
Checking things costs real time and money and is worse if inside the machine tool itself which is on the floor for one reason... to make chips.
Bob
 
I would much rather use my expensive machine time to make parts, not inspect them.

.
i record total time to machine part in excel work log which auto calculates time average. total time included rework and remaking parts. if inspection says end of part (50% of parts) needs recut setting up again it can take 2 hours total time shipping out included, each recut or rework.
.
so if i determine cause of rework and fix the problem even if it takes 5 more minutes to average part time as opposed to 1hr more for rework average then it faster to fix the problem. and often the problem is measurable at the machine especially if inspection points out where the problem is
.
they are tools. using inspection data AND measuring at the CNC. measuring at the CNC can save total average time making parts
 
Lot of good responses here, thank you guys for that. I've got a pretty good handle on using the probe for process stability, use them alot for calculating critical finish cuts, clamp confirmation. I also agree that machine time is pretty expensive to be using them as a CMM. Think what it comes down to is the CMM's are backed up right now, and they are looking for some alternate measuring methods. Also had the thought that I am programming the parts, and am the only person who knows the probing stuff, so would probably end up writing the inspection programs if it came to that. I've always thought that another set of eyes looking at the parts catch things that you don't see as being a problem. I guess I was not that far off in thinking that using the machine tool probably isn't the best inspection tool, but wanted to ask, you dont know what you dont know.
 
True, when your machine is probing the part, the chips are not flying. BUT, when you have to break into your current setup in the machine to re-cut a part you just cut yesterday (and did not check), that is when you finally see dollar signs fly out the window.
 
.
i record total time to machine part in excel work log which auto calculates time average. total time included rework and remaking parts. if inspection says end of part (50% of parts) needs recut setting up again it can take 2 hours total time shipping out included, each recut or rework.
.
so if i determine cause of rework and fix the problem even if it takes 5 more minutes to average part time as opposed to 1hr more for rework average then it faster to fix the problem. and often the problem is measurable at the machine especially if inspection points out where the problem is
.
they are tools. using inspection data AND measuring at the CNC. measuring at the CNC can save total average time making parts

I fully agree.
On-machine measurement is not just measurement; it is measurement with the aim of immediate correction.
And, in most cases, it may be sufficient to measure at an interval of, say, 50 parts.


Back
Top