What's new
What's new

Precision Boring Procedure for the best possible bores

geoffw

Aluminum
Joined
Feb 21, 2014
Location
Las Vegas, NV
I need to bore 2 precision holes that are:

+/- .0002" (.7881 - .7885 diameter) x 1" deep.
+/- .00025" (1.5260 - 1.5265 diameter) x 1.25" deep.

This is my first time using a boring head on a CNC, here is my setup:

-1998 Haas HS1 Horizontal (low hours, less than .0001" runout measured with a ground test bar)
-Criterion Boring Head(s) (.001" Increment) in Solid holders.
-Single point 1/2" carbide boring bars w/CCGT32.51 Insert (1.5" stickout)
-CAT40 Spindle
-500RPM, 2IPM
-7075 Aluminum

When the program is ready for the boring head(s), the machine brings the spindle as close to the operator as possible and the operator will clean the tapers and insert the tools. We have the spindle lugs and the holder marked so the holder is inserted in the same position every time.

We are using a standard boring cycle that bores in and then back out. Its time consuming!

Is there anything that Iam NOT doing that I should be doing? I want to establish a procedure for boring the best quality holes possible, now and in the future!

Here is a picture of the setup, the 2 bores should be pretty obvious. Its a small engine connecting rod:

bores.jpg
 
What kind of quantities are you dealing with? It might be more cost effective to bore them u/s and hone to size. How tight is your center to center tolerance?

I would consider interpolating them u/s and then reaming them.
 
We will probably do a production run of 100pcs every 2 months until the product has proven itself. I was going to keep it permanently setup in the machine. Ive dedicated 1 side of a tombstone just for this product.

We are currently interpolating to rough and boring to finish.

Center to Center tolerance is +/- .005" Nothing crazy.

I was definitely considering honing to size, is there a hone that you could recommend?

As for reaming, Ive never been able to ream a quality hole...maybe Iam doing it wrong.
 
Mapal is a company specializing in precision hole making: MAPAL: Reaming & Fine boring
I would contact them with your process issues and see if they can recommend fixed tooling that would cut to size. Even a Haas should give consistent results with the right tools, just C to C may vary a tiny bit. Make sure spindle bore, toolholder tapers, and (this gets forgotten about) carousel pockets are clean so chips can't skew the cutters.
 
I once had to do some bores in steel to that tolerance level with a Criterion boring head. Drove me nuts trying to get it right. Then we took a job with a lot of bored holes. Convinced the boss to drop $600 on a real CNC insert boring head from Sandvik if I remember correctly. Piece of cake! Dialed in the first and blew them all out in no time, easily paid for the tool on that job.
 
I don't see any reason to hand load the tool holders into the machine. Just use your tool changer. I have to think the horizontal can handle a simple boring head tool change.

Also, if at all possible, buy a .0001 adjustable boring head or two. Yeah, they are spendy, but even a .0001 adjustment is 25% of your tolerance. Using a .001 adjustable head means your finest adjustment is 200% of your tolerance. That puts you in to splitting lines to at least come to your adjustment being only as accurate as your tolerance. Sure fire way to make bad holes.

KENAMETAL TBH5OA TENTHSET BORING HEAD 1 DIV = .1" VERNIER 1DIV =.1 | eBay
That will do very well for your smaller hole I would think.
 
No disrespect but i was boring a hole with the bridgeport just yesterday, ok not to your tolerance, but it was a 2" hole in steel and i was going 1Krpm and 3 thou a rev feed with a upsharp tin coated CCGT06 0204 insert. IMHO you should be able to spin that thing miles faster, easily 3Krpm.

Run out does not matter one iota, its the advantage of single point boring, so long as you keep the bar indexed to the spindle (cat holders :-) you can have any amount of run out you wish with in the travel of the boring head.

The criterion heads are good, so long as there not abused but for a job like that in a production environment, i would sure as hell be going for something better, with tenths graduations and a more rigid set-up, you want something in its own shank, theres lots of options out there, other options to look at some of the specialist reaming options, theres some really nice things made to do holes like this day in day out. Go for a PCD insert on it and you probably may well never need to change or adjust it again! Honeing is how this stuff use to be done, its fine its accurate, but its anouther operation and its not normally all that fast. + theres a fair bit of capital out lay to do it too! With your position tolerance and qty's it makes more sense to tool up well and just finish them on the machine.

If its not a trade secret, what are the little fingers for off the big ends? never seen a con rod with thoes before? PS they look great too!
 
If its not a trade secret, what are the little fingers for off the big ends? never seen a con rod with thoes before? PS they look great too!

Splash lubrication, as the big end dips into the crankcase the finger picks up and flicks oil around to lubricate the piston skirt and other bits. Also seen in some piston air compressors.
 
Cogsdill makes some really nice reamers you might want to check in to. I used to hold .00005 ( fifty millionths) size and roundness with them. Checked with an air gage.
 
Splash lubrication, as the big end dips into the crankcase the finger picks up and flicks oil around to lubricate the piston skirt and other bits. Also seen in some piston air compressors.

Never seen them on the sides like that, i take it the cylinders not a vertical arangment! Only ever seen them on the bottom on compressors before.
 
i would do the following

rough it out with and endmill
semi finish it with a roughing boring head
finish with a micro boring head

How much would you leave for a finish pass?

Right now we are interpolating with an endmill and leaving .004" for finish.

-Geoff
 
How much would you leave for a finish pass?

Right now we are interpolating with an endmill and leaving .004" for finish.

-Geoff

Have you tested the consistency of leaving the boring tools in the magazine? Did you have errors from machine loading, which is why you went to hand loading? What condition are the carousel pockets, are they clean or full of gunk?

Your Criterion boring heads aren't bad, but certainly not optimal for the job. If you don't want to spend on better boring tools, at least look into PCD tipped inserts for the bars you have, or swap out bars to one that has PCD inserts available. .004 might be a little light for the finishing, but with a sharp diamond insert should be fine.

Along with getting your process to allow machine tool loading, you can also try speeding up the RPM and feed by trying to balance the boring head with a slug of brass or tungsten coming out the cross hole of the head (if it has one) opposite the boring bar. Make sure the slug can't hit anything, and grind a flat on it so the set screw will positively lock it in place.

You should be able to significantly increase the RPM with a reasonably balanced cutter/head. Then, command a tool orient when the pass is completed, note the bar location, then issue a small offset move to get the tip away from the bore and rapid out - no reason to feed out if the cutter is working well.

Shorten bar stickout as much as possible, and make sure it's a snug fit in the boring head so it can't flex outward at the higher speed.

So, is this rod for a boxer engine, or a laydown single cylinder? Racing application?
 
Although I don't have an issue boring to those tolerances, I would leave undersize, and then finish hone to size.

I have a Sunnen 1660 and have found the scrap is lower if I finish the close tolerance holes on the hone. Honing machines aren't that expensive used, and you wouldn't need more than a few mandrels.

Finishing on the hone will speed up the process on the CNC. I would circular interpolate the hole, then make one pass with the boring bar undersize, that way you don't spend time sneaking up on the tolerance on the CNC.
 
I need to bore 2 precision holes that are:

+/- .0002" (.7881 - .7885 diameter) x 1" deep.
+/- .00025" (1.5260 - 1.5265 diameter) x 1.25" deep.

This is my first time using a boring head on a CNC, here is my setup:

-1998 Haas HS1 Horizontal (low hours, less than .0001" runout measured with a ground test bar)
-Criterion Boring Head(s) (.001" Increment) in Solid holders.
-Single point 1/2" carbide boring bars w/CCGT32.51 Insert (1.5" stickout)
-CAT40 Spindle
-500RPM, 2IPM
-7075 Aluminum

When the program is ready for the boring head(s), the machine brings the spindle as close to the operator as possible and the operator will clean the tapers and insert the tools. We have the spindle lugs and the holder marked so the holder is inserted in the same position every time.

We are using a standard boring cycle that bores in and then back out. Its time consuming!

Is there anything that Iam NOT doing that I should be doing? I want to establish a procedure for boring the best quality holes possible, now and in the future!

Here is a picture of the setup, the 2 bores should be pretty obvious. Its a small engine connecting rod:

View attachment 184100
.
.
i bore holes
-.005 test cut (only 0.25" depth just enough to measure)
-.005 full depth ( so rest of cuts more even less cutter deflection)
-.002 test cut (measure exactly for example might be -.0022)
-.002 full depth
.0000 test cut (last chance to measure)
.0000 final cut
.
i use indicating bore gages set to ring gage kept in cnc so same temperature and i compensate for ring gage calibration error for example 1.0000 error +50 or +.000050 so ring gage actual 1.00005"
.
length of boring bar effects tolerances usually 4 to 1 ratio of length to boring bar diameter is considered rigid, get over 6 to 1 and you get problems cause of boring bar deflection
.
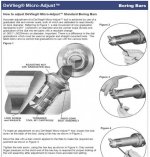
picture shows geared head boring bar with spring compression. can adjust precisely .0022" with out loosening locks spring keeps it tight.
.
many other boring heads when loosened they tend to jump around. backlash and or dirt getting in. not unusual to get .002" diameter change when locks loosened. it helps to push boring head cutter in while locks are tightened. very much like pressing carbide insert tight to pocket of cutter while screw tightened
.
many materials there is minimum cut for example many boring bars will not cut less than .001" in certain metals they tend to skate over surface. adjust another .001 and it will bite in taking more than the .001" adjustment. thus why i say last cut take .002" or if measurement says .0022" take that. i leave final cut for a .001 to .003" cut. less or more of a cut is unstable.
.
boring head getting banged around in tool changer and dirt in spindle i would not trust any boring head to stay on size finer than +/.0005" and even then i would take a shallow test cut to confirm size ok
 

Attachments

  • BoringBar1.jpg
    BoringBar1.jpg
    45.2 KB · Views: 335
  • BoringBar2.jpg
    BoringBar2.jpg
    64.1 KB · Views: 500


Back
Top