What's new
What's new

Question about setting tool height

ProjectZero

Aluminum
Joined
Oct 21, 2016
Hi guys,

I’m hoping for some help figuring out how to set tool height offset. I learned at school on a 2013 Haas with a built-in height measurer..thing. We selected the tool and ran a routine which brought the tool down on a smart platform which would detect its height (and if we needed, its exact diameter as well). Pretty much it had a nice expensive tool that made it easy.

Now at my new job we’ve bought a 2005 Fadal. Not so fancy anymore. I’m trying to figure out how to set tool height. A friend sent me a link to a [dial depth gage, but I’m not sure how it works. I watched this video (Pro Touch Off Gage cnc milling machine tool setter - YouTube) about a Tool Touch-Off Gage. This seems to make sense, and I’m not sure if it’s the exact same thing as the Dial Depth Gage my friend sent me.

I'm realizing I need to take a step back and figure out the sequence of events here. My 2005 Fadal will have an absolute coordinate system at the tool change position. I set a Work Coordinate System, personally usually at the top of my part. But because my machine doesn't know the length of my various parts, I need to add in the tool offset, which is how far out my tool sticks from the spindle. But how does bringing my part down onto a gage black or tool touch off gage tell me this exact length? Wouldn't that require me to know the exact length from my spindle/MCS to the bed?

Clearly I'm still wrapping my head around this. Advice appreciated!
 
I touch my tools off the back of the vise or the top of the tailstock using a round pin, both are big flat surfaces. The pin diameter I use on the vise is equal to the height of the hard jaws above the top of the vise, .25" on my Kurt vise with good hard jaws, and .25" over the tailstock. The .25" pin is a broken endmill so it is pretty common. Doing it this way allows me to just use my calipers to measure from the top of the stock to the vise jaw to set the Z value of my fixture offset. Very straight forward and easy to keep my numbers straight so I don't hit the vise jaws.
 
Height offset setting is kinda one of those complicated things to explain, but once you “get” it, you’ve got it. I also haven’t seen a good explanation that isn’t rooted in 1985 eras of gear (edge finders and ZigZag paper). So, please pardon the Wall -O- Text:

I’m going to implore you to buy 2 pieces of gear that will make you a better, more efficient machinist, that will give you 80% of what full tool/part probing can give you, for about $500 instead of $5000.

- A Haimer 3D sensor for about $400.
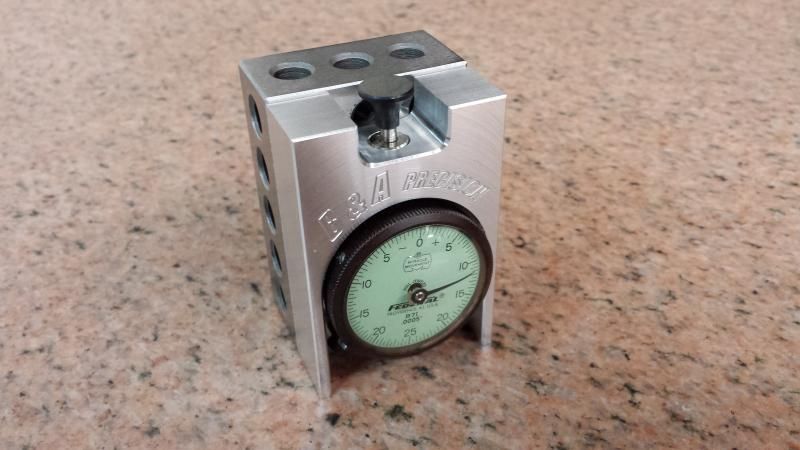
- An Edge Pro Height Gauge for about $90.

I’m going to explain how to do this (and some decisions you have to make) around these two pieces of gear because I think they are the minimum bits of equipment for modern machining efficiency. By modern and efficient, I mean these are pieces of gear way more accurate than "feeling" stuff moving under the tool to gauge it's height, and you aren't having to do ANY math in your head. Every bit of arithmetic you do in your head in this game, is a chance to fat finger a number and crash shit.

The machine has no idea where the world is in Z, aside from it’s homing and limit switches. Tool offsets tell it where to move the Z relative to the part program, and G54 tells it where the part program Z is, but both of those numbers need to be built around some sort of agreed to reference point. Fadal was smart, and set up most of their Fanuc controls with a “Gauge Height” function on the offset page. The “Gauge” is whatever surface you’ll be touching all your tools off on - that could be the old codger Zig Zag paper on a 123 block method, that could be the Edge Pro height gauge, or that could even be an electronic toolsetter. The point is, you set the gauge height once, and the machine remembers it and sets everything relative to it.

(My Robodrill, and some Fanuc controls, do NOT have a Gauge Height setting, the basic function is done using the Relative coordinate system Z0 preset, which resets every power-on, which is a real pain in the ass).

So let’s agree that the Edge Pro Height Gauge, sitting on your table will be your gauge height. Cool! Now we need to wonder what tool we are actually going to touch on it to set that gauge height with. A lot of folks would say you need to touch the spindle nose to this gauge. If you do this, all your tool lengths are positive offsets, so you can look at a tool and generally sorta know (roughly) what the offset will be. More importantly, some machines physically move the spindle when you hit G43 to turn on tool height compensation; with positive offsets, that means the spindle will move up and away from the work, with a negative offset value, you could fuck up and turning on G43 will send the tool down and into the work/table/fixture/bad day.

(Side note: moving the spindle on G43 is stupid, and how stupid accidents happen. Go to your params, and disable it, making the machine shift the coordinate system instead of physically shifting the tool. This is *HIGHLY* recommended).

In your case, I would probably use the spindle nose to set the gauge height directly off of the Edge Pro. Now you can bring all your tools down, and touch them off the Edge Pro and everything will be The Business…

But what about the Haimer? You’ll totally want to use this to touch off work because it’s way more accurate and capable than any other method, but you need to measure it’s height, and you can’t touch it off of the Edge Pro because it’s a dueling indicator situation. Luckily, the Edge Pro is exactly 4” off of the table, so a pair of 123 blocks can get you that height (and you can calibrate the Edge Pro to them exactly). Touch the Haimer off and set it’s tool height… Call G43 H_haimer_ before you touch off your work, and now you can probe Z with the Haimer to set your work offset heights.

Backing up a bit, you don’t need to use the spindle nose to set your gauge height. For example, my Robodrill has a spindle that can only get about 6” away from the table, so gauging the spindle nose is a pain in the ass; I need to set my Edge Pro on top of a block to do it, and it gets rickety, and I don’t want to do that every time I set a tool. I also need to re-set the gauge height every machine power on (it picks up tool-heights from the Relative coordinate system, and that zero resets every machine power-on). On my Robodrill, I set the gauge height by touching off the Haimer to a 4” gauge block… so the Haimer tip is basically the relative position of everything (all my tool heights, are + or - compared to the Haimer dial at 0). Old schoolers would call this method the “Master Tool Length” method. Once nice thing about it? When I touch off work to set G54, I don’t need to call up a height offset for the Haimer - I just get it in the spindle and touch off.

So yea, that’s my (horrid) attempt to explain some of this. It’s really better explained with a video, but it’s kind of a pain in the ass to film. Rip me to shreds people!
 
I agree with gkoenig. The Haimer 3D Taster and a height offset gauge are the two best pieces of setup equipment to have. Make sure you buy a couple of extra tips for the Haimer since, thankfully, they are designed to snap off if you accidentally rapid the tip into the work-piece or vise when you convince yourself that you are good enough to just hit the jog button with out cranking the MPG a little first to make sure you are jogging the correct axis.

On my VMC, I reserve reserve offset G59 just out of practicality and reserve and keep empty pocket 10 in my 22 tool changer for the 3D Taster which I load in and out by hand by the way to protect it from coolant. I set a zero tool length offset and never adjust it again for this pocket. Then I set Z to zero with the taster directly on the table. Then using my 2" height offset guage I set the tool offset for each tool to read 2 inches. Once all the tool height offsets are set, I call up tool 10 and insert the 3D Taseter into the spindle and change to G54 (or whatever work offset I am going to cut with) and set X,Y, and Z to the workpiece.

All of the tools follow along accordingly. If I break a tool mid cut, I can just swap back to G59 set the new replacement tool's height offset to read 2" when touching off my height offset gauge. Then switch back to G54 and resume cutting.
 
Ran a Fadal for a year. I kept an edge finder in toolholder 1. That's a $20 3D Tester! Put it in a dedicated toolholder and put a dab of security paint on the joint so you know for sure it has never moved. I make the end of that edge finder my Z zero always. All tools are referenced to the end of that tool. Pick up any flat surface anywhere and set any tool to that surface.

I'm clumsy, I don't like getting close to a part, the vise, or the table. I use a 0.500" pin rolled under the edge finder to pick up surfaces. An oops in jogging has room to avoid a crash. Instead of entering zero for Z position, enter 0.5 and now all tools you've set are ready to go.

I like the idea of the 3D taster, I really do. Haven't been able to convince myself it is worth the cost and the fact that everyone seems to break off a probe sooner or later. I have a cheap little laser edge finder. I find that very useful when you want something lined up to only a few thousands at best. No Z involved, can't be crashed if you don't get close. Even tolerates accidently starting the spindle if the isn't set to Ludicrous Mode.
 
resets every power-on, which is a real pain in the ass).

So let’s agree that the Edge Pro Height Gauge, sitting on your table will be your gauge height. Cool! Now we need to wonder what tool we are actually going to touch on it to set that gauge height with. A lot of folks would say you need to touch the spindle nose to this gauge. If you do this, all your tool lengths are positive offsets, so you can look at a tool and generally sorta know (roughly) what the offset will be. More importantly, some machines physically move the spindle when you hit G43 to turn on tool height compensation; with positive offsets, that means the spindle will move up and away from the work, with a negative offset value, you could fuck up and turning on G43 will send the tool down and into the work/table/fixture/bad day.

I don't run a Fadal, so I don't know what is possible. But, I prefer to use negative length offsets (on a Haas) as standard practice. If I made a typo (although I practically never type in the length, I let the machine measure it) and the offset was positive by mistake, then the machine goes up in a safe direction. That seems like best practice to me, either the offset is negative and the machine moves where it is supposed to, or it moves up to a safe height (or the Z + limit).

The consequence of this is that the offset lengths don't have much meaning in a tool to tool visual comparison, but that could look about right and still not be correct anyways, one must pay attention to procedure and make sure all the tools get set to the gage.

Yea, I might have gotten confused; positive offsets move the spindle down on G43, negative moves the spindle up.

Having said that, almost every machine can be made the shift the coordinate system instead of moving the spindle on G43. For about a thousand reasons, this is a way better idea than having the spindle physically move. Totally worth digging into your parameter manual to turn on.

For me, tool +/- offsets are basically meaningless. I also like being able to touch off work with the Haimer without having to remember to hit G43H14 and cancel that out with a G49. Haimer tip is zero for everything.
 
Height offset setting is kinda one of those complicated things to explain, but once you “get” it, you’ve got it. I also haven’t seen a good explanation that isn’t rooted in 1985 eras of gear (edge finders and ZigZag paper). So, please pardon the Wall -O- Text:

I’m going to implore you to buy 2 pieces of gear that will make you a better, more efficient machinist, that will give you 80% of what full tool/part probing can give you, for about $500 instead of $5000.

- A Haimer 3D sensor for about $400.
- An Edge Pro Height Gauge for about $90.

I’m going to explain how to do this (and some decisions you have to make) around these two pieces of gear because I think they are the minimum bits of equipment for modern machining efficiency. By modern and efficient, I mean these are pieces of gear way more accurate than "feeling" stuff moving under the tool to gauge it's height, and you aren't having to do ANY math in your head. Every bit of arithmetic you do in your head in this game, is a chance to fat finger a number and crash shit.

The machine has no idea where the world is in Z, aside from it’s homing and limit switches. Tool offsets tell it where to move the Z relative to the part program, and G54 tells it where the part program Z is, but both of those numbers need to be built around some sort of agreed to reference point. Fadal was smart, and set up most of their Fanuc controls with a “Gauge Height” function on the offset page. The “Gauge” is whatever surface you’ll be touching all your tools off on - that could be the old codger Zig Zag paper on a 123 block method, that could be the Edge Pro height gauge, or that could even be an electronic toolsetter. The point is, you set the gauge height once, and the machine remembers it and sets everything relative to it.

(My Robodrill, and some Fanuc controls, do NOT have a Gauge Height setting, the basic function is done using the Relative coordinate system Z0 preset, which resets every power-on, which is a real pain in the ass).

So let’s agree that the Edge Pro Height Gauge, sitting on your table will be your gauge height. Cool! Now we need to wonder what tool we are actually going to touch on it to set that gauge height with. A lot of folks would say you need to touch the spindle nose to this gauge. If you do this, all your tool lengths are positive offsets, so you can look at a tool and generally sorta know (roughly) what the offset will be. More importantly, some machines physically move the spindle when you hit G43 to turn on tool height compensation; with positive offsets, that means the spindle will move up and away from the work, with a negative offset value, you could fuck up and turning on G43 will send the tool down and into the work/table/fixture/bad day.

(Side note: moving the spindle on G43 is stupid, and how stupid accidents happen. Go to your params, and disable it, making the machine shift the coordinate system instead of physically shifting the tool. This is *HIGHLY* recommended).

In your case, I would probably use the spindle nose to set the gauge height directly off of the Edge Pro. Now you can bring all your tools down, and touch them off the Edge Pro and everything will be The Business…

But what about the Haimer? You’ll totally want to use this to touch off work because it’s way more accurate and capable than any other method, but you need to measure it’s height, and you can’t touch it off of the Edge Pro because it’s a dueling indicator situation. Luckily, the Edge Pro is exactly 4” off of the table, so a pair of 123 blocks can get you that height (and you can calibrate the Edge Pro to them exactly). Touch the Haimer off and set it’s tool height… Call G43 H_haimer_ before you touch off your work, and now you can probe Z with the Haimer to set your work offset heights.

Backing up a bit, you don’t need to use the spindle nose to set your gauge height. For example, my Robodrill has a spindle that can only get about 6” away from the table, so gauging the spindle nose is a pain in the ass; I need to set my Edge Pro on top of a block to do it, and it gets rickety, and I don’t want to do that every time I set a tool. I also need to re-set the gauge height every machine power on (it picks up tool-heights from the Relative coordinate system, and that zero resets every machine power-on). On my Robodrill, I set the gauge height by touching off the Haimer to a 4” gauge block… so the Haimer tip is basically the relative position of everything (all my tool heights, are + or - compared to the Haimer dial at 0). Old schoolers would call this method the “Master Tool Length” method. Once nice thing about it? When I touch off work to set G54, I don’t need to call up a height offset for the Haimer - I just get it in the spindle and touch off.

So yea, that’s my (horrid) attempt to explain some of this. It’s really better explained with a video, but it’s kind of a pain in the ass to film. Rip me to shreds people!


Thank you for the wall of text. This is exactly what I need! Apologies in advance for some of these things - the mill is on its way but I don't yet have it in front of me, and some of these questions may be obvious when I do.

1. Let me get this straight. I set the gage height once, using the spindle nose and the edge pro height gage (EPHG), and the machine remembers it. You say that my tool offset will be positive, so that means UP from the EPHG, into the air away from the bed, is now +Z. And below the top of the EPHG is minus Z. Is this correct?

2. Then I bring the tools down and touch them off the EPHG. Is there a display on the fadal that shows my distance from the gage height? And that's what I enter in as the tool offset for each tool?

The Haimer sensor is fascinating. It's an analog version of the fancy digital probe we used on my school's machine. And just like my school's probe, we have enter in the probe's height offset before we use it to set G54 WorkCys. But my school's machine was smart enough that once I entered in the probe offset, I could use it to find X,Y,Z without any math - especially written program for the 2013 haas. My 2005 fadal probably won't be, so I'm assuming I have to do a bit of math.

3. When I set my G54 Z, I'm assuming I have to find my desired Z (in my case usually the top of my stock) relative to the gage height. So I bring the haimer down until I'm touching the top of my stock, and then I subtract the haimer tool offset length from this Z value, and that should give me the stock height relative to the gage height. Thought experiment: I'm machining some 2 inch stock. This means it is 2 inches below the gage height, at Z -2.0. Assuming the haimer is roughly 4 inches long, my Z height relative to gage height will read +2. So I need to subtract the haimer tool height and enter in the correct -2 for my G54 Z, or else I'll be machining in the air. Am I....on the right track here?

Thanks everyone again for answering my questions!
 
There's a thousand ways to skin this cat but the most straight forward way is to pick up your XY work offset with the Haimer and leave your work offset at Z0. I use a 1" gauge block and in the Fadal tool offset settings it will ask you for block height, so I put in 1". This automatically accounts for touching my tools off 1" higher than my Z0 (for this example let's say top of part). In your tool offset utilities you'll tell it what tools you want to offset and it will automatically change tools when you're finished with each but you'll need to jog each tool down to measure the offset. Machine Z0 is the toolchange height on the Fadal so unless you have long tools and a tall part/fixture you'll almost always have a negative Z offset for your tools.

Using the gauge block method is simply measuring the distance from machine Z0 to your work offset Z0. I simply bring the tool down below the top height of the block, then jog the spindle up until the block slides under. Move the block away, change the increment finer and repeat as precise you want. Just never come straight down over the block.

If you're constantly changing out tools or jobs this method is fast and reliable. Using a common touch off location is also a great method you'll just need to calculate the difference from where you're touching your tools off to where your work offset Z0 is and out that difference into each work offset Z value.
 
1. Let me get this straight. I set the gage height once, using the spindle nose and the edge pro height gage (EPHG), and the machine remembers it. You say that my tool offset will be positive, so that means UP from the EPHG, into the air away from the bed, is now +Z. And below the top of the EPHG is minus Z. Is this correct?

I couldn't tell you if the number is positive or negative since I'm not at my machine and I can't confirm. The important thing is that (using this method), your spindle nose is at zero, in reference to the gauge you will be using to measure tools. Honestly? I've never once paid attention to see if my tool heights are positive or negative... it's basically irrelevant data to me.

2. Then I bring the tools down and touch them off the EPHG. Is there a display on the fadal that shows my distance from the gage height? And that's what I enter in as the tool offset for each tool?

Once you set the gauge height, you won't be inputting any numbers manually, you'll just touch the tool to the EPHG till it reads zero, hit Measure Tool or Set Length or (in my case) Input C.

The Haimer sensor is fascinating. It's an analog version of the fancy digital probe we used on my school's machine. And just like my school's probe, we have enter in the probe's height offset before we use it to set G54 WorkCys. But my school's machine was smart enough that once I entered in the probe offset, I could use it to find X,Y,Z without any math - especially written program for the 2013 haas. My 2005 fadal probably won't be, so I'm assuming I have to do a bit of math.

Feedback touch probes and tool setters are an entirely different animal, with their own macros and calibration procedures... driven by the fact that they send feedback to the machine that Haimers and EPHGs don't.

3. When I set my G54 Z, I'm assuming I have to find my desired Z (in my case usually the top of my stock) relative to the gage height. So I bring the haimer down until I'm touching the top of my stock, and then I subtract the haimer tool offset length from this Z value, and that should give me the stock height relative to the gage height. Thought experiment: I'm machining some 2 inch stock. This means it is 2 inches below the gage height, at Z -2.0. Assuming the haimer is roughly 4 inches long, my Z height relative to gage height will read +2. So I need to subtract the haimer tool height and enter in the correct -2 for my G54 Z, or else I'll be machining in the air. Am I....on the right track here?

No.

Look, not to disagree with *everyone*, but I've never once typed in a tool height. The only time I've had to do math on a G54 setting is when I've got some funky deal going on where my Haimer can't directly touch an edge. All this jazz with feeling pin gauges, or touching blocks sounds like absolute madness to me.

Here is how I do things, just for some background:

- Machine turns on and Relative Z is basically zonked and set to Machine Z. On my Fanuc, tool length offsets are automatically set with the Relative Z number, whatever it is at. So I warm the machine up, load my Haimer in the spindle, touch it on a 4" block, and set Relative Z origin. On your Fadal, this is the exact same thing as setting Gauge Height (and your machine won't forget it every time it powers down!), but I don't use the spindle nose, I use the tip of the Haimer.

- I pull the 4" block off the table, and I throw in my EPHG... remember, the 4" block and the 4" EPHG are the same height, and I calibrate the EPHG with the same block I use. Now I touch off all of my tools and have the control set their height with the tool measure function (labeled Input C). On my control, it's just grabbing the Relative Z figure, and spitting that into the Tool Height Offset field. My tool heights? They are all relative to the Haimer reading Z0. Some of my tools are positive, some are negative, and I don't care.

- Now I touch off my work, directly with the Haimer. I set it wherever I want Z0, and I use the Measure function in the Work Coordinate Offset page. I don't need to set G43 H14 (the Haimer lives in pot 14). I don't do any math, I don't have to know the height of the Haimer... because the Haimer IS zero.

So with this method, I:

- Never ever need to remember a tool offset.
- All my measurements are 100% direct, with the Haimer and the EPHG. No funky math or having to use gauge blocks.
- I can reach in and grab very funky Z0 positions without having to do any fussing. As long as the Haimer probe gets in there, I'm good.

I tried a lot of things before I got to this setup. I found touching tools off on solid stuff barbaric and time consuming; wiggling a gauge block under a tool as I slowly creep it down... MADNESS! This setup lets me touch off a turret of tools, and set G54 in about 5 minutes, totally brain dead simpole, and the accuracy is the accuracy of my measuring tools (0.0005"). Short of a full probe package, every other method I see people outline seems outright silly.
 
One more style I always use the same set of parallels I touch off all tools to the parallels. I program all work off of bottom of block never have to touch off tools. I just look if I'm on my trusty parallels I'm good to go. If I change parallels I quick measure the difference then mass modify all tools at once done in 10 seconds.


Sent from my iPhone using Tapatalk
 
Short of a full probe package, every other method I see people outline seems outright silly.

Aside from not having a dial on the face of it, using a gauge block is no different than using an Edge Tech touch off gauge. They're both known heights and on a Fadal the "block height" is going to be whatever you're using, so in your case 4" of the gauge is on top of your work offset Z0. Nobody is saying to jog a tool down onto a hard surface even when using a gauge block or pin, you're going below and sliding it under as your tool travels up. This is as reliable as your machine movement is in jog. I love the Edge Tech setup, I have a ton of their stuff but it adds extra steps if your part is too small to have it sit on top.

Using the Edge Tech on the table and touching everything off of it that way is a great method. You just need to swap it out for a solid 4" block and measure from there to wherever your work offset Z0 is and put that into your work offset Z value, which is fine it's just added steps compared to other methods mentioned above. Takes longer for my Fadal to do a tool change than it does to set a tool offset the way I've outlined above. Don't see how that is silly.

If I had set tools in set pockets and left them there always no matter the job I'd touch everything off a known constant height (Edge Tech off the table) but since almost all of my work is different tools on different parts in different setups it's faster to just touch them off my work offset Z0 with a 1" gauge block and not even use the Haimer for anything but picking up X & Y. There's no additional calculations or steps.
 
Aside from not having a dial on the face of it, using a gauge block is no different than using an Edge Tech touch off gauge. They're both known heights and on a Fadal the "block height" is going to be whatever you're using, so in your case 4" of the gauge is on top of your work offset Z0. Nobody is saying to jog a tool down onto a hard surface even when using a gauge block or pin, you're going below and sliding it under as your tool travels up. This is as reliable as your machine movement is in jog. I love the Edge Tech setup, I have a ton of their stuff but it adds extra steps if your part is too small to have it sit on top.

First, yea... that is way smarter to slide the gauge under the tool as it is moving up in Z. The method most everyone teaches is to bring the tool down until the gauge block stops sliding, and I find that maddening.

So, what is the advantage of touching your tools off on the top of your work? Am I missing something?

I'll often run 4-5 setups over a few hours prototyping parts. I never need to re-touch tools once I set them as everything is set off of the 4" height off the table (Edge Pro for all the tools, and the Haimer touches the 4" tall side of a 246 block I use to calibrate the Edge Pro). Like I said, I've never once had to do math on a tool-length offset or part offset. Touching tools to the Edge Pro takes literally 15 seconds tool-to-tool. I can have my whole turret touched off in about 2 minutes.

And a lot of my setups are funky because the whole reason I got the Robodrill is to explore parts, so I'll totally rock a janky, unrigid setup just to get one part in-hand to evaluate it. Being able to probe it 100% with the Haimer makes doing that child's play.

Like this funky setup, using a metric 10x20x40 block for support. The Haimer made setting this thing up so easy, even my dumb ass could do it:
dXxXpGS.jpg
 
ProjectZero,

This is a Fadal with lots of built in help. In my situation I'm doing a lot of prototyping, thus constantly changing tools, etc. There may be better ways to do this, but I would suggest you check out the following:

Hit the space bar until you get to 'Enter Next Command'. Type UT for the utilities menu; type 1 for tool length setting; enter number of first tool to measure; enter number of last tool to measure; enter the height of the device that will measure tool length - assuming you are measuring from the top of the part, this can be anything from a known thickness piece of shim stock to any one of the devices mentioned already (I use a device that is 4inch high when it hits zero). If the tool changer is not at the first position to measure, it will ask you to press START to get to that position.

Now hit 1 and enter the tool diameter, hit ENTER. Now hit 2, then the JOG button and position the tool just above your measuring device of choice. Once you have touched off on the measuring device, hit MANUAL, then START - the tool length is stored in the tool table and machine indexes to next tool. Just repeat until all are set.

The Fadal also has utilities to find corner of stock, center of hole, etc. all with an inexpensive edge finder (though I second the idea of getting a 3D Taster one day for edge setting). Best bet is to look at the Fadal manual. If you don't have one, they are available to read and/or download on the net from various after market Fadal suppliers.

The other commands to learn are DT (display tool table) and DF (display fixture offsets). For example, with DT you have option 3 - select a range of tools, enter an offset and all tools are moved by the offset amount.

I'll be the first to admit, there are no doubt better ways to do this (Bobw where are you??), but its become so second nature, that tool setup is quick enough for your truly.

Fred

Edit: BTW, where are you in California?
 
The method most everyone teaches is to bring the tool down until the gauge block stops sliding, and I find that maddening.

So, what is the advantage of touching your tools off on the top of your work? Am I missing something?

I'll often run 4-5 setups over a few hours prototyping parts. I never need to re-touch tools once I set them as everything is set off of the 4" height off the table (Edge Pro for all the tools, and the Haimer touches the 4" tall side of a 246 block I use to calibrate the Edge Pro). Like I said, I've never once had to do math on a tool-length offset or part offset. Touching tools to the Edge Pro takes literally 15 seconds tool-to-tool. I can have my whole turret touched off in about 2 minutes.

I completely agree touching of jogging down into a hard surface is not good practice. I think most of us can agree on that.

I personally don't touch off tools on top of work as I rarely make my Z work offset the top of my part. Most of my parts start in Talon Jaws so my Z0 is the bottom of the stock (top of my jaws) so everything gets touched off on the top of my jaws as they almost never come out of the mill. For each varying work offset I'll Haimer that same spot, record the Z value, pick up Z0 on my other work offsets and input the difference into my other work offset Z values (that's the only time any calculation is done since Fadal doesn't have any reference position that's clearable). When using an Edge Tech off the table it's the same process just need to swap the ET out for a 4" block to pickup with the Haimer.

If you're sharing tools between different parts and different setups a common touchoff location is important yeah but if you're using specific tools for a specific part/op it's just adding extra steps touching them off somewhere else then calculating your work offset height.
 
I completely agree touching of jogging down into a hard surface is not good practice. I think most of us can agree on that.

Yet, that is the method still taught by most. It's terrible!
(confession: I'm going to go try tool height measurement using your method when I am next in front of the Robodrill!)

I personally don't touch off tools on top of work as I rarely make my Z work offset the top of my part. Most of my parts start in Talon Jaws so my Z0 is the bottom of the stock (top of my jaws) so everything gets touched off on the top of my jaws as they almost never come out of the mill.

Fun trick if you're on HSM Works/Fusion - when doing work in Talons, set G54 Z0 on the built in parallel. When HSM spits out your g-code file, it puts the minimum Z depth of each tool in the top header. If you're like me and enjoy maximizing your material use and really running a 0.06" thick carrier, it's a quick way to make sure you get full clearance.
 
Yet, that is the method still taught by most. It's terrible!
(confession: I'm going to go try tool height measurement using your method when I am next in front of the Robodrill!)


Fun trick if you're on HSM Works/Fusion - when doing work in Talons, set G54 Z0 on the built in parallel. When HSM spits out your g-code file, it puts the minimum Z depth of each tool in the top header. If you're like me and enjoy maximizing your material use and really running a 0.06" thick carrier, it's a quick way to make sure you get full clearance.

That's exactly why I do it from the top of the jaw/bottom of stock! My max depth on everything around the profile is Stock Bottom +.065". I'm using Fusion360.
 
That's exactly why I do it from the top of the jaw/bottom of stock! My max depth on everything around the profile is Stock Bottom +.065". I'm using Fusion360.

Am I the only one who wishes Adaptive Clearing would see the part model for Stock To Leave, but go to my From Bottom setting for everything else?

I do not like having to stack various offsets... Right now, I set bottom to 0.030 below stock, with 0.020 stock to leave, so Adaptive winds up cutting 0.010 below model bottom. I wish I could set all that directly. The hundred little hacks like that are exactly where machine crashes and mistakes live, and it's really not good UI design.
 
I use a tool height guage and set the tools with that. For tools that move/flex when you cut, i make a light cut for flatness with my known good tool and then make a heavy cut and measure the difference. This can be 1-3mils off the touch off gauge. I do all the part height setting with a 3d sensor.

Also keep a sharpie nearby to write the offset on the tool if it comes out the machine
 
A long time ago, I bought one of the first Edge Technologies tool-setters. This one:


This thing was a pretty good concept. But I quickly figured out, it was missing one very important feature, to work great for me.
The way I handle my Z work coordinate is: The value for Z = the distance from the point I touch all my tools off, to wherever I want Z "0" on the part.
So, not knowing exactly where this Edge technologies thingy was at when the needle was at "0" was a problem.
My solution was: I swapped out the Edge Technologies platen for a flat Starrett indicator tip. Shown in the previous pic.
Then I machined a steel "donut" to sit in the pocket in the tool setters body left wide open after the big stock platen was gone.
As seen here:


What this accomplished: it allowed me to make the indicator read "0" when the Starrett tip was flush with the donut!
Now. when I set all my tool-offsets where the indicator read "0", I had a reference point so I could measure the difference between that point,
and the point on my part or fixture where I wanted my actual Z "0". This is where the HAIMER comes in.
Bring your HAIMER down, zero it on the top of the donut, and then origin your Z position in your operator position page of your machine control.
Now you can take the HAIMER and go zero it wherever you want your part "0".
The number you end up with in your operator position page gets copied to your work coordinate (G54, G55, etc.).
Done!
The beauty of this that I like is, all my programming is done from Z "0". So, if I want to face the top of my part at Z "0", that is what the actual code reads.
My face-mill wil face the part at G54 Z0.0. And, every other bit of code is relevant to Z"0". Trying to figure out if that drill drilled deep enough for the tap?
Its easy! No math, just look at the numbers. trying to figure out if you have enough flute, or stick-out? Again, look at the code, the numbers don't lie. No math!

I have tried many different techniques and strategies for handling tool-setting, work coordinates. And, this is by far the easiest (for my simple mind to handle).
It is also the hardest to screw up. There is no math. The only opportunity for error is copying the value from the position page, to the work coordinate.
Even that is pretty hard to screw up.
The HAIMER and tool-setter are tough to beat! I couldn't operate my shop without them!

After living with the Edge Technologies contraption for about 4 years, I got tired of messing with the donut, and hated the fact that zero was not "straight up".
So, I made my own get-up to accomplish the same thing. And it functions absolutely amazing. No more donut to fiddle with when setting larger tools.
And, with a larger foot-print, and square corners, its sits much more stable.


Back
Top