What's new
What's new

Suggestions on Workholding for otherwise simple part

Jared

Aluminum
Joined
Jan 17, 2006
Location
Portland, OR
Going to be running some new parts soon and the powers that be have decided already on how its going to be done. I dont necessarily think its the best way but am struggling for better answers. I figured i would ask the pro's and see what you guys come up with. I'm always looking for stuff that i haven't thought of or seen before.

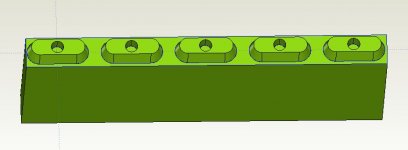
Part is brass, tight surface finish callout, center hole is +/- .001, rest is .005 or better. Already have the correct tapered end mills. Size is something like .600 x .200

MUSP0sQ.jpg


Batch size would be 10-1000.

Bar-Feed it. Pisses some material away, but I find more often than not it is worth the lack of handling. Makes holding the centre bore easy as well. Don't even need a sub for a done part if you pre-part it.
 
It's still a simple part. Do them in bar form. .250 x 1.5" bar Cook it in an oven 400 one hour. Stress relieve, so it won't go "WOW" on you. ;)

Cut the bar the length you want to use. I used 21". Put the bar on it's .25 edge. Grab enough to have a sturdy sample that wont chatter.

Pick up a .030" x 1/2" dia. carbide woodruff cutter. \ <- this represents the tooth cutting angle 7 degrees on all the teeth. the woodruff shank extends above the represented cutting edge. We are going to part these pieces from the bar stock after the part has been drilled, and profiled. When the parts are ready to be sliced, you set the w cutter down to just cut .010" past the center of the bar center. This will just cut ~1/8" into the part side. Then do it on the other side to part them. RPM 1000 or less to start, feed around 7" per min. CLIMB mill. My numbers may need to be adjusted. Just sneak in for the test run.

Important! when going from side 1 and around side 2 DON'T lift the tool, to ensure same height for surface finish. When the parts release there will be a VERY small tit where it released. Slide it on 600 grit wet dry.

This may sound funny.. If you air blow the first side to get the chips out and use no air on the second side the parts will lean away from the w cutter and may just sit there after the cut. Sometimes if you don't use air at all, the little parts will sit on the chips.

Incidentally a carbide circuit board drill will put the hole in tolerance.

I know this a lot of instruction, but if you get it working it's a very useful setup.

Best regards,

Stan-
 
Brass with those sharp edges would be very easy to damage at part-off. Take an old live center apart, make a new arbor for it with a rod about 1/2 the size of the hole sticking out 3-4". At part off, run the quill in so the rod fully enters the hole in the part. Part off, dwell long enough for the part to quit spinning on the rod, retract tailstock quill. You could bolt / clamp a brush or something on the quill housing so it brushes the part off the rod into something soft to catch it as the quill retracts.
 
I like Stan's idea... Run them in strips... I've been swapping over a lot of my parts to that method lately, its saved me a lot of time.

That 10-1000 batch size quickly becomes batch sizes of half a part on the low end, and 50 on the high end.

The inverted taper makes sense so that you don't kill that sharp corner on part off... Also that inverted taper and matching
cutter could be used to make soft jaws to grab an entire strip of parts for back side facing if the parted/sawed off surface isn't
good enough for you..

But, you already have the tapered endmills... The issue I see there is the very sharp corner at the bottom of the part.. Its
going to be a bitch to deburr by hand for a part that small.. Either a small vertical to blunt the corner a bit, just a few thou,
and then a pass over the sand paper like Stan said... Or a back chamfer tool, though finding one small enough to fit between
parts may be tough.
 
Make them in a strip just like your looking at the print but upside down. make a set of soft jaws that holds them with a inverted cutter, mill back off, throw in tumbler, rinse, dry, ship.
 
Last edited:
If that part really has a sharp edge, it's a terrible design. The edge going to be super fragile.

Probably fastest to profile and part them off with saw/t-cutter/woodrufcutter.

If you have a bar fed lathe sitting around with live tooling that would work too.
 
I run parts like that in the lathe.


--------------

Think Snow Eh!
Ox
If he has live tooling and the part is only .600 long that is the only way to fly. I was thinking he did not have live tooling. Don't know why I thought that.
 
If he has live tooling and the part is only .600 long that is the only way to fly. I was thinking he did not have live tooling. Don't know why I thought that.

No live tooling unfortunately.

Also in case it wasn't clear the back side is flat and parallel to the top.

I'm intrigued by the lathe suggestions though.
 
Make them in a strip just like your looking at the print. make a set of soft jaws that holds them with a inverted cutter, mill back off, throw in tumbler, rinse, dry, ship.

No live tooling unfortunately.

Also in case it wasn't clear the back side is flat and parallel to the top.

I'm intrigued by the lathe suggestions though.
Then that is how I would do them. After first side I would saw them into individual pieces put them in there little nest milled in soft jaws and cut the back off. probably 6 per set of jaws. Or a fixture with hold downs the angle of the part and a little pocket they set in maybe .015 deep..It would be tiny but your just milling the back off of brass. Be changing them in there fixture while other fixture is in vice getting cut. No need for special tool to mill hold downs. Problem is cycle so short. I love little simple parts but hate how fast they get done.
 
Going to be running some new parts soon and the powers that be have decided already on how its going to be done. I dont necessarily think its the best way but am struggling for better answers. I figured i would ask the pro's and see what you guys come up with. I'm always looking for stuff that i haven't thought of or seen before.

Part is brass, tight surface finish callout, center hole is +/- .001, rest is .005 or better. Already have the correct tapered end mills. Size is something like .600 x .200

MUSP0sQ.jpg


Batch size would be 10-1000.
.
a piece of brass held in mill vise with 4 dowel pins sticking up. you place 4 rectangular pieces over dowel pins with super glue between
.
machine outside taper, heat parts (toaster oven not used for food) to break super glue bond. of course super glue can break free suddenly during machining especially if parts get too hot
.
doing 4 at a time what with super gluing and heating to break glue bond i can see it taking time
.
off course if taper angled sides could stop short .010 so you could put then in a shallow slot fixture with one screw holding it through the hole it would be easier and make the super glue not needed. often corners are rounded off .010 anyway
 
.
a piece of brass held in mill vise with 4 dowel pins sticking up. you place 4 rectangular pieces over dowel pins with super glue between
.
machine outside taper, heat parts (toaster oven not used for food) to break super glue bond. of course super glue can break free suddenly during machining especially if parts get too hot
.
doing 4 at a time what with super gluing and heating to break glue bond i can see it taking time
.
off course if taper angled sides could stop short .010 so you could put then in a shallow slot fixture with one screw holding it through the hole it would be easier and make the super glue not needed. often corners are rounded off .010 anyway

Your talking R&D prototype quantity. He may be making 1k of these. Super Glue and Baking parts???? Don't open your own business....
 
machining

Your talking R&D prototype quantity. He may be making 1k of these. Super Glue and Baking parts???? Don't open your own business....
.
he asked how to do. i never said it was fast. quantity is 10 to 1000
.
if made .100 too tall so then could sit in normal vise jaws. then flip and machine center 1/3 holding down on ends, then put screw in center hole and machine outer 1/3 on ends will do it too
.
thats 3 ops and moving clamps on each piece. yes that may mean only 5 to 10 per hour
.
not everybody has a lathe with live milling tooling
 
.
not everybody has a lathe with live milling tooling


Then it is the managers responsibility to learn what parts that he is, and is not equipped to process efficiently, and what to doo about that.

A) N/Q
B) Take risk farming it back out - in effort to keep customer coming to him.
C) Quote at the higher / inefficient price, and hope that the buyer doesn't locate someone that can run cheaper...
D) Buy high $ equipment that he kant otherwise justify, to run otherwise cheap parts.
E) Run them the hard way for a break even rate.

D/E = ...and then spew drama all over message boards about drain circling and all that rot - simply b/c they chose to engage in a process that they were not efficient at.

... at least that's how I see it... ;)


On a job involving up to 1000 pc qtys, the non-efficient 1pc "Toolroom" process is not helpfull.


edit:

If I was to run these on a mill, I would NOT use a tapered endmill, and would instead use custom ground woodruff key type cutter.
Run the part upside down.
Cut off the host material with a slitting saw.

If required - you could re-fixture and skim cut the top, but that would be a lot of werk for little gain IMO.

Toss in Vibe and an hour later - you have parts!


I know that I read some ideas involving woodruff cutters and such. I didn't follow along too close.
This same idea may have been recommended in whole or in part already.
I think this process could be reasonably competitive.


EDIT II:

The whole reason that I mentioned upside down was to allow flipping and clamping, but if the slitting saw does a nice job (which it should) you could run it right side up. I was not in the mind of the slitting saw when I started the reply.

If running right side up, you could gang strait off the bar with the small kerf loss of the tapered mill.
If going the route of the tapered woodruff cutter, then you would want to saw blanks ahead of time as the woodruff cutter would waste too much material between parts.


--------------------

Think Snow Eh!
Ox
 
a lot of parts are made on not the most efficient machines
.
1) mill with 0.09" in vise, tapered sides tapered end mill and hole
.
2) flip and clamp 40% holding down machine the 60% off (.090)

3) move clamp or rotate part so machined part under clamp and mill the 40% off (.090)

maybe 10 a hour. and like a lot of things if thought about maybe can setup to do more than one at a time
80/day or 400 a week
.
in Short Run Cell thats all we do is make stuff in low quantities. if it is a constant repeat job then yes we would look into making process more efficient
.
sorry if my ideals are not helpful. he asked for ideals and i mentioned how it could be done
 
Just thinking out loud.....

What if you had a strip of say 24" long between two vises with long soft jaw, 10-12 parts and thick enough to run say 4-5 batches in one setup. Use the slitting saw that Ox mentioned and step down incrementally in Z the part thickness by using a sub. Could yield 50+ parts per setup.

Have no idea if it will help but thought I would throw it out there.;)

Capture.JPG
 
Dave has a super idea - and not only does it save loading time, but it also saves waste material that is in the vise(s).


Another edit to my previous post:

I guess that you wouldn't even need the woodruff cutter for the upside down app.
Could just get the mill ground the other way.
However - with this approach - you would paroll want to start with a bigger mill as your helix is pulling heavier chip into smaller cavity. With a big enough mill this may still be OK. The woodruff would have strait flutes.


----------------------

Think Snow Eh!
Ox
 
Ask the customer if you can have construction holes. Even something as small as .062 on the bottom side will work. Then either use stripper bolts, or a custom made shoulder bolts, for hold downs. You would have to cut your parts to the correct thickness before machining the profile.

If I was doing it myself.....first off, I would cut the blanks close to size. I would then machine the parts to the correct thickness. Next, I would put in the main hole, along with either one or two construction holes. Then I would make a plate up that has room for 10 stations. Load your parts, then run your profiles.

If the center hole has a tight tolerance, you may have to make up some special hold down bolts. If it is a nominal size center hole, then a few stripper bolts would work. And if the center hole is a nominal size, you could get by with one small construction hole just to keep the part from pivoting.


Back
Top