What's new
What's new

2 cavity injection mold cavitys d4 style.

diamondman

Cast Iron
Joined
Mar 17, 2005
Location
diamond ohio
Hi all,
It has been a while but thought you guys would like to see where
i am on this mold.
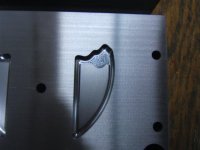
This is an insert tool for one of my customers.
The cavities are just roughed in using a .218 ball endmill. to leave finish stock I programmed the tool radius comp .008 larger the the tool
next I will finish the contour and depth (fixed half .118 deep, moving half .273 deep) with a .236 ball endmill.
Then finish the flat area around the hole with a 1/16" endmill.
The part sample is in this picture.

http://oi41.tinypic.com/2nqe4wn.jpg

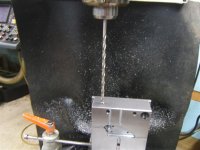
This is a picture of the moving half showing the .025 step overs while roughing.
The finish step over will be .010

http://oi42.tinypic.com/2dlq886.jpg


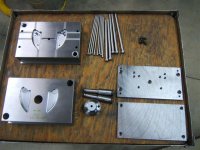
No cam program was used to make this mold I used my cad program to get the points for tangent points and arc dimensions.
The whole program with 3 tool changes for both halves is 117 lines of code and 2,645 bytes of memory.
This is accomplished using the G79 contour pocket cycles, %*subroutine for the contour,looping blocks, G56 absolute offset
and mirror image G81.
I will post final pictures when I get it finished.
I cannot post the program for confidentially reasons But I got the O.K. to post generic pictures.
Dave
 
Last edited:
I forget: does G79 rough out using both climb and conventional milling? How do you avoid wrecking the cutter during the conventional portions? I hate that most of the D4 pocket routines use conventional milling at least some of the time. I know you can force one of G7x pocket routines to climb all the way, but only if the X dimension is bigger than the Y dimension.
 
I am using g81 x mirror to get the right cavity it conventional mills due to the g81.
I would program each cavity separately if I had a problem with tool life or finishes.
You can clear out the pocket either way (climb or conventional) by programming the contour climb milling and the pocket will clear out both directions as it is faster(no lost motion to lift and reposition) .
You can climb in pin milling or circular pocket and helical moves by using g2 or g3. I am not sure about the rectangular pockets.
I am only doing 1 so tool life is not an issue. The cutter speed, cutting depth and feed are more important for the tool life and finishes than cutting direction.
Dave
 
Dave:
Thanks for posting the photos....did you tell us what the material was in an earlier post? What speed/feed on each cutter.
Will you use a honed edge on the finish tool?
What coolant do you use?

How did you define the profile (outer) to the floor clearing? (G79?)

What is the called profile allowances?
How much time to get to this point?

Cheers Ross
 
Ross,
Slow down I live and have my shop in a pole building in the out in the country.
We don't get in that big of a hurry.
material 4140 heat treated to 32 rc.
2500 rpm larger cutters 3200 1/16 endmill
water soluble air mist( chips are small and the air helps since I am running vertical to use my flip head rpm.)
the g79 prompts you for the pocket clean out (step over,clean out direction, start point
and infeed and a few others.)
After g79 you use a g42/41 and define your outside contour then another to define the islands( bosses or shapes you want to leave and clear out around then the pockets you want in the islands you left. then close it with m79 or m78.
I just finished milling both halves cavities and have 10 hrs. in the fixed half and 12 hrs
in the moving half.
Still have to lightly bench scotch brite and some 320 grit to blend machine marks,
drill and ream holes for ejector pins,and cut off and grind to length the pins, ejector plate, press in guide pins and bushings, make to cores for the 1/4" hole and drill and pipe tap
cooling lines.
probably will have 35 to 40 hrs drawing , programming and machining.
$500.00 in material and tooling
that is if it shrinks right. If not damage control and insert the pockets, move the 1/4" core
grind the part line or cut the pockets deeper to get the part to print.
Welcome to the injection mold business kind of like die making.
thanks for your interest are you going into the mold business?
you cannot compete with the chinese they sell a mold for what I pay for a mold base.
Dave
Not sure what you mean called profile allowances. No tool honing feedrates slow on infeeds and what feels right no necessarily book chip per tooth ratio for carbide cutters(rather slow to achieve finishes to eliminate most of the benchwork.)I will post pictures.
 
Last edited:
Dave:
Thanks for the info...Nope not going into the mold business,can't keep up with my current work load! Just curious as to what other guys are doing and how they get there...its all education, ya stop learning and you might as well stay in bed.

Is there allowance for part shrinkage in the cavity, or is it not significant?
Can you tell us what the finished part material will be?

Love to see the photos when you get it done....
Cheers Ross
 
It looks like it could be fun to me but that might be because I don't do that kind of work (yet:)) for a living,rebuilding engines used to be fun:drink:.Seriously though, can you really not compete with the chinese I mean do you have customers that tell you they can get it cheaper from chinga linga or is it like a silent disappearance where you just don't here from them again? I got to compete with low cost junk too, it pisses me off but it makes me hungrier and better. If you don't mind me asking what would a job like that pay in the good young USA. Regards,Mike
 
Mike,
It used to pay better 80s and 90s Now I make a decent rate and do 3 or 4 a year.
My customer has the master base in a dedicated machine The inserts are clamped it a tee slot. They have quick disconect water cooling lines everything is qualified so I can build an insert tool while he is running other jobs.
This way when he sell a new tool a lot of expense is gone vs, buying a whole base.
The set up is a lot quicker for him also.
I have made about 100 of these over the years,
This one goes for $3,850.00.
I use only DME American made ejector pins ,sprue bushings, and guide pins.
I have 4140 burnouts burnt locally form plate send them to the heattreater.
In this mold I have about $350.00 worth of tooling and materials.
It will be finished tuesday.
I will post pictures them.
Dave
 
End Result

Hi All,
Here are the pictures of the finished mold.
It was sampled yesterday. waiting for approval from my customers customer so I can bill it$$$
After milling the base , guide pins, bushing holes and cavities I went to my Bridgeport and finished the ejector pin holes (drill and ream 5/32" 1-7/8 deep) the runners and gates and the water lines(1/4"dia 7"+ deep) sorry but the Deckel is not as good at these in this situation.
For positioning my Bridgeport has a 2 axis anilam control.
Mike, yes they are vents.
Dave
 

Attachments

  • DSCF5593 (Medium).JPG
    DSCF5593 (Medium).JPG
    47.8 KB · Views: 378
  • DSCF5596 (Medium).JPG
    DSCF5596 (Medium).JPG
    64.1 KB · Views: 432
  • DSCF5600 (Medium).JPG
    DSCF5600 (Medium).JPG
    73.5 KB · Views: 411
  • DSCF5614 (Medium).JPG
    DSCF5614 (Medium).JPG
    66.6 KB · Views: 346
  • DSCF5617 (Medium).JPG
    DSCF5617 (Medium).JPG
    56.9 KB · Views: 457
Hi All,
After milling the base , guide pins, bushing holes and cavities I went to my Bridgeport and finished the ejector pin holes (drill and ream 5/32" 1-7/8 deep) the runners and gates and the water lines(1/4"dia 7"+ deep) sorry but the Deckel is not as good at these in this situation.
Dave


Hi Dave
Would be interested in hearing your thoughts about why you prefer the Bridgeport for those operations vs the Deckel and why you find the Deckel lacking?
 
Not a lot of drift,
Make sure the drills have a good point, i start with a center drill then jobbers then taper length lastly extra long 8" with 6-1/2" flute. The taper length and the longest one are too long for a drill chuck so I put them in a R-8 collet. Also the holes don't have to line up perfectly to allow the cooling. They do have to be close enough to not restrict the flow.
Maybe some day I will get an old mold my customer no longer needs(obsolete part)
and cut it down to the water lines and see how bad they are,
Dave
There are actually 4 1/4" x 7 holes in this mold.
 
Last edited:
Steve,
Bridgeport has 6" quill travel deckel has 3+. There is a lot of backlash in the deckel quill which makes it hard to control the drill. Drilling .150 dia. holes 1-7/8" deep with the deckel quill it is hard to feel what the drill is doing.I can shove the 1/4" drills up in the r-8 collet 3" and only extend as much as necessary to go to depth. As far as doing deep holes with out through the drill coolant i wouldn't try to do them using cnc. Even with the toolmakers chip pan I can get closer the the work on a bridgeport. If you programmed it on the deckel you would still have to babysit each hole with your hand on the estop in case the drill grabbed or went back in and there were chips in the hole. A lot of gates are small and I like the feel of the bridgeport.

Thanks for the kind words everyone.
Dave
 
Interesting perspective--thanks for sharing your photos and experience.

I drill a lot of small holes (with the quill) and find the Deckel quills satisfactory, never found the backlash to be an issue. I used to be a big fan of the Bridgeport and it was a leap of faith to go Deckel. I don't miss it one whit, so I find it interesting that a Deckelmaster like yourself would prefer it. I can see how the enclosures keep you away from the work and don't have them on my machines for that reason.

Have you ever experimented with adjusting the tension on the quill spring to get better feel when drilling?
 
I have done lots of small deep hole drilling in tough materials with my FP4NC.....I have an ER collet setup that allows direct holding of literally any drill size.
That job looks to me like a natural to run horizontal...no gravity to cloud the feel, (no return spring either) and much better chip evacuation.....Close to the operator as well, and easy to watch. A directed coolant stream along the drill axis will flush the hole and not just puddle.

I do sensitive drilling using the quill (horizontal) and the MPG.....
Leave the control set in mode4 and drill using the quill ,retract then advance the "Y" and repeat...
The MPG will repeat position if you move it the same position each time, so returning to the last position is quick and accurate.
To advance the depth on the "Y" i extend the quill slightly, leaving the clamp loose and advance until i see the handle move (touch the drill to the hole bottom) then continue the hand feed....
If you set the control readout when you first started drilling at touch down with the quill fully retracted, when you get almost to full depth i retract the quill and finish the last little bit using just the "Y" feed and your depth will read direct on the control...

Bridgeport makes a pretty good drill press...but i hate cranking the knee, and the R8 collets!
I can totally understand not wishing to change over to horizontal when the BP was standing there waiting.....after all time is money.

Thanks for sharing the finished photos.

Cheers Ross
 
Ross, I agree the horizontal quill is fine. drilling horizontal is always better But I had a nc indexing job That I had to get started on. Another reason I do the mold finishing on my bp, why tie up aned put wear hours an expensive cnc machine with operations that can be done on a drill press.
I don't tap on the deckel much either. I use a tapping head on my drill press I do tap on the deckel if the thread is larger than 1/2".
My fp4 has been running other jobs since last thursday while I finished the mold on the bp
Ross you are right its all about the $$$$.
Dave
 
Diamondman,

thanks for posting the pics & the writeup on your mold build.
good stuff inducing the appropriate technical dialogue.
appreciate Ross's return comment of the Deckel's horizontal
work envelope to the BP's vertical. a nice learning opportunity
for someone like me who is watching this specific forum to
flatten the learning curve for a future Deckel purchase.


Back
Top