What's new
What's new

FP2 headstock (horizontal spindle ram) questions

ballen

Diamond
Joined
Sep 25, 2011
Location
Garbsen, Germany
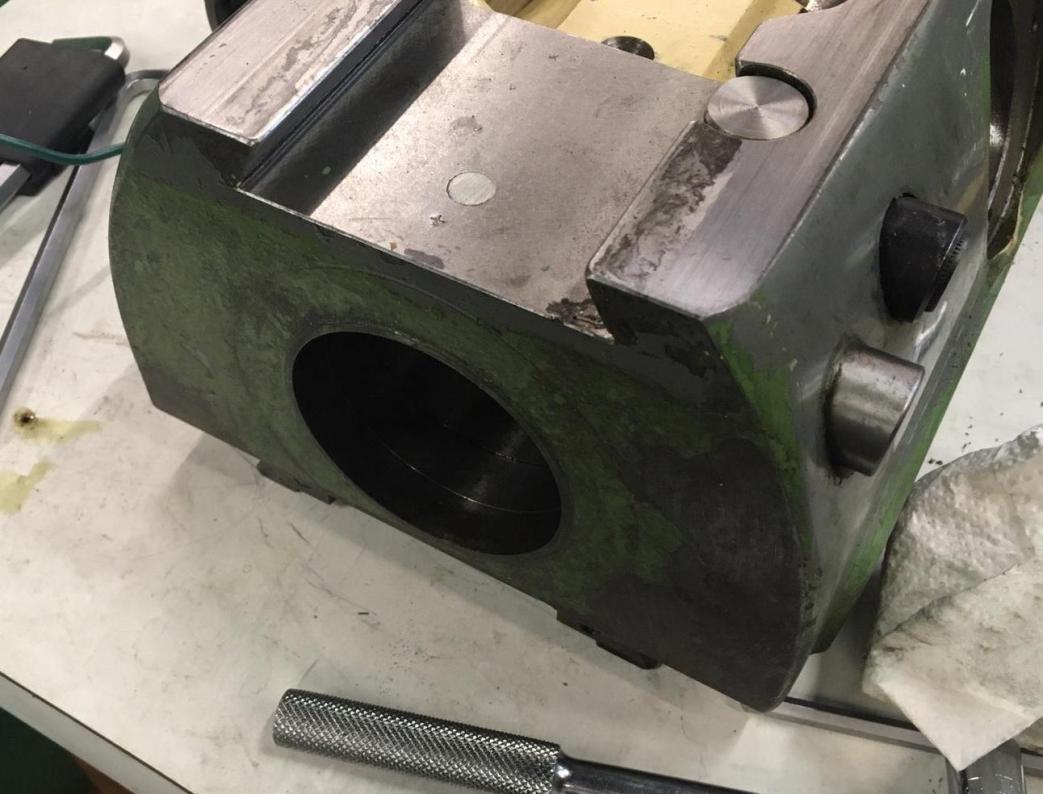
I've got the headstock (horizontal spindle ram) off my 1964 FP2 in order to paint it. First time it's been off the machine in 6 or 7 years. I've got a couple of questions:

- Should I paint the end around the spindle nose (photo below)? Or remove the paint and leave it blank (or scrape it for appearance)? Point is that I often stick a magnetic indicator base there.

attachment.php


- I'm going to replace the two 6010 (50 x 80 x 16mm) bearings that hold this gear. Should I do anything to the shaft to remove the marking from pushing the bearings out? For example spin it in the lathe with a bit of emery paper and oil? Or will that remove too much material?

attachment.php


- Once I have the Y-axis locking hardware off, I would like to pressure wash the casting with detergent before painting it. But am slightly concerned about getting water/detergent into the region around the spindle locking ring (which I have not removed, visible in the first photo above). Is my concern misplaced? I suppose I could grind a plug to the same diameter as the horizontal spindle and insert it there during the wash, if needed.

Cheers,
Bruce
 
Last edited:
Bruce:
Think i would paint the end or your "Y" slide.....Not a well finished part and there is the interruption of the ring that closes off the face of the spindle (Captures the locking ring) might take a fair bit of
scraping to get that surface flat or to look finished and machine like.
Painted is the way Deckel finished all the "Y" axis ends even the FP-NC's were painted there with the exception of the flip head machines (on those, that face becomes a fit for the fold down "door" to seat against)
I understand your liking the surface for sticking a mag base....But i think using the underside flat on the dovetail works just as well.

As to pressure washing, yes i would make a "blank" to keep water out of the spindle housing bore..Wouldn't bother with grinding, .I would turn the blank and fit with "O" rings to seal off the water...

As to the gear, think what you see there is the strobe pattern from the grinding....surface has a slight ripple in the finish, the bearing inner race has shined the high spots on removal....Could lightly polish it with some very fine abrasive,,,Don't want to remove any real amount of material,just enough to be sure there are no burrs or pulls that might upset the bearing fit up.

Will wager that if you oil the shaft and heat the bearings (200/250*f or so) the bearings will simply fall onto the shaft...no pressing required

Cheers Ross
 
Hi Ross,

-- OK, makes sense, I'll paint the end of the Y slide.

-- have ordered a couple of 70mm ID 80mm OD O-rings to make a sealing plug

-- regarding light polish/fine abrasive, what would you reach for? is fine emery paper suitable?


Will wager that if you oil the shaft and heat the bearings (200/250*f or so) the bearings will simply fall onto the shaft...no pressing required.

I can't do it here. This is one of the Deckel "ship in a bottle" type parts. The only way to get the gear into place is to remove all bearings and spacers. The bearings have to be pressed onto the inner shaft and into the outer bore at the same time. Franz Singer told me to do one bearing first, and then the second. If I have understood the design correctly, they are meant to be a relatively easy fit on the ID (where they are preloaded with a couple of thick bellville washer springs) and a somewhat tighter fit in the bore. If so, I'll have to make up a "puller" to pull them into place putting pressure only on the bearing OD. Does this make sense to you? Here's the drawing:

attachment.php


As always, thanks for the guidance!

Cheers,
Bruce
 
Bruce:
As to polishing....Have 1" cloth backed strip abrasive on rolls ...Finest i have is 320 grit.
I would use that, but first prep it by setting the abrasive side against a piece of scrap steel or the anvil on the rear of my bench vise....
Then use light hammer blows on the back of the strip, move a bit and repeat.
This will break down the sharp corners of the grit on the strip and make the cutting action much softer.....

Your assembly technique sounds correct....not a fan of designs where you have to push or drive a bearing into position against both the inner and outer races, means you are applying pressure
across the balls ...not a good practice. Here if the fit is light on the shaft i would make a driver or puller that applied the pressure only to the outer race.
Are you going to fit a sealed bearing on the outboard end? Is this a attempt to cure the oil leak?

Cheers Ross
 
Hi Ross,

I've got abrasive papers up to 2000, and I think the emery cloth is softer than those. So will use that.

...not a fan of designs where you have to push or drive a bearing into position against both the inner and outer races, means you are applying pressure
across the balls ...not a good practice.

Reading that made me realise that I can make a puller in this case which applies pressure to both the inner and outer races in parallel. So in principle if everything is flat, cylindrical, and perpendicular there won't be any force across the balls. This assumes that the inner and outer bearing races are the same width and parallel.

Are you going to fit a sealed bearing on the outboard end? Is this a attempt to cure the oil leak?

Karl persuaded me that a sealed bearing on the outboard end is a Bad Idea (TM). It makes it hard for oil which creeps down the groove in the shaft to return back to the main sump.

But I'm replacing the bearings anyway, because new SKF explorer ones cost 30 bucks for the pair and have less play than the ones that are there now. It ought to help reduce the noise a bit.

Regarding the oil "leak", I did discover that the cap/cover on the end was deformed by someone removing it in the past. So that *might* be the source of the leak. I'll turn a new cap on the lathe (with some puller threads for the next guy).

attachment.php


But I now think the more likely source is simply oil that get onto the upper side of the Y-slide, under the long reach head. Gravity pulls some of it down, and it lands on the trough behind the Y slide.

I've giving serious thought to making a drain hole with a screen, that carries oil from that area either back inside the machine or to a conveniently=located valve where I can periodically drain it off, filter it, and put it back into the machine.

PS: to pull off the cap above without doing any damage, use a "threaded wood nut" with one of the spikes flattened down on a bit of threaded rod. It fits between the bearing and the cover, and can be used to tap out the cover without doing any damage.

attachment.php


Cheers,
Bruce
 
Think i would paint the end or your "Y" slide. As to pressure washing, yes i would make a "blank" to keep water out of the spindle housing bore and fit with "O" rings to seal off the water...

attachment.php


I got a new spray gun (Devilbiss FLG5) which I am using both for primer and topcoat. It works really well, very consistent:

attachment.php


attachment.php


You can't see it in this photo, but I did paint the nose
 
Hi Bruce,

well done! Your painting works do look better than my (also not bad) painting results.

Nearby: The color inside the headstock and the gear boxes is RAL1001 (Beige).

If the oil comes from the contact area between the top side of the headstock and bottom side of the long reach head, a gutter (above the cap) with a hole to the inside could be a good solution.
At the rear side of the column there is a gutter around the y-axis, too. The y-bellow is popped into the press buttons of the gutter.

Cheers,
Karl
 
Whenever I wanted a really nice paintjob (for my own machines ) I used 2k polyester spray on body filler after applying the first body filler for the big spots
It is very thick and you need a 3.5 mm nossle
It sands real easy and fills all the little spots Limited lifetime and limited potlife though
Another thing to keep in mind
I did sand down all the corners to bare metal at a 45Dgr angle Used a angle grinder even with a cutting disc using the flat side of it Sounds wird but you get a really smooth corner with it
The reason for that is that you do not chip off any filler that easy then when using or repositioning the machine

Peter
 
Whenever I wanted a really nice paintjob (for my own machines ) I used 2k polyester spray on body filler after applying the first body filler for the big spots. It is very thick and you need a 3.5 mm nozzle.

It's a good idea to break the sharp edges and corners. On this machine, that's mostly been done already.

I'm using a Devilbiss FLG5 spray gun with a 1.4mm nozzle for both primer and paint. Key point is that the old finish is in good shape and mostly smooth and well adhered, just hidden under two badly applied coats of green paint that were slobbed on with a brush. So my approach does not need any thick layers of filler. Here's what I do:

- scrape/sand off the crappy green paint. This is the worst part of the entire job.

- Clean off grease/oil with soap/detergent

- With sandpaper rough up the original paint and any exposed filler or bare metal

- I spray a thin coat of 2k primer/filler for adhesion (MIPA 2k-acryl primer/filler)

- use 2k putty to fill the chips/holes and level off

- sand aggressively, partly dry, partly wet, to get an even surface. Quite a bit of the primer comes off in this process. In fact the primer is there just to help the putty bond well and it helps me see imperfections in the surface. So when I am done a lot of the primer is gone.

- Now I spray one more thin coat of 2k primer/filler. This is to help the paint adhere

- very light wet sand to get rid of nibs, dust, orange peel or splatter. I try hard NOT to break through the primer.

- One or two really thick coats of 2k (MIPA PU 200-90) applied in a single spraying session, with a pause for the first layer to flash off. My philosophy: if I don't get at least one run, I'm not putting down enough paint. If I get it right, the surface afterwards is almost like glass. Because this is a 2k paint, you have to spray all the layers a short time after each other, not more than ~15 minutes, otherwise they won't fuse and bond properly.

- wet sand with 1000/2000/3000, rubbing compound, wax. This takes very little time if the previous step went well.

As you know, the time spent spraying paint and primer is only a few minutes, but the entire process takes a lot longer :). It's my least favorite part of fixing up a machine.

On this machine (1964 FP2) the original paint finish is automobile quality. I'm trying to reproduce that. The factory near Munich probably got a lot of their painters from the Mercedes and BMW factories nearby. So standards were high. Here is an interesting thread from someone in Germany who recently found and bought a "used" FP2 built in 1962. He says that the machine has had perhaps 10 hours of use since it was shipped from the factory. Look at the photo, you can get a good idea about how the machine looked when it was new:
Eine fast neue FP2 geholt - Zerspanungsbude
 
Last edited:
This question is off-topic, but since the last few message are about painting/bodywork, here goes. I'd like someone to recommend a 2 component putty with a long working time.

I've just finished scraping/sanding the badly applied green paint off the gray base casting of my FP2. It took a couple of long days. Now I need to fill numerous "dings". The largest ones are about
25x50mm (1 x 2 inches) and about 2-3mm deep (3/32-1/8"). At the bottom is cast iron, typically surround by a ring of white primer inside a circle of gray paint.

Until now I've been using MIPA 99 putty, but the problem is that it sets up in 2-4 minutes. I want a much longer working time (say an hour) so that I can patch 40 of these spots, and have time to shape them to minimize sanding time. I looked at other "bondo" type products and it seems that they all set up in just a few minutes.

Are there any slow-setting putties with more working time?
 
Look for "Spot Putty"
Under automotive refinishing....Usually a one part putty comes in a tube. For filling just the type of area you describe.
Not sure you will find anything that has an hour working time....Body guys won't wait that long...
But since its a one part putty you can use as little as you need at each spot...work them one at a time apply right from the tube.
Cheers Ross
 
Look for "Spot Putty"...Usually a one part putty comes in a tube.

I have some putty of this type (MIPA A40, https://www.mipa-paints.com/fileadmin/product/gb/pi/lm/A40.pdf) but have only used it on very small spots, like deep scratches. I've read that it's problematic for a couple of reasons. First, when used under 2-pack paints (I am using 2 component polyurethane PU) it has a tendency not to harden completely, and to keep shrinking long after application. Second, according to the tube, it's only supposed to be used very thin, so multiple coats/passes will be needed. I was hoping to do it in one go.

In looking on-line, I have seen that some people use bondo, but reduce the amount of "hardener" quite a bit. That makes sense: it's really a catalyst, not a hardener, and does not get "used up" during the curing process. But if there is a 2k product specifically intended for this, I'd prefer to use that.

By the way, the data sheet above says, "a fast drying acrylic finishing putty to level minor irregularities, scratches and pores on the surface of body fillers, primers and fillers". So it seems that it's not really meant to fill dings, just to touch them up.
 
Thats exactly why I use the 2K poly To fill all those little scratches and dents that keeps popping up Bodyshops use it too
You also get a layer that is the same hardness everywhere and it sands realy easy
Sanding a spot of relativly hard putty will result in the paint beside it to be lower as that sands more easy


Peter
 
look for glass fiber filled body filler, they are polyester resin based usually, it is supposed to have less shrinkage, but you still want to avoid laying it down in very thick coats in one go, I wouldn't go over 3mm in one go

putting very little hardener in carries a risk - you can put too little in and have it not harden fully at places, it is a catalyst, but it needs some minimum amount to kick start the reaction, better practice is to mix multiple small batches

shrinkage comes from resin used in the filler, and epoxies have generally less shrinkage, I remember there being special - low shrinkage body fillers years ago, but recently when I went looking for one in a car refinishing supplier shop, all they had was that glass fiber filled polyester filler

if you still want a long setting filler, get a non-thinned slow curing epoxy (slow hardener), some aerosil (fumed silica powder, also used as a food additive - thickener), glass spheres (to reduce the amount of resin needed and make sanding easier, also reduces shrinkage), and cotton fiber (for strength and durability, or chopped glass fiber, but I prefer cotton) and mix it up to your desires - all these things are available in shops that sell materials making carbon/glass laminates

mix up epoxy, transfer to another pot, add glass spheres and cotton to taste, it will already thicken somewhat, but it will still run when you apply it to a vertical surface, this is where aerosil comes in, add it little amount at a time till you're happy with the consistency

p.s. this diy epoxy filler will be much more difficult to sand, so don't put on more than absolutely necessary, you can do final filling with the easy to sand regular body filler

here is a link to shop in Germany I've purchased supplies from in the past - Buy Fillers online at R&G
 
If you still want a long setting filler, get a non-thinned slow curing epoxy (slow hardener).

Good point, there are plenty of epoxies with a 30-minute or longer working time! I just had a quick look and found this putty, which is epoxy-based, and has a 15-20 minute pot life, and a 6-7 hour cure time. It claims to be easy to sand. I've ordered some to try out.

https://www.airo-chemie.com/pdf/N0_TM_Nautic_EN.pdf
 
Bruce, what you ordered it what I use. If I would have known earlier, I would have send some to you.

Meanwhile it's stored more than 10 years and works like when it was new.
Seldom I put some epoxy-thinner in the mix.

When filling rounded machine parts and areas, 20 minutes work time is too short. At temperatures above 20 °C the working time decreases.

Sanding is not as easy than the fillers with short working time. Less hardener in the mix makes sanding a little bit easier.

Next time I would test the second item in that shop (Epox-Spachtel Ultralight: 40-50 minutes working time and should be easier to sand):
Spachtelmassen

There seems to exist 2 different hardeners for:
https://www.airo-chemie.com/pdf/NL_NP_NR_TM_DE.pdf

Cheers,
Karl
 
Next time I would test the second item in that shop (Epox-Spachtel Ultralight: 40-50 minutes working time and should be easier to sand). There seems to exist 2 different hardeners. https://www.airo-chemie.com/pdf/NL_NP_NR_TM_DE.pdf

I note another difference as well. The ultralight product sheet carries the following, which is not on the normal product: Bei Stahl- oder Aluminiumbooten sollte vor dem Spachtel eine gute 2K-Korrosionsschutzgrundierung aufgetragen werden.

(Translation: For steel or aluminium boats, a good 2k anti-corrosion primer should be applied before the putty.)

That probably indicates that the "lightweight" stuff is more porous than the regular stuff or does not bond as well. I think I'll give the people at Airo-Chemie a phone call this morning, and see if I can get the regular stuff with a slow hardener.


Back
Top