What's new
What's new

Help IDing taper shank on old Wohlhaupter UPA3?

Cheetah

Aluminum
Joined
Nov 26, 2013
Location
Montana
I understand there are a few Wohlhaupter experts lingering in this section, but if I'm in the wrong spot, please feel free to redirect me.

Found an old UPA3 in a parts bin at work, nobody seems to recognize the shank, and I can't come up with any info anywhere I look. Hoping maybe somebody here recognizes it. Unfortunately it's the older style UPA3 without a removable shank, hence being in the parts bin to feed the newer replacements with R8's.

Taper is ~1.240"/31.5mm at the large end, 1.100"/27.9mm on the small end, over a distance of 2.724"/69.19mm. Threads are buttress type, with an OD of .775"/19.69mm. From any info I can find, that's oversized for 20mm buttress thread, to include the likely German sawtooth thread. Thread pitch is darn close to, but not quite 1.5mm. My Machinery's Handbook only has a couple pages on buttress threads, and I'm not finding much promise online.

IMG_2173.jpg
 
those dimensions look close to MT4, except length (which is taken up by the thread)

my UPA4 with a non-removable standart MT4 had a marking on the face where the "UPA" is engraved, see the attached photo, that may give you a clue about the shank

also, there are quite a few people (me included) who have modified these to suit different holders, mine (UPA4S, older style), had a case hardened body which is one piece with the shank, case hardening is around 1mm deep, so you can cut that MT4 stub off to desired length with something like an angle grinder and later turn/grind it down to some dimension that you have holder to hold it with (I adapted a capto iso40 holder for this, which required some additional hard turning and grinding - I don't recommend that :D )

IMG_20180725_210516.jpg
 
Taper is ~1.240"/31.5mm at the large end, 1.100"/27.9mm on the small end, over a distance of 2.724"/69.19mm.

Too much like work. Grab a 1-2-3 block or three, see what the taper is over one inch.

I could be wrong.. etc.. but it looks suspiciously as if it has already been modified, in situ.

A possible candidate could be a larger MT - not so great for mills - turned then ground to a smaller B&S taper, which ARE good for milling. Also very, very common on mills for long years. Not easy to detect MT or B&S by eye unless one has both in regular use, but the B&S taper is a skosh shallower so as to grip better under a mill's side loading than the better-for-drilling MT.

PS: Any Van Norman mills in the company history? They had a few ideas of their own as to how to mount "stuff".

2CW
 
Hoping maybe somebody here recognizes it. Unfortunately it's the older style UPA3 without a removable shank, hence being in the parts bin to feed the newer replacements with R8's.

I'm on the road, so can not easily check the dimensions. But this is very likely a Morse Taper 4 with a 2mm buttress thread (45 degrees/5 degrees) on a 20mm stub. This was a standard for many early Deckel mills, which were often supplied with these Wohlhaupter heads.

The German description of this is MK4 S20x2. If you look you might find this or Mo4 S20x2 engraved on the body. Here is a typical example:

Wohlhaupter UPA3 MK4 S2x2 z.B. Deckel Frasmaschine | eBay

You can easily convert this to a standard 40 taper with one of these adaptors:

offene Reduzierhulse SK4-MK4-RCORH44

The threaded section can be adapted to some drawbars with a small adaptor. What do you need?

I think we have a winner! Dug out the metric pitch gauge, and while it obviously doesn't fit right, the crests line up just about perfectly on 2.0mm.

I asked the old machinist if he thought Deckels were a possibility; apparently we used to have a bundle of them around. He called our one remaining shop that has one, but it's a CAT40, so no easy test there. My crude caliper and height gauge measurements don't correlate to a Morse 4, but I'm not sure I've ever actually tried measuring a taper before. I'll try to dig out a sine bar tomorrow and get a real number on it. All evidence seems to suggest you're spot on, however.

The only markings on the head are:

UPA 3/40923
K 294
2140 002011
Made in Germany

I narrowed 40923 down to being the serial number, as it's engraved by hand on the inner bits. The only K294 reference I can find is a Bohler-Uddeholm powdered steel by the trade name "Microclean." Searching the 2140 number returned this thread where tcody suggests this is the model number for an integral shank metric UPA3, plus there's some other hinting at Deckel shank UPA3's.

It seems like it's been fiddled with by someone in the past. I'm not at all familiar with Wohlhaupters, but the two detent pins don't seem to serve any function whether they're in or out. Likewise the thumbwheel that appears to be a gib tensioner doesn't seem to do anything. Being out of a parts drawer, I'm thinking it's already seen at least one trip to the butcher shop.

If I'm able to rescue it at all, it'll likely be turning it down to a straight shank rather than using adapters, but since it's not mine, I don't get a lot of say in what happens to it. We've got another R8 UPA3, a bigger Enco clone, and a Criterion, so I don't think I'll convince anyone to spend any money bringing this one back to life.
 
I'll try to dig out a sine bar tomorrow and get a real number on it.
I wasn't kidding about the 1-2-3 blocks, There's a nicely documented - with photos, even - example on PM.

By placing two blocks at right-angles to the centerline, their edges slid-up to contact the taper, and the width being accurately known as one inch, a depth-mic reads the taper PER inch (and per-side...) directly off the difference in their surfaces at the other end of the blocks.

Only "hard" part is getting that "at right angles to the centerline" to be true. In the PM example, the goods were on a lathe, t'ween centres.

Sine bar if you are au fait with that, but it is probably more stuff to dig-out, lift, handle, put away, ergo slower.

I fiddled with 123 blocks on the surface plate after reading your post, but I'm no machinist, and really not even all that clever. My measurements were coming out quite far off of any taper listed in a couple editions of the handbook, so I was reduced to assuming my procedure was at fault.

This is the only 123 block/taper post I unearthed in searching, but doesn't seem to match the description you give.

I'll give that approach a shot tomorrow, but if you can point me to where to look for the post you're referring to, I'd definitely like to check it out!
 
It seems like it's been fiddled with by someone in the past. I'm not at all familiar with Wohlhaupters, but the two detent pins don't seem to serve any function whether they're in or out. Likewise the thumbwheel that appears to be a gib tensioner doesn't seem to do anything. Being out of a parts drawer, I'm thinking it's already seen at least one trip to the butcher shop.

These are precision tools but remarkably robust, so there is a good chance that you can get it working. Others here have turned/reground the tapers to be cylindrical so that they can clamp the heads in standard collet chucks, and say that it works well. If you do this, obviously you should set up carefully to maintain the same rotation axis. But if you don't get the axis exactly right, that's OK, provided that the axis is exactly perpendicular to the motion of the slide [1].

Here is the operating manual:
http://www.wohlhaupter.com/index.ph...le=uploads/media/102165_BA_UPA1_3_engl_05.pdf

The references in this thread have disassembly instructions:
https://www.practicalmachinist.com/...ne-mills/wohlhaupter-upa1-bits-needed-333409/

The references in this thread have exploded diagrams:
https://www.practicalmachinist.com/...a3-boring-head-exploded-parts-diagram-333626/

Regarding the taper, I think yours is likely a Deckel one:
~1.240"/31.5mm at the large end (MT4 is 1.23", that's consistent)
1.100"/27.9mm on the small end (MT4 is 1.02", but I think the Deckel one is short)
over a distance of 2.724"/69.19mm (MT4 is 4.06", consistent with the Deckel one being short)

Your taper slope is 0.14"/2.724"= 0.0514
MT4 taper slope is 0.21"/4.06"=0.0517
These are close enough to be consistent with measurement error.

Can someone here check the taper length on a stock Deckel MT4 S2x20 and confirm that it's about 2 3/4 inches?

[1] I did not have this correct in my original post, but Ross corrected me!
 
Last edited:
I fiddled with 123 blocks on the surface plate after reading your post, but I'm no machinist, and really not even all that clever. My measurements were coming out quite far off of any taper listed in a couple editions of the handbook, so I was reduced to assuming my procedure was at fault.

This is the only 123 block/taper post I unearthed in searching, but doesn't seem to match the description you give.

I'll give that approach a shot tomorrow, but if you can point me to where to look for the post you're referring to, I'd definitely like to check it out!

From a more recent post in re Deckel, it is probably Morse, and it is only the male threaded extension rather than the usual internal thread for drawbar-tribe MT that is unusual.

The cited post is not "the one", but is actually a faster and easier method. Readings should be close enough, so long as the calipers are laid dead-flat to the tops of the blocks, each go. They do not even need to be in precise calibration, as you are only looking for the difference over a known long-axis span, not the exact diameters.

Tune your technique against whatever "known" tapers are lying about. It should come good quickly and remain a handy one in coming years.

If/as/when you go to MAKE tapered goods, then you will be better served with TWO methods of setting up for them and checking them.

That is more about mistake-resistance than which of the methods is the more accurate! Or so those who might actually make such a mistake might advise!

:)
 
I fiddled with 123 blocks on the surface plate after reading your post, but I'm no machinist, and really not even all that clever. My measurements were coming out quite far off of any taper listed in a couple editions of the handbook, so I was reduced to assuming my procedure was at fault.

This is the only 123 block/taper post I unearthed in searching, but doesn't seem to match the description you give.

I'll give that approach a shot tomorrow, but if you can point me to where to look for the post you're referring to, I'd definitely like to check it out!

I don't know what is so hard about this...

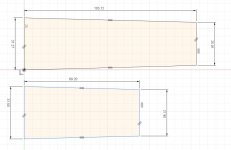
here are 2 pics, first one shows MT4 standard dimensions layed out on top, and the ones you measured below it
2nd pic shows your dimensions overlayed on top of the standard, as you can see - the taper is almost identical, so it is quite safe to say that it is MT4 taper shank for some specific draw bar, which you can just ignore, cut off and regrind it to cylinder and use with like 1"(25.4mm) collet

when I turned and ground the shank on my UPA, I left as much as I could, which turned out to be around 28mm, but mine was a 4S, which is considerably larger than the UPA3, so you should be fine with 1" cylindrical shank for it

A.JPGB.JPG
 
I don't know what is so hard about this...

Depends on who you are, and what yah got handy.

My case, I'd slide it into a MT4 to MT5 adapter sleeve, be able to take a decision on what that confirmed in mere seconds. Not everyone has those sleeves around, especially at least one still new and undamaged.

Shanks that fit my spindles being common, this one less-so, it is better traded, as-is, to a Deckeleer than altered. That should not be too hard, either.
 
Seems the taper and drawbar thread are unimportant unless you have access to a manual Deckel or Maho!

Could be good info if your intent is to market the head...otherwise your most prudent course is to just modify the shank to being a plain straight part (forget the taper)

I Have an UPA3 with a 1" shank and it is fine...no issues with rigidity and that straight shank makes the head usable in many different machines...

I hold mine for my Deckel CNC's with a short (one set screw) Weldon style holder....when i need to use the head on the manual Deckels, simply loosen the set screw and move the 1" shank to a 1" collet.....
Makes the head more or less "universal"....

Only precaution here is in modifying the shank. Be careful to set the head up with the axis used to turn/grind the shank being dead perpendicular to the slide of the head....error here will produce conical surfaces when
facing with the head....Easy to check...just indicate the flat face of the bottom of the slide when it is setup...

These heads are very nice...easily beats a most other makes. Well worth spending some time and $$ to bring it back....it will easily become your choice for any boring task run on the mill...

Cheers Ross
 
That is a useful boring head for the older Deckel FP-1 mills with a MT4 taper.
Let me know if it is for sale. If so, please post or PM more pictures, most come with wrenches and boring bars in a neat wood case.
If it came from a scrap bid, how high did it bounce when it hit the bottom? Did your company have other Deckel machines?
It is a bit unusual to have this in a non-Deckel shop.

Regards,

Dan
 
These are precision tools but remarkably robust, so there is a good chance that you can get it working.

Thanks for the links! I'd found the patent info thread, but didn't get much out of the PDFs. The others confirmed it; I'm definitely missing a handful of small internal pieces.


I don't know what is so hard about this...

Got it, the taper is MT4. I didn't mean to offend your sensibilities by trying to leverage my situation to add a proven method of measuring tapers to my toolkit, for the inevitable situation where I need to measure a different one in the future. Thank you for your input.


In response to other posts: in the past, we apparently had numerous Deckels of various vintage, which would explain how it got here in the first place. Not sure if I'll be able to convince them to service it or allow me to turn it down, and it's definitely not mine to sell, so there's decent odds it just winds up back in the junk drawer until somebody forwards it to a trash can some years down the road.

I'm a curious individual, so I'll tear it down farther and clean up this fossilized grease, and try to get it working again in case I can convince them to let me turn it down, or maybe convince them to sell it and let somebody save the seemingly rare old thing.
 
That is a useful boring head for the older Deckel FP-1 mills with a MT4 taper.
Let me know if it is for sale. If so, please post or PM more pictures, most come with wrenches and boring bars in a neat wood case.
If it came from a scrap bid, how high did it bounce when it hit the bottom? Did your company have other Deckel machines?
It is a bit unusual to have this in a non-Deckel shop.

Regards,

Dan


Dan, our other UPA3 is in its case with all the accessories, but this one was found rattling in a drawer with a bunch of other random junk, so none of the bars, split bushings, etc.
 
For what it's worth, here's what such things are worth in Germany. (I just picked these at random from some for-sale listings, and have no connection with the sellers.)

A more-or-less complete set is 460 Euros:
Wohlhaupter UPA3 in Altona - Hamburg Bahrenfeld | Heimwerken. Heimwerkerbedarf gebraucht kaufen | eBay Kleinanzeigen

An almost-bare head without the accessories is 250 Euros:
Ausdrehwerkzeug Wohlhaupter in Schleswig-Holstein - Trondel | Modellbau gebraucht kaufen | eBay Kleinanzeigen

Very clean and complete is 640 Euros (somewhat overpriced in my opinion):
Wohlhaupter UPA3 Plan und Ausdrehkopf in Baden-Wurttemberg - Bruchsal | Heimwerken. Heimwerkerbedarf gebraucht kaufen | eBay Kleinanzeigen
 
Got it, the taper is MT4. I didn't mean to offend your sensibilities by trying to leverage my situation to add a proven method of measuring tapers to my toolkit, for the inevitable situation where I need to measure a different one in the future. Thank you for your input.

there is no reason to start this passive aggressive crap, except maybe if you're wearing a skirt instead of pants

123 block method and measuring these tapers over an inch freehand with calipers is not a "proven" method - it is a method when you don't have anything better, best practice is to measure such angles at the furthest possible ends of the taper - thus minimizing possible errors, if you measure over an inch of taper because it is easy to understand, then you don't understand the problems you're creating for yourself, your first measurement at the big end and the the furthest possible point in the narrow end was the better choice, the only thing you had to figure out was how to hold the calipers perpendicular to the center axis of the cone - and even then it doesn't have to be totally perpendicular in every angle, 90 in one direction is good enough for this angle of taper, if you have a large enough V block, set the taper in there, and hold the calipers flat against the ends of the V block (sort of the same manner as in the 123 block suggestion) to make your measurements, and while doing this, you'll see that your calipers are not totally perpendicular to the cone center axis, but it doesn't matter for this measurement, because your measurement plane will be at 90 degrees to the center axis in one direction - which is enough

better way is to find a lathe, put a boring bar in the middle slot of the moving support in the boring head, chuck that in the lathe, tail stock center on the taper end, indicate so that the taper has no or very minimal amount of runout and do your measurements then going with an indicator (NOT the one with the lever arm, but the one that moves straight) pointing dead vertical into the top of the part, with the cross slide you can verify that your're actually measuring the very top as well at both your measurement points

p.s. when measuring in with the 123 blocks or V block, then make sure to add the thickness of the calipers to the distance between your measurement points (especially if you're measuring over a small distance like an inch or something), because at one end the points you're contacting the taper with your calipers are on the plane where your caliper lies, but at the other end the contact points will be further away (the thickness of the calipers)
if you're using a Vblock, then there is some additional geometry-math to do when calculating distance between your diameter measurement contact points, and you'll most likely have this problem with 123 blocks as well, because you probably wont know if the cone center axis is perpendicular to 123 block faces you hold your calipers to, but for the purpose of this particular problem, of identifying which taper it is out of known machine tapers, the error introduced will be quite small - thus the measurement when the part is set up between centers on lathe is a better choice

Capture.JPG
 
Taper is ~1.240"/31.5mm at the large end, 1.100"/27.9mm on the small end, over a distance of 2.724"/69.19mm.

I just checked my own Wohlhaupter UPA3, which is Morse Taper 4 S20x2 and is fitted with an adaptor cone to convert it into SK40 S20x2. The length of the taper portion is about 69mm, just like yours. This (together with the other measurements) confirms that yours is indeed MT4 S20x2.
 
there is no reason to start this passive aggressive crap, except maybe if you're wearing a skirt instead of pants

123 block method and measuring these tapers over an inch freehand with calipers is not a "proven" method - it is a method when you don't have anything better, best practice is to measure such angles at the furthest possible ends of the taper - thus minimizing possible errors, if you measure over an inch of taper because it is easy to understand, then you don't understand the problems you're creating for yourself, your first measurement at the big end and the the furthest possible point in the narrow end was the better choice, the only thing you had to figure out was how to hold the calipers perpendicular to the center axis of the cone - and even then it doesn't have to be totally perpendicular in every angle, 90 in one direction is good enough for this angle of taper, if you have a large enough V block, set the taper in there, and hold the calipers flat against the ends of the V block (sort of the same manner as in the 123 block suggestion) to make your measurements, and while doing this, you'll see that your calipers are not totally perpendicular to the cone center axis, but it doesn't matter for this measurement, because your measurement plane will be at 90 degrees to the center axis in one direction - which is enough

better way is to find a lathe, put a boring bar in the middle slot of the moving support in the boring head, chuck that in the lathe, tail stock center on the taper end, indicate so that the taper has no or very minimal amount of runout and do your measurements then going with an indicator (NOT the one with the lever arm, but the one that moves straight) pointing dead vertical into the top of the part, with the cross slide you can verify that your're actually measuring the very top as well at both your measurement points

p.s. when measuring in with the 123 blocks or V block, then make sure to add the thickness of the calipers to the distance between your measurement points (especially if you're measuring over a small distance like an inch or something), because at one end the points you're contacting the taper with your calipers are on the plane where your caliper lies, but at the other end the contact points will be further away (the thickness of the calipers)
if you're using a Vblock, then there is some additional geometry-math to do when calculating distance between your diameter measurement contact points, and you'll most likely have this problem with 123 blocks as well, because you probably wont know if the cone center axis is perpendicular to 123 block faces you hold your calipers to, but for the purpose of this particular problem, of identifying which taper it is out of known machine tapers, the error introduced will be quite small - thus the measurement when the part is set up between centers on lathe is a better choice

View attachment 234245

?? F**k all that overhead. I don't have TIME for "passive".

How many possible tapers d'you think OEM makers worked to ? An infinite variety, maybe?

The goal was simply to ID which standard & size within it off a VERY short list of possibles.

Not to reinvent the entire science of geometry.
 
the taper was identified very early and I think that OP even suspected it was MT all along, and from a Deckel or alike, because the thread was posted in this and not the General section, it was the OP that wanted to fiddle with 123 blocks to learn to measure tapers in general, this why I wrote the long post explaining that it is not a good idea to measure them with 123 blocks, and even less so to measure them over short distances


Back
Top