What's new
What's new

Please post instruction manual for HENSOLDT WETZLAR centering microscope

ballen

Diamond
Joined
Sep 25, 2011
Location
Garbsen, Germany
I'm thinking about buying a used HENSOLDT WETZLAR centering scope, meant for a Deckel mill. These come in at least three types:

- early, gray hammertone paint, one bulb, no swivel joint
- later, gray hammertone paint, 4 bulbs, swivel joint
- latest, red paint, 4 bulbs, swivel joint

It would help me to decide which type to get and to evaluate it, if I could read the instructions. I know that several people here have one of these centering microscopes. Please, could one of you scan and post the instruction manual? English, German or French would all be OK.

Cheers,
Bruce
 
Have one with 4 bulbs/grey and swivel eyepiece...Sorry no instructions...pretty straight forward really.

Like the swivel eyepiece...makes it easier to use i think....
Cheers Ross
 
Bruce

I think I can help you because if I remember correctly, the instructions are pretty straighforward.
Something like : "look into the eyepiece and align wathever you want with the crosshairs" ;)

Joke set aside, I've had the fixed model and the one with the swiveling eyepiece and I kept the latter.
I can think of at least one time when the swivel eyepiece came in handy. I had to cut a gear and used the microscope to set the gear cutter relatively to the dividing head axis before mouting the blank.

Travail - réparation pignon contrepointe Schaublin 125  (22).jpg

Now for the hammertone or red thing, only you can decide. I have hard time figuring out what kind of differences there could be between both beside color.
 
Red units are made by MZM-- not sure if or how they are related to HENSOLDT WETZLAR. I will say that MZM were completely unhelpful in the extreme when I wanted some information on adjustment.

On edit:
actually maybe it's just the model MZM 30 or some such. Here is the website:

http://www.iof-wetzlar.de/swf/skip.php?la=en

They make both fixed and swivel versions.
 
Ross, TNB, Sneebot,

Ross - I think the swivel eyepiece is a must have. From what I have read, this version contains a prism that makes the image the right way around, and also makes it possible to look through the microscope from comfortable angles.

TNB - your photo was useful because it made me realize that buying an SK40 S20x2 scope might be a mistake, I couldn't use it in my dividing head, which is MT4 S20x2. It would make more sense to purchase an MT4 S20x2. Then I could use it in the dividing head, or fit it with an MT4 to SK40 adaptor for use in the spindle.

Sneebot, thanks for the link! All of these were made in the region around Wetzlar, a city known for its optics and optics firms. The gray ones were made by Hensoldt, which at some point was merged into the famous optics company Zeiss. Later, production was taken over by the company Grün Optik (again around Wetzlar). Then Grün Optik was purchased by another Wetzlar company, IOF (Industrie Optik Fischer), whose web site you found.

Everyone, you're all teasing me about needing instructions (center point in crosshairs) but my inquiry is a serious one. First, I would like to read about how to "trim" the location of the crosshairs to the true center. I don't know if the trimming is the same for the different models. Second, I'd like to know if there are bits that come with the microscope, that I should look for when purchasing. (I have seen some kind of accessory in some of the fitted boxes, edge finder?). Finally, studying the instructions gives me some clue about what to look for or expect when examining a used scope.

Cheers,
Bruce

IOF basically said it can only be adjusted at the factory and would give no advice (or instructions) on adjustment. This is a bit ridiculous- On the MZM30 there are four screws you can loosen that will then allow you to move the crosshairs around. Adjustment is completely primitive as when you go to tighten the screws everything moves. It takes a bit of trial and error. I'm sure it would be possible to build a jig to make this easier but I haven't had the spare time to do so.

I believe they usually come with:
Edge Finder
4 bulbs
Bulb Extractor

The bulb retention on the MZM30 seems quite twitchy-- getting all four bulbs to light up simultaneously doesn't usually happen. Not sure if this is true across the different models or for all MZM30 units but I was unimpressed with this aspect.
 
Sneebot, thank you for the helpful comments. If I buy one of these, and a bulb dies, I will probably solder in some high output LEDs with a constant current DC/DC regulator. LEDs fed with the correct current should last for hundreds of years of normal use. Cheers, Bruce
 
Ross, TNB, Sneebot,

TNB - your photo was useful because it made me realize that buying an SK40 S20x2 scope might be a mistake, I couldn't use it in my dividing head, which is MT4 S20x2. It would make more sense to purchase an MT4 S20x2. Then I could use it in the dividing head, or fit it with an MT4 to SK40 adaptor for use in the spindle.

Everyone, you're all teasing me about needing instructions (center point in crosshairs) but my inquiry is a serious one. First, I would like to read about how to "trim" the location of the crosshairs to the true center. I don't know if the trimming is the same for the different models. Second, I'd like to know if there are bits that come with the microscope, that I should look for when purchasing. (I have seen some kind of accessory in some of the fitted boxes, edge finder?). Finally, studying the instructions gives me some clue about what to look for or expect when examining a used scope.

Bruce

Living in Germany, it should be pretty easy for you to find an SK40 diviging head for your FP2, and that would probably make more sense than to use an MT4 microscope with an additionnal sleeve wich is questionnable for us, ultra precision guys ;)
The accessories mount of the SK40 spindle is definitely better than the threaded nose of the MT4 dividing head.

As for the accessories that come wit the microscope, the only thing I can think of is the edge finder.
I have one, but never used it. To me, it is just much quicker and easier to use a 3D taster to locate an edge.

I only use the scope when the only reference I can take is visual. It happens.
There's one example I have pictures of on hand. I made a repair for a friend of mine whose universal table had a broken mounting plate.
Prior to machine the index pockets in the new part, I had to figure out their precise location on the old mouting plate.
There's nothing like the microscope in that situation.

Travail refabrication platine fixation table Deckel FP3 (29).jpgTravail refabrication platine fixation table Deckel FP3 (17).jpgTravail refabrication platine fixation table Deckel FP3 (50).jpg
 
Totally agree with "T" on all his points.....Off that SK4 dividing head and get the correct "kit" for your FP2....To me a higher priority, and way more useful than a scope....

Oh and which one to get....go for the 4 bulb , swivel grey version...Its the proper vintage for your machine.....
Cheers Ross
 
I have the grey swivel one and use it now and then. Mine has a cylindrical 25mm shaft, hence it's always in a collet which is not so nice for us "ultra precision guys:-)". I have been told however by some body that part of the optics (prism?) is in the shaft and therefore the shaft cannot be replaced. Does anyone know the reliability of this info? It's a nice microscope though, also because right is right and not inverted as is more usual.

Charles
 
I have been told however by some body that part of the optics (prism?) is in the shaft and therefore the shaft cannot be replaced. Does anyone know the reliability of this info?

I don't think the prism is higher than the eyepiece "arm".
If you think about what a prism is, there's no reason why it should/could be located in the shaft.

1145px-Roof-pentaprism.svg.png
 
Hi Charles,

For what it's worth, here is a cross-sectional drawing of the more modern MZM-30 version made by IOF, taken from their instruction manual. Part number 2 (Strichplatte = grating or reticule) seems to be integrated into the shaft. In thinking about how this works, I think that part must also have a mirror built onto the back side or placed just behind it. The prism, part number 5, is in the rotating angle joint.

Cheers,
Bruce

149641-mzm30.jpg
 
Very interesting ! I would never have thought about that kind of layout. Thanks for posting.
Seems like there are three prisms in fact

One for to redirect the image from the lens, one to redirect the reticle's image, and one in the angle joint. (but I'm no optics guru !)

I wonder if there's a particular reason for that design. I can think of several centering scopes I've had with removeable shafts so there's clearly a way to integrate the reticle elsewhere than in the shaft. Those units I'm thinking about didn't have the swivel eyepiece, but I can't figure out why this feature would imply that particular location for the reticle.
 
Hi Ballen, many thanks. So it wasn't a fairy tale! So, rather than a reticle in the light beam, it projects an imaginary recticle image at focal distance (if I understand it correctly). Btw, I tried to find this picture on the web, but failed. Or is it only in a hard copy manual?

Charles
 
The picture comes from the IOF manual; the company kindly sent me a copy. Here is a description of how it works (my translation from the German manual, with some obvious typos corrected):

Light is reflected from the work, and enters into the objective [7]. The light passes through the beam splitter [9] where part of it is directed to the grating [2] and part through the deflecting prism [5] and into the eyepiece lens [3]. An image of the grating is formed in the image plane of the eyepiece from light passing through the beam splitter. In this way, the operator simultaneously sees a sharp image of the work and of the grating [2]. The sharpness of the grating image can be adjusted via a focus equalizer in the eyepiece [3] to compensate for operator near or far-sightedness. For ergonomics and to adapt to the needs of the machine, the viewing tube [4] can be rotated through 360 degrees. By placing the optical axis of the grating [2] along the mechanical axis of the taper adaptor, a centering precision of 1 micron is achieved.
 
Thanks, very well. Only the last sentence seems ambiguous. How does the user place the optical axis ... along the mechanical axis ... Or do they mean to tell us that this is what is done in the factory (and hence cannot be adjusted by the user) to achieve the 1 micron?
 
Hi Charles,

I think the last sentence means that during manufacture the center of the cross hair in the grating/reticule is lined up with the center of the taper to 1 micron accuracy, and the beam splitter and objective are located to similar precision.

For optics, that's garden-variety accuracy, many laser components are specified to a small fraction of a wavelength which for a red laser is around 650nm = 0.65 microns.

From what I read in the manual, there are no adjustments of any type that can be done by the user. I find it good design if the centering precision is machined into steel and glass. It also explains why repairs might require an expensive trip back to the factory.

Cheers,
Bruce
 
I'm thinking about buying a used HENSOLDT WETZLAR centering scope, meant for a Deckel mill. These come in at least three types:

- early, gray hammertone paint, one bulb, no swivel joint
- later, gray hammertone paint, 4 bulbs, swivel joint
- latest, red paint, 4 bulbs, swivel joint

It would help me to decide which type to get and to evaluate it, if I could read the instructions. I know that several people here have one of these centering microscopes. Please, could one of you scan and post the instruction manual? English, German or French would all be OK.

Cheers, Bruce

Hi Bruce following your earlier PM I won the Centering Scope :D ... did you ever get a set of instructions??

Best wishes

John:cheers:
 
Hi Bruce et all ...

Well the scope is working well but there is a serious piece of dirt / dust that's showing on the graticule / scale screen.

Anyone stripped their scope down and given it a deep clean in this area.

Many thanks

John :typing:
 
Hi Gentlemen,

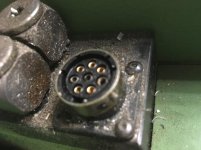
I just bought a MZM30 (latest version according to above posts) - but for My Deckel FP2A the connector is the wrong one. Machine manual says it will connect the usual working lamp connector and machine spindle is blocked to avoid to turn it on with the microscpoe in...

machine has a round 5 pin connector ITT Cannon Trident Ringlock with round pins - microscope has a round 5pos flat contact connector (I guess conventional milling machine version).

Can anyone of you with the MZM's perhaps give me the correct connection plan? or just open the connector to provide a pic how it is connected right?

many thanks for your support!

FP2A connector.jpgMZM30.jpg


Back
Top