What's new
What's new

Electrode Construction

bigfloyd

Plastic
Joined
Oct 26, 2012
Location
griffin, ga
Hi Guys,

I'm pretty green when it comes to the sinker and I'm having issues with flushing on a particular part. Could one of you EDM experts take a look at what I'm doing and give me some pointers on how to construct an electrode or flush pot for this part? I'm basically trying to do the larger coned part.

Thanks,
Floyd

Capture.jpgResized_20210520_161938.jpg
 

Attachments

  • Capture.jpg
    Capture.jpg
    8.6 KB · Views: 106
Which part are you edming?

What machine are you using?

I'm guessing it has flushing through the head.

Does it have a c axis (rotating head)?

What material is the electrode?

Are you using multiple electrodes?

Do you have external flushing?
 
Hi bigfloyd:
I assume we're seeing two cross sections 90 degrees to each other in the two detail views, so the cavity you're trying to burn is kind of like a cylinder squashed flat at one end.
An approximation would be a tin can that's been stepped on at the open end so it's round at one end and rectangular at the other.

Is that correct?

If that is so, and the narrow dimension at the squashed end is skinny, you don't have room to put much in the way of flushing holes in the electrode.

There are a couple of ways to get around this:

The first is to abandon the sinker and do it on a wire EDM with a "complex upper and lower" wire path...but if you have a sinker and not a wire capable of extreme angle burning that's not much use as an answer.

Second, there's no law that says you only get to use one electrode...you are free to make a rougher, or a few roughers and just bang in flushing lines wherever you want...ignoring the fact that they will leave male defects on the walls of the shape.
You can either make a rougher with asymmetrical flushing lines and flip the trode with the C axis to clean up the defects before the finishing trode goes down, or you can make two separate roughers with a different flushing hole pattern, so the second one cleans up the tits left over from the first one.

If you are lucky enough to have a linear motor sinker like a Sodick, you can ignore the flushing lines altogether and just jump flush it.
Sodicks and other linear motor sinker machines have a super fast and super precise ram motion, so the pumping action of the ram going up and down into the developing cavity at blinding speed is enough to flush the gap.

You can also help yourself by orbiting the electrode...if the tip is very skinny, you'll have to make a non circular orbit, but most modern sinkers have lots of orbit patterns available, and if you need to you can just chop off the tip of the first rougher so the trode is a bit more robust and can tolerate some power and a circular or spherical orbit.

You might also get enough flushing by just directing two wands onto the angled flat faces of the trode.
You will have to make the trodes longer though, so you still have someplace to direct the wands when the trode is almost all the way down.

This shouldn't be a killer job...pretty much any modern machine can do this without difficulty, but not if you just try to cook one single electrode down without flushing, without jump flushing and without orbiting, and still hope to complete the job.

It's ultimately all about keeping the spark gap clean enough that the trode doesn't short against the cavity wall from crap packed in the gap.

Cheers

Marcus
Implant Mechanix • Design & Innovation > HOME
Vancouver Wire EDM -- Wire EDM Machining
 
Last edited:
Which part are you edming?

What machine are you using?

I'm guessing it has flushing through the head.

Does it have a c axis (rotating head)?

What material is the electrode?

Are you using multiple electrodes?

Do you have external flushing?


Which part are you edming? I'm EDMing the part shown in the drawing, basically the coned area.

What machine are you using? Older Agie Mondo 20

I'm guessing it has flushing through the head. Yes, I started with a hole through the center which leaves a tit.

Does it have a c axis (rotating head)? No

What material is the electrode? Copper, I don't think I have the machining capability to handle graphite.

Are you using multiple electrodes? Yes.

Do you have external flushing? Yes.
 
Hi Marcus,

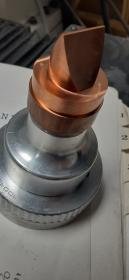
You are correct about the part, I added a photo of the electrodes. I'm trying to not give to much detail of the part because it for a customer and confidential.

We don't have wire so that wouldn't be an option, but I was telling the boss it would be great to add the thin slot with the wire just for flushing.

When you say flushing lines could you be maybe show me an example? I'm thinking this is my only option with addition to multiple electrodes.


Thanks,

Floyd

Resized_20210521_080117.jpgResized_20210521_081330.jpg
 
Hi bigfloyd:
You're 99% of the way there...I can tell because you have an electrode that clearly has made it pretty much all the way down the cavity.

So you managed a successful burn.

What, specifically are you still having trouble with?
Is the burn stalling part way down?
Are you taking more time than you (or your boss) think is reasonable?
Are you unable to hit dimensions or geometric fidelity?
Are you unable to get the finish you desire?
Is the leftover flushing tit from the roughing interfering with the finishing?
Is the electrode wearing excessively?
Are you unhappy with the burn settings for copper electrodes on your machine?
Did you know the settings for copper are typically quite different from the settings for graphite, and that copper has limitations that graphite does not have?

From what I can see, there are only two comments I have.
Your electrode could stand to be longer and the flange gets in the way.
Ideally you want a nice escape path for the burn debris and you want a place you can point a flushing wand onto, to help wash the body of the electrode every time it is retracted from the burn.
You could also probably benefit from having more and smaller flushing lines drilled through and directed to the pointy end of the trode, especially out toward the corners of the cavity where it's harder to flush and more prone to arcing.
Once you break through the part thickness, all those flushing lines become kind of pointless unless you seal the workpiece so the dielectric oil is still forced through the spark gap instead of just pissing out the slot at the bottom of the burn.
Setting the part on a plate is all you need...the seal does not have to be perfect...just good enough that the dielectric oil is forced mostly through the spark gap.

Regarding your question about flushing lines...there are two kinds; the internal lines like you've drilled into the electrode, and external ones that are simply hoses you point at the electrode or at the cavity and piss dielectric oil out of to wash the cavity walls or the electrode walls or both.

The internal lines can be pressure flushing lines where the dielectric comes out of the trode, and washes through the spark gap, or vacuum lines where the dielectric and the cut debris is sucked through the electrode, and the oil is supplied from the tank.
Sometimes vacuum flushing will be beneficial...I doubt this is one of those cases, but there's no harm in trying.
Every modern sinker has vacuum flushing ability, you just have to find out how to hook it up on your particular machine.
On mine you have to swap a hose from the trode to the dielectric manifold...yours may be different.

Cheers

Marcus
Implant Mechanix • Design & Innovation > HOME
Vancouver Wire EDM -- Wire EDM Machining
 
Macus,

To answer your questions:

What, specifically are you still having trouble with?see below
Is the burn stalling part way down?Yes, when not flushing through
Are you taking more time than you (or your boss) think is reasonable?Yes, all the time
Are you unable to hit dimensions or geometric fidelity?I think I can get the dimensions desired
Are you unable to get the finish you desire?The finish seems reasonable
Is the tit from the roughing interfering with the finishing?Yes
Is the electrode wearing excessively?When roughing
Are you unhappy with the burn settings for copper electrodes on your machine?I think they are ok
Did you know the settings for copper are typically quite different from the settings for graphite, and that copper has limitations that graphite does not have? I'm using the setting the machine suggest for copper, and I do know there is a difference, but don't know the limitations.

I guess the trouble I'm having is figuring out an efficient way of making multiples parts.
Where to start with roughing size and settings and where to finish with size and settings.
And how many electrodes between.


I think with this part I will make just the coned portion with an off center flush hole so that I can just rotate the electrode 180 degrees to burn the positive area off.

Where should I start roughing? Do I go to the max setting and just fry away? And then step down to finish mode.

Or do I start with multiple finishing cycles and go slow?

Thanks,
James
 
Hi James:
The first thing to understand is that if you are running production, you have four key things to consider:

1) Find a way to run graphite electrodes...you can put a lot more power into them and they will wear a lot less.
Graphite sublimates at a far higher temperature than copper melts at, so go graphite for sure, and cut your burn time in half.
There are a lot of places that can make graphite trodes for you...I've used Saturn Industries whenever I've needed graphite trodes, but you can easily find another if Saturn is inconvenient or too pricey for you.

2) EDM is paradoxical in that a rougher burn setting wears the trode less than a finer burn setting does.
So the rule of thumb is to rough as close as you dare to go and still have something left to finish.
Typically, you want to rough within a thou using as long a pulse duration and as much power as the trode can possibly tolerate.
Also, trodes wear most aggressively in the corners and the fine details, so there's no point in machining them on the trode if you're going to wipe them out in the roughing burn anyway.

3) Whatever material you can remove using machining techniques other than EDM, you should do.
Mill as much away as you can...even if it has to be hard milled, and even if it's a pain in the ass to set the parts up on two machines.
EDM proceeds one spark at a time...yeah there are lots of sparks per second, but you get the point.

4) Accept the coarsest finish you can get away with ...fine finishes take FOREVER.
I can rough for an hour and then finish for ten on a burn with lots of surface area that needs a super fine finish.
Modern machines can burn to a very fine finish indeed, but paint dries faster than a 32 microinch finish burn proceeds, so if you don't need it, don't do it.

I'd also encourage you to experiment with the burn settings and the flushing...whatever you can do to improve the flushing will help you more than almost anything else.
It's worth it to make trodes with good internal flushing...yeah it's a PITA, but it pays off big time. (unless you have a Sodick linear motor machine!)

Cheers

Marcus
Implant Mechanix • Design & Innovation > HOME
Vancouver Wire EDM -- Wire EDM Machining
 
I don't get how you can machine copper electrodes...a pain in the ass, but can't make graphite pieces.

Like Marcus said, flushing is key, once you get too much material between the electrode and the workpiece it basically grounds out. If more, higher pressure flushing isn't available then maybe retract the electrode more periodically to allow the dielectric flush out.

Are you running an orbiting/vectoring pattern?

Again as Marcus said, machine out as much as possible. It looks like a lot of the features could be done on a 3ax vmc. Trying to burn those features from the raw shape is just wasting time, money, and resources all over.
 
Hi plastikdreams:
You wrote:
I don't get how you can machine copper electrodes...a pain in the ass, but can't make graphite pieces.

The problem is that machining graphite is just so damned messy.
I avoid it even knowing it's a better electrode material, but I just hate that Goddamn black crap up my nose so badly I accept the limitations of tellurium copper.
If you invest in the proper housekeeping for graphite, it's a real no brainer as you point out.

Cheers

Marcus
Implant Mechanix • Design & Innovation > HOME
Vancouver Wire EDM -- Wire EDM Machining

Oh I know allll about it. The coolant the company used grew swamp monsters and the new guy...me...got to clean them.

Last place I was at I had to machine these large graphite discs on a cncd Bridgeport. I rigged a vacuum up to the spindle and dealt with almost 0 cleanup.
 
I thought machining graphite required higher RPM's? Also thought it was abrasive and could possibly damage VMC unless you have machine setup for it. I do have orbiting and vector option. Will orbiting effect or round the sharp corners?
 
Hi bigfloyd:
Yep, it's abrasive as Hell.
You don't want it in the slides of your machines and you don't want it in the shop computers, and you really don't want it where your wife can find it!

In the toolrooms where I worked in a previous life, all the milling cutters were diamond coated, and the machines were specialized graphite machining centers with high spindle speeds, built in vacuum systems, and pallet stations fitted with 3R System pallets and holders that would go directly from the machining center onto the ram of the EDM and would be accurately positioned within a tenth.

Now that I run my own shop, I don't have nearly the volume of EDM work to justify spending that kind of cash, so I get away with dodging all that and running copper trodes in a regular VMC.

I accept the poorer burn performance because I don't need to be super efficient with the burns...they burble away autonomously in the background and if it takes an extra day, nobody cares..
It's all prototypes and injection mold cavities and weird stuff that isn't production oriented anyway.

So I bill out the machine at a cheap rate to compensate my customers for my inefficiency, and when the project grows from one to ten or a hundred I invite them to find a production vendor with better gear.

Cheers

Marcus
Implant Mechanix • Design & Innovation > HOME
Vancouver Wire EDM -- Wire EDM Machining
 
Hi plastikdreams:
Actually we agree perfectly on all of the important stuff...I fully realize the drawbacks of my choice, but I've made a conscious decision to accept them and it has not hurt my business in any measurable way.
I would be singing a completely different tune if I depended on my sinker to be successful, but I run it a few times a year, and it does well enough for me to keep it around.
So have zero argument with your claim that graphite is miles better than copper for most burns.

Cheers

Marcus
Implant Mechanix • Design & Innovation > HOME
Vancouver Wire EDM -- Wire EDM Machining
 
Hi plastikdreams:
Actually we agree perfectly on all of the important stuff...I fully realize the drawbacks of my choice, but I've made a conscious decision to accept them and it has not hurt my business in any measurable way.
I would be singing a completely different tune if I depended on my sinker to be successful, but I run it a few times a year, and it does well enough for me to keep it around.
So have zero argument with your claim that graphite is miles better than copper for most burns.

Cheers

Marcus
Implant Mechanix • Design & Innovation > HOME
Vancouver Wire EDM -- Wire EDM Machining

To be completely honest, I've never ran anything other that graphite.
 
I would avoid using copper. Drill your flushing lines on an angle so they will just burn away as the trode burns down. Also looks like you used a big diameter flushing line based on that wear in the pic?

I would also extend the base of that electrode much further up. Helps with flushing and also lets you have a better lookie while it burns.


Back
Top