What's new
What's new

Tall Aluminum Wire Cut Problems

Nate Palsa

Plastic
Joined
Feb 23, 2016
Hey everyone. This is my first post but I have been referencing this forum for a few years now and have never been disappointed with the help I found.

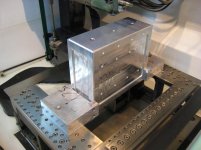
I have a few quick questions about a troublesome wire EDM cut in aluminum but first, the facts:

Machine - Elox-Fanuc Series M Wire Cut EDM.

Material - 6061 Aluminum, 3x4" and 7.5" cut depth.

We have replaced the resin in our DI system and after cycling the water for an evening, we were able to get the resistivity to 100Kohm*cm (my apologies if any incorrect terminology is used)

As for some of the machine settings;

Voltage - 7
Current - 15
On Time - 5-8 (experimenting)
Off Time - 18-30 (experimenting)

I have read that the voltage and current numbers are not actual values but rather arbitrary assignments to compare with.

I would like to add that after much trial and error with countless wire brakes, the furthest we were able to cut was 1" at an average of 0.005"/minute.

Today, there was a short span of 0.025 - 0.030"/minute of cutting feed with very stable conditions (seldom flashing the low voltage light) and then the wire broke for what seemed like no reason. Now, we are having trouble getting the wire back to the point where it broke. It just seems to feed about 80% there and then low volt/short on in the existing cut kerf until the wire breaks. The wire is being started from the center of a 0.25" diameter drilled hole.

Sorry for the long read but we are really quite stumped with this part and would just like to know if there is anything else that we could try. Please ask any questions about setup or running conditions and I will do my best to answer!

Thanks everyone,

Nate
 
I'm a newbie too, but when our Fanuc robocut starts complaining about low voltage and behaves like you describe, it's usually time to disassemble and clean the lower wire guide.
 
Nate,

I can't really speak to other settings to try on your specific machine model, but below are some pointers that I hope might help you:

- Have you verified that your contacts/energizer plates are indexed to a new and good location on both the Upper and Lower Heads? If these are excessively worn, they will contribute to your wire break issue.

- Have your tried increasing the Voltage settings (I believe this is the Servo Voltage on your machine). Making this value bigger should increase the spark gap area, which will slow the burn speed down a little bit, but it should help improve the machining stability and prevent wire breaks.

- Have you tried increasing the Wire Feed rate value? This will consume more wire, but will help to prevent wire breaks.

- Have you tried lowering the Wire Tension value? This will help to prevent wire breaks, but may add more bellow or bow (error) to the part.

- What type and size wire are you using? Have you tried another spool (maybe current wire spool is bad or is wrapped underneath itself)? Have you also tried using a coated wire such as Topas Plus on your machine (this will help improve machining speed while also helping to reduce wire breaks)?

- Have you tried lowering the flushing pressure and On-Time to allow the machine to feed back to where you last had a wire break?


-Brian
 
Nate,

- Have your tried increasing the Voltage settings (I believe this is the Servo Voltage on your machine). Making this value bigger should increase the spark gap area, which will slow the burn speed down a little bit, but it should help improve the machining stability and prevent wire breaks.


-Brian

Hey Brian, Thanks for the suggestions. I am using OKI OB-20P which is some 0.2mm Wire, I do not believe it is coated.

My boss and I have cleaned the contacts, upper and lower heads, and much of the machining area with a considerable amount of lime scale removing acid. The machine itself is much cleaner looking and we even got about 3/8" cut at about 0.005"/min but the wire then broke again.

I have tried playing with the V.servo parameter which as stated in the operators manual will adjust the speed of the servo feed (the setting that adjusts the feed rate of according to discharge conditions)and this gave a noticeable reduction in feedrate which I thought would be helpful when the wire tries to cut faster than the spark allows and the machine cannot adjust to cure the short condition before the wire brakes.

Much of the trouble has come from the machine's inability to get back to the point where it can cut new material since it low-volts and then shorts in the kerf before the original stoppage. Even when it does cut, it seems to run consistently and then outrun its spark causing a short.
 
What's your flushing pressure? Are you clearing all the swarf from the cut area?

What profile are you cutting? Is it possible to mirror, rotate, or reverse the cut?

It's not unheard of for "cheap" material to have non-conductive inclusions.

Those can really ruin your day ... or week depending on what you're cutting.
 
Nate,

This is the tallest aluminum part I cut on my Agie 170HSS. Unfortunately, my records are a bit weak after 7 years, but the notes I have say that I cut this part in 8 hours. The part was approximately 4" x 10" in size, and about 8.5" or 9" tall as I recall (including two 1/4" thick sacrificial plates in order to have flat surfaces to put the nozzles against). I do recall that I had to drop the power a bit on the one long side that had holes through the side.

So at 28" around and 8 hours, that's just under .060"/minute.

I typically ran about 70% off time on the Agie when cutting aluminum, and the big secret for me was CobraCut B wire (copper wire with zinc oxide coating). That wire would typically double my usual feed rate on aluminum parts, and rarely ever broke (could really apply the power to it as well). That wire was really expensive (don't even think it's available any more) -- I recall paying well over $500 for a 30lb roll, however on a part like this it didn't matter because the cutting speed was so fast. FWIW, I show using 8300 meters of wire on this part.

PM
 

Attachments

  • 1.jpg
    1.jpg
    87.1 KB · Views: 1,521
  • 2.jpg
    2.jpg
    85.8 KB · Views: 842
PM, thats quite a part!

I finally got 2 of the 3 parts cut from this project. With 16.5" and 8" to cut for the first and second part, you could imagine how long that took at 0.008" per minute! (fastest average we were able to reliably achieve)

A major problem we encountered was caused by the aluminum oxide that was forming. The wire would either break instantly on contact or feed past the previous end of cut without even giving a short light. Etching with delimer solution and playing with the setting we were able to get a cut.

The last part is causing some more head scratching as none of the proven settings are working. I have tried the previous ones and also much lower voltage and current values with a range of servo feeds and off times without luck.

I will post updates.

Thanks!


Back
Top