What's new
What's new

Terrible machining condition

mazo

Plastic
Joined
Jun 2, 2009
Location
Slovenija
Hello,

I have been all day in mould shop trying to sort our one insert on my Fanuc alpha 1C, year 2000.
Problem is that insert has 3D parting line and height on one side is 370mm and on other side 120mm. I need to cut opening for many lifters which has from the back side enlarged opening.
For these reason flusing is very bad since I have both nozzles very far away from the part.

I have cut one test opening 17,7x17,7 with tolerance+0,02mm and the opening came out 17,68x17,82mm ?????

I have no idea why on one side opening is bigger and on other side smaller???

Does anyone have any idea how to cut these opening with good tolernces???

Looking forward to receive some promissing answers I will had home.:(
 
Hi Mazo:
Almost certainly, the complicated parting line and the angle on the lifter pockets (I'm assuming they're angled) is deflecting the flushing stream and thereby deflecting the wire during roughing.
About the only solution I've ever found to solve a problem like this, is to rough each pocket well under size, and then do as many secondary roughing passes as you need to, in order to bring the pocket up to a big enough size that you can begin your skim cuts.
I turn the flushing right down during these secondary roughing passes, and bump up the wire tension.

In a recent thread, I brought this subject up in regard to finding a cutting strategy when the part moves a lot during roughing.
Brian Pfluger from Makino suggested as an alternative, to rough well undersize and then do many first skim passes with decreasing offsets to bring the part to dimension, ready for final skims.
I haven't tried that strategy yet, but it makes sense too, so long as your first skim cuts don't bog down from a localized area with a lot of stock on it.
No matter how you decide to do it; I don't believe you can just set and forget it and expect it to come out to proper size.
I think you'll have to nibble away at it until it's out to size, and everyone will just have to accept that it will take some time.
The alternative of course, is just to wire the pockets to whatever size they come out to, and fit the lifters to the pockets on the surface grinder, but that will make the other toolmakers angry.
Cheers

Marcus
Implant Mechanix – Design & Innovation - home
Vancouver Wire EDM -- Wire EDM Machining
 
Marcus thanks for your quick response.
I am cutting with 1 rough pass and 2 finish passes.
How much smaller you thing I should make rough pass-0,5mm/side???
After I will measure it should I repeat all passes or just 2 finishing passes?
When I will repeat the second cutting should I just add mathematicaly what offset I need?
Can you describe more in details what Brian Pfluger suggested for my example: dimension 17,70x17,70+0,02 with 1 rough cut and 2 skim/finish passes?

Cheers
Mazo
 
Hi Mazo:
The first thing to do after roughing, is diagnose which walls of your pocket are oversize so you know roughly how much you have left for the worst wall to clean up.
You can measure it while the job's still on the machine but one way I've found to be very revealing is to do a quick skim pass; listen to it and watch how consistent the speed is.
That will tell you a lot about where the wire deflected in the roughing pass.
An unusually fast skim with intermittent moments where the wire is barely cutting or not cutting at all tells you the wire has deflected in the direction that would over cut the part, whereas having the skim slow right down means the wire has deflected to under cut the part.

Remember, this is not machine movement error (unless there's something wrong with your machine!!), it's wire deflection from asymmetric flushing pressure and widely spaced wire guides, so every pocket will be different as you move around the job cutting lifter pockets in different locations and having the flushing stream directed over the wire differently.

There is no way, under these circumstances to predict exactly where the wire will deflect during roughing, so it's impossible to give a bulletproof solution that you can simply follow and be guaranteed success.
However, the objective is to get as quickly as possible, to a point where you have very even amounts of stock left on all of the pocket walls that can then be removed bringing the pocket to final size with the pocket location already established.

So here's what I do:
First I rough significantly undersize (say 0.1 mm more per side than normal) using normal flushing pressure and wire tension, so I can get through the cut without breaking the wire too often.
Next I take a quick skim pass adding the same amount to the first skim pass offset as I did in the roughing pass and watch and listen. (I want the relationship between roughing offset and first skim offset to be as it normally is so I can tell which areas have deflected and in which direction).
Now I measure the pocket in the places where the skim was normal speed to determine how much stock I actually have and decide if I need to take another roughing pass with the flushing down and wire tension up, or if I can just do more skim passes with first skim power settings but reducing the offset by 20 microns or so each time until the remaining stock is right for my final skims.
Beware taking a single skim, measuring and then reducing the offset by a calculated amount; you will almost always overcut the pocket in places and undercut it in others.
You need at least two, sometimes several more first skim cuts to get the walls even before you can confidently predict how much stock can be removed to get to final skim territory.
Remember also, as soon as you start compensating for deflection like this, all the predictions about the offsets the machine manufacturer determined for you won't work any more, until you get the stock remaining on the walls perfectly even; that's why you need so many more first skims...to knock away the high spots.

Once I have a perfectly even amount of stock of the correct thickness on every wall, I can take my final skim passes in the normal way
This is all terribly tedious, I know, but I cannot think of a better, safer way to cut these pockets if you need them accurate for location and size when you have to fight poor flushing.
Cheers

Marcus
Implant Mechanix – Design & Innovation - home
Vancouver Wire EDM -- Wire EDM Machining
 
Hi Marcus,

I have attached image of actual part, 3D model-section, 2D drawing and what I have measured.
2013-OR-030-ZER_problemi.jpg
Sorry to bother you but I need to do these one right or the hole insert will be destroyed.

If I understand correctly I should devide toolpaths for each wall seperatly and play with first skim cut so many times that I will have equal stock on all sizes and the I can run "normal program" with 1 main cut and 2 skim cuts and the dimensjon should be fine.

I am missing something?

Cheers
Mazo
 
Hi Mazo:
You need to break up your goals and address them separately.
First goal is to cut most of the material away, leaving you enough stock so everything cleans up to size when the job is finished.
So do a first roughing pass that's well undersized by adding to your roughing offset but using your regular roughing power settings.
I suggested adding another 0.1mm to your usual roughing offset, but if you're worried about it, you can add more to be safe.
Your next goal is to find out what the roughing pass actually made.
I do it by adding the same amount of extra offset to the first skim pass and going around the pocket, noting where it cut and where it didn't.
I use that information to judge whether I can safely take another roughing pass with reduced flushing and higher wire tension, or whether I should go straight to my skim passes.
The next goal is to get the stock left on the walls perfectly even.
If it will be skim passes, I leave my power settings correct for first skim passes, and start going all the way around the pocket over and over, each time reducing the offset by 20 microns or so, until the wire is cutting evenly all the way around the part walls.
My first few skims at this setting will leave some areas un-cut, and will start to cut in other areas.
So long as those un-cut areas are still smaller than the final pocket will be, all will clean up eventually.
Once it does, you can measure what you still have to remove and then set that amount in your offset to bring your pocket to the size you need for your finish skims.

Where you're probably misunderstanding, is that the errors you are seeing in your test cut come from the fact that the wire was deflecting from its intended path mostly because of the flushing pressure of your roughing cut.
As soon as you turn the flushing pressure off for your first skim, the wire will want to stay where the machine positions it and will cut away the bits that are too small while ignoring the bits that are larger than your current offset setting will reach.
By successively decreasing the offset and going round and round the pocket, you gradually erode the high spots away.
If you try to do it all in one skim, the wire will have too much to cut in some places and the skim cut will bog down.
Also I've found that taking too much with a skim cut leaves a belly in the surface which then requires more skim cuts to remove, so you want to avoid having skim cuts trying to remove too much material.
But you can just go around and around the pocket, knowing that the wire is cutting where the machine is telling it to, because the main deflecting force is now gone (your flushing pressure is off, or at least greatly reduced).
However; your normal offset settings, the ones that come with normal machine operation are no longer valid, so you have to keep track of what each offset is doing.
A good way to confirm this is true, is to make a test cut on a simple test piece.
Wire cut a round hole in the normal way on a flat piece with perfect sealed flushing, and measure what you get.
Now duplicate only the last skim cut without touching the offset and see how much the hole grows in size.
Run the last skim cut again and see the hole grow again.
You can often take out as much as 25 microns by repeating the skim cut over and over again without touching the offset, until the wire finally stops cutting and the hole size stops growing.
That's why it's normally not recommended to jigger with the offsets when you're cutting normal parts with normal flushing; the size of the finished part depends on always having the right amount of stock for the next skim cut.
But in your circumstances you MUST jigger the offsets in order to avoid overcutting the part from wire deflection, so now you need to sneak back to where the wire can cut evenly around the part and get the process back under control.
What I would do to give myself some confidence, is cut one of the openings a couple of millimeters too small and go through the whole process so you can see what happens without wrecking the part.
Once you're confident you can achieve control over the size, you can re-cut the pockets to finished size with more confidence.
You must always remember though, the high flushing pressure on an asymmetric parting line will make the first roughing cut completely unpredictable, so it's unwise to make a test cut, measure the result and then presume you can simply adjust the offset and go again; that only works on flat parts with good, sealed flushing.
Cheers

Marcus
Implant Mechanix – Design & Innovation - home
Vancouver Wire EDM -- Wire EDM Machining
 
Hi Marcus:
I have read many times your answer and I will try to write what I will try to do tomorrow on the machine:
I am cutting one rough cut and two skim cuts. My program is separated into rough cut, cut off and finish cuts.
I will add +0.1mm to my rough cut D1 S1 and then I will repeat my first skim cut D2 S2 with also added +0.1mm on the standard offset so many times that the dimension is not changing anymore. When that will happen I will measure the dimension and then repeat D2 S2 (first skim pass) and D3 S3 (second skim pass) with calculated offset and the pocket should be finished.

Am I right??

What I was thinking about is:
1. Do first rough cut with offset +0.1mm from standard offset and standard flushing.
2. Repeat first rough cut with standard offset and reduced flushing (I would use the same flushing as from technology for first skim cut)
3. Do remaining two skim cutts according to technlogy
4. Cross my fingers it will came out right :)

Marcus what do you thing?
 
Hi Mazo:
Almost but not quite.
Take your roughing cut and add however much to the offset as you guess that you might need. (I picked 0.1 mm just as a guess that I often use when I expect trouble)
If you're very afraid of ruining the part add more than you think you need, but the more you add, the longer it will take to finish the part.

Next, take your first skim pass adding the same amount to the first skim offset; so if your roughing offset would normally be 200 microns and you added 100 microns, add 100 microns to your first skim pass offset too.
Record where it cut and where it did not.
In the places where it did cut, measure how big the opening is.
If it's still too small by more than 100 microns or so, (per side), take a second roughing cut with low flushing pressure and high wire tension, and reduce the roughing offset so you will have about 50 to 100 microns left on each wall.
If it's too small by less than 100 microns, take another first skim pass reducing the offset by 20 microns, then take another, reducing the offset another 20 microns and continue until the all the walls are being evenly cut, taking a quick measure every few passes to check your progress.
Once it's cutting evenly, stop again and measure what you have left on the walls.
If it's within 20 microns of your final size, take a last skim at the power settings for your first skim to bring it within the amount that's normally left on for final skims (less than 10 microns on my machine), otherwise continue to take more skims at first skim power settings until you're within the right amount for final skims.
Depending on how cautious you are you might have to take many skim cuts at your first skim power settings, but you change your offset after each skim cut.

Now take your finish skims using the proper settings and offset for those skims.

The business I described about taking skims without changing offsets was to illustrate that you can change the size of a part by violating the manufacturers prescribed protocol; therefore under normal circumstances you should not deviate from the cutting conditions, offsets or number and sequence of skim passes prescribed by the manufacturer, if you want your parts to come out the correct size.

That's not what you want to do in this case; you NEED to deviate from the normal process because if you don't the asymmetric flushing pressure will make the wire cut away too much material in some places during the roughing pass as happened with your test cut.
As soon as you must deviate from the normal cutting conditions and offsets on the first pass, it ruins your ability to just follow the rest of the protocol you'd normally use.
You have to slowly work your way back to a state where you have the right amount of material left so you can do your finish skims and have the part come out correctly for size and finish.
That is what all the first skim passes do, and the changing offsets allow you to nibble away at the walls until you get there.
Cheers

Marcus
Implant Mechanix – Design & Innovation - home
Vancouver Wire EDM -- Wire EDM Machining
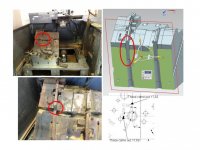
 
Hi Marcus,

These is summary what I have done today:

For all trials: 3 passes; 1 rough cut and 2 skim cuts.
1. For first rough cut I have decreased flushing from 13 to 8 (10 is according to technology for these height) and increased wire tension to 2000 (1700is according to technology for these height). I have added 0.1 to standard offsets for all cuts. After first rough was done I notice that first skim cut "fly trough" the shape which normaly means problems ahead. The second and last finish pass was going back and foward and there was strippes on the part.
2. Then I decided to repeat first rough cut and it was cutting all round the shape just the sound was not standard-I could hear more intensive and less intensive cutting. After that I run first finish pass and now it was cutting all round - like on normal conditions. Then I let last finish pass and it was the same story: The second and last finish pass was going back and foward and there was strippes on the part.

From what I have noticed today is that on my Fanuc second cut; first trim cut do not have enough power to cut material away so I have no success reparing these cut with different offset.

These is for today I hope I receive some good ideas for tomorrow.

Cheers for today.
Mazo
 
Hi Mazo:
I think the back and forth motion that leaves stripes on the part comes from too much material left on the walls for the skim cuts to take off.
The backward motion is when the wire senses an imminent short and backs up as a result.
On my machine (CHMER) my first skim cut settings can comfortably remove 20 microns per pass; is that not true for your Fanuc?
Also, when I take a second roughing cut I can turn the flushing down to skim cut pressures so long as I take cuts of around 0.1 mm or less.
IF your machine doesn't let you cut very much with a normal first skim cut setting, you might have to bring up the power settings until it does, or else take roughing passes to get close to your skim cut sizes, just turn the flushing right down, not just a little bit down.
You don't want the wire to flutter when you're taking these cuts.

I have no idea how much pressure there is at a setting of 8 on a Fanuc machine; I've never run one.
On my machine the flushing pressure for all skims is 0, but full blast is 7, so obviously my numbers don't mean what your numbers do.
I do know at setting 0 it's not a very strong flow; it's about like a kitchen tap that's been opened to just where it stops dribbling and starts to flow smoothly.
It's low enough that it doesn't register on the pressure gauges.
That's the pressure I use on all cuts except the first roughing pass.
Cheers

Marcus
Implant Mechanix – Design & Innovation - home
Vancouver Wire EDM -- Wire EDM Machining
 
compound angle error.jpgAre we sure this isn't just a math issue of having the part loaded on an angle and the angling the wire?
Different Z values about which the wire is pivoting?
I used to have to compensate for this all the time while making dovetail tooling with existing front clearance.
 
Hi JayCee:
I can't say for sure, but the part he's got clamped to the worktable is sitting flat on the platen.
I have no idea what the code looks like, but the lifters appear to be square pockets cut on an angle.
The symptoms he's getting where the first skim pass cleans up only in places leads me to believe the wire is overcutting in places on the roughing.
Agreed, there's much we don't know; and I agree a programming error could be responsible for the pocket geometry error.
I ASSUMED that part of it was OK but assuming is a fast way to mistakes too.
Cheers

Marcus
Implant Mechanix – Design & Innovation - home
Vancouver Wire EDM -- Wire EDM Machining
 
Hi all,

I will post what I have discoverd and how I was able to cut in right and I hope it will be usefull to others. All seting are for Fanuc Alpha 1C and was ussing 3 cuts (1 rough cut and 2 skim cuts)
1. I have decreased flusing for first cut from 10 to 5
2. I have decreased offset for first rough cut for -0.03mm
3. I have decreased offset for first skim cut for -0.01mm
4. I have increased wire tension from 1700 to 2000


Back
Top