What's new
What's new

Thin Wire Snapping when Roughing Spark Ignites

Lotaxi

Aluminum
Joined
Jun 9, 2020
Hello all,

I'm working with a Charmilles Robofil 510, and I'm having an issue trying to machine an open profile with 0.004" wire. Everything seems to be working correctly, though I am using a wire that doesn't match the available thin wire technologies that the machine has. Specifically, this is brass wire, not zinc coated brass, and I only have access to ST10.WIR and ST10A.TEC (the zinc coated brass files).

Unspooling is smooth, with no pigtailing, and there are no issues with brake tension.

When I rough into a solid piece I have no issues. Roughing a punch or die works just fine, but I'm having a hell of a time roughing when it's an open profile for some reason. The wire snaps the moment the spark ignites and I can't figure out why. I've tried adjusting the average pulse voltage, the pulse lengths, the frequency, and everything else that I can think of or know to adjust, but there's no change.

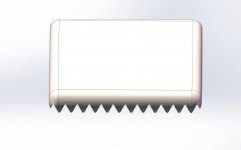
I am machining teeth into a very small plate that will lock into an opposing rack to stop the movement of a slide (see the attached pictures). I reworked the base blank that I am machining into and figured that with the small amount of material that needs to be removed (<.010") I could just let the finish passes handle it, but it constantly hangs up and warns of a short.

The shorts happen at every peak of a tooth. When it warns of a short, I back the wire off the profile, return it to the contour, and then it starts up like nothing happened until the next peak.

Occasionally, random pieces will simply snap the wire instead of shorting. I don't know what to do or how better to describe the issue.

Any help is greatly appreciated.

View 1.jpg Profile Detail.jpg
 
Hi Lotaxi,

I'm not involved in Charmilles machines because only I do Mitsubishi Electric, despite of it I can give you some tips. Usually, (I guess) you work with 0.25 mm wire, if you're using thin wire as 0.1 mm is necessary to change position of some consumables as Wire Tension roller, back tension rollers, change DD guides for 0.1mm, etc. because for a thin wire it can only go through new path and not in the way that 0.25mm wire was. Also, I guess you should modify the tension of the collection rollers in case you have thin wire.

Another point is that if you don't have technologies for it you should contact to Charmilles to develop the correct technology.

For what I can see in your pictures, is it conic cut try to lower Wire tension on your technology, becase for that kind of cut you should need wire of 400 or 500 N/mm (recommended but I know people, as me that lowering WT from EPACK could do the job).

For a job that is opened as yours, try to start with an approaching Epack to do the first path before changing to rough, but if it happens in every tooth in expenses to do it in one cut do it everything with approaching Epack and adaptive control.

I hope this helps you,

Best Regards.
 
Is the 510 submerged or not? If not, if you have the one nozzle that has the screens in it that creates a flood more than a jet of water from the top I would try that. Could be flushing is just deflecting off the part...
 
Hi Lotaxi,

I'm not involved in Charmilles machines because only I do Mitsubishi Electric, despite of it I can give you some tips. Usually, (I guess) you work with 0.25 mm wire, if you're using thin wire as 0.1 mm is necessary to change position of some consumables as Wire Tension roller, back tension rollers, change DD guides for 0.1mm, etc. because for a thin wire it can only go through new path and not in the way that 0.25mm wire was. Also, I guess you should modify the tension of the collection rollers in case you have thin wire.

Another point is that if you don't have technologies for it you should contact to Charmilles to develop the correct technology.

For what I can see in your pictures, is it conic cut try to lower Wire tension on your technology, becase for that kind of cut you should need wire of 400 or 500 N/mm (recommended but I know people, as me that lowering WT from EPACK could do the job).

For a job that is opened as yours, try to start with an approaching Epack to do the first path before changing to rough, but if it happens in every tooth in expenses to do it in one cut do it everything with approaching Epack and adaptive control.

I hope this helps you,

Best Regards.

We typically use .25mm wire as well, but this is a special case. The features are too small for the larger wire. I've followed all of the conversion instructions given by Charmilles (change the diamond guides, modify the pinch rollers on the bottom head to get rid of the possibility of wire snags as it unspools, change out various other parts, and slightly alter some service parameters), but the wire path across the tensioning rollers doesn't change.

Wire tension during machining is theoretically where it should be (between 350N and 500N depending on the cut parameters), and according to multiple techs at GF who had a lot of experience with these machines, the technology file isn't far off enough for it to matter that I'm using a different wire composition. I know that it must be altering *something*, but it doesn't seem to matter all that much for our purposes. I should also point out that I don't believe that a brass version of the .1mm wire files exist for this machine at all (would be LT10.WIR and LT10A.TEC).

Unfortunately I don't know what you mean by an "Epack."

Thanks for the pointers!

Is the 510 submerged or not? If not, if you have the one nozzle that has the screens in it that creates a flood more than a jet of water from the top I would try that. Could be flushing is just deflecting off the part...

I make sure to adjust the upper head's flushing until it's not deflecting anywhere and it smoothly covers the wire without turbulence. As far as I can tell, the flushing is fine. When I try my finish pass strategy, the spark seems stable, solid blue, with no sparking or red color.

We are using the basic adapting nozzles, held just above the part without contact as detailed for the part height in the technologies manual. We have the diffuser nozzle in our tool cart, though, so that's worth a try.

Thanks!
 
Hi Lotaxi,

By EPACK I mean technology, can you modify by hand the wire tension that maybe WT is in 11 to lowering at 8 or something like this?
Try this if you can,

Best Regards.
 
Not sure if you have alot of these parts? If you are just wanting to get through you can lower the FF value, increase WS and decrease brake value as well...
 
Not sure if you have alot of these parts? If you are just wanting to get through you can lower the FF value, increase WS and decrease brake value as well...

I don't very many to make, since they are for a prototype we are developing. We don't do long production runs, thankfully.

I tried lowering the FF value (from 100 to 80 or 90) without result. It actually seemed to completely stop the spark entirely. I don't know exactly what's up with that. I've also tried decreasing the brake tension from .35 to .2, .25, and .3, but I don't see any difference in the result. I also added a couple extra roughing cycles in an attempt to increase my initial offsets to cut down on the amount of material that needs to be removed, but that's not working either...

What's most recently frustrating is that the soft start M functions don't seem to be doing anything.

What I think I'm observing is that the feed rate isn't being adjusted down quick enough once the spark ignites, so the wire is getting close enough to the workpiece to short and vaporize. I tried decreasing the S value, which helped a little bit, but not enough to matter. I'm thinking I might just decrease it further and see what happens.

I can try to increase WS as well.

It must be something to do with the fact that this is a very shallow profile on the outside of a part. The wire never really gets deep enough to fully engage with the work, so it's only roughing on one side of the wire. That's gotta cause some sort of instability...
 
Does indeed sound strange. If it was me, I would drop the FF all the way down to 10 and see what happens. Also, have you tried increasing the off time? I dunno, never ran that small of wire. We use 8 and 10 here, but both are submerged.
 
With all the threads, the initial problem got lost for me when reading this so I thought it would be good to restate it again....
"When I rough into a solid piece I have no issues. Roughing a punch or die works just fine, but I'm having a hell of a time roughing when it's an open profile for some reason. The wire snaps the moment the spark ignites and I can't figure out why. I've tried adjusting the average pulse voltage, the pulse lengths, the frequency, and everything else that I can think of or know to adjust, but there's no change."
Question..What material are you running? Also, I remember reading somewhere that the approach from outside the material is different than when inside of it to make the cut. Another thing that came to mind was have you rechecked everywhere for a piece of wire that might now be stuck somewhere causing the break at time of spark? Just saying that it might be worth taking a step back now just to make sure not over complicating the situation at this point. I have done so a time or two myself.
Just trying to redirect everyone to the main issue at hand.
Tvalen1432

Just trying to help resolve because I'm curious of different approaches to possibly fix the issue for personal ref.

Cutting hardened D2 steel, using 0.004" full hard solid brass wire.

So far what I've observed is that if I'm machining a gap into a solid plate, I have no problems. Problems begin to arise where I am cutting a shallow profile on the edge of a part. I did actually check for stuck pieces of broken wire, since that's been an issue in the past.

I've tried using tailored profiling/pocket machining technologies, as well as the cut entry protection strategies the machine has available. If I was making the entry from a start hole I think I'd be having more luck, but there's not really any way to seal off this particular cut in any way, unfortunately. It's just a little nub of material to start that's 0.25"x 0.26" being held in a custom fixture. Teeny, tiny little part.

It almost seems as though the machine isn't adapting its feed rate fast enough once the spark engages, and that's causing a short and a snap.

If I ever figure it out I'll toss the answer into this thread for you. I'm about to call Charmilles again, so we'll see if that gets anything figured out.

OT, but 1/4x1/4' would be a larger part where I work LoL.... I hope you get it figured out, and if so please update! :)

edit: we used to use half hard brass alot, even though not doing tapers and such, a bit more forgiving....
 
This may seem silly but there was a time crazy unexplained stuff was going on and was about 2 sec from screaming :angry: F*^k IT and walking out. I tried everything in my knowledge and beyond. My boss came in to help and told me to change the spool of wire and then walked out. I figured he had stopped at the bar during lunch but humored him. I'll be damned if that machine all of a sudden worked.

Tvalen1432
settings for .004 wire .250 thick.jpg
 
Last edited:
This may seem silly but there was a time crazy unexplained stuff was going on and was about 2 sec from screaming :angry: F*^k IT and walking out. I tried everything in my knowledge and beyond. My boss came in to help and told me to change the spool of wire and then walked out. I figured he had stopped at the bar during lunch but humored him. I'll be damned if that machine all of a sudden worked.

Tvalen1432
View attachment 297934

KISS works a lot for me in life. I have no real idea what’s going on but I’ve tossed welding wire spools on my welders before and had a night/day experience even using another spook of the same brand/thickness.
Good luck OP you seem to be having a time with it!
 
OT, but 1/4x1/4' would be a larger part where I work LoL.... I hope you get it figured out, and if so please update! :)

edit: we used to use half hard brass alot, even though not doing tapers and such, a bit more forgiving....

Unfortunately full hard is all I have at the moment. I really just need to work with what we have in the shop, mostly. We're tiny, so we don't often get new material/tooling in.

This may seem silly but there was a time crazy unexplained stuff was going on and was about 2 sec from screaming :angry: F*^k IT and walking out. I tried everything in my knowledge and beyond. My boss came in to help and told me to change the spool of wire and then walked out. I figured he had stopped at the bar during lunch but humored him. I'll be damned if that machine all of a sudden worked.

Tvalen1432
View attachment 297934

Thanks for the settings! I'll see what I can adapt!

The wire might be brittle at this point, yeah. I've been discounting it just because it looks very clean and doesn't snap due to tension at all. Probably worth trying, though...

KISS works a lot for me in life. I have no real idea what’s going on but I’ve tossed welding wire spools on my welders before and had a night/day experience even using another spook of the same brand/thickness.
Good luck OP you seem to be having a time with it!

My original background is welding and oh yeah. Water is death to welding electrodes. Any water in the air will corrode mig electrodes and screw with flux core and stick electrodes. Soggy wire sucks. New wire right out of the vacuum bag is the best. Typically for flux core I'd always take it back out of the welder, chuck it in the bag, and toss it on top of the shop transformer to keep it nice and dry. Worked pretty well since we didn't have an electrode oven large enough for anything but about 30 pounds of 7018. Got into the habit of tossing my mig wire on there, too. Key is to keep it clean and dry as you possibly can.

There's more complex chemistry there, if you're interested, but that's typically what a new spool of wire fixes.

The shop I'm working for only uses GTAW for now. Trying to get my boss to get us a combo welder so we can expand to GMAW and FCAW for heavier shop improvement jobs. I'm not structurally certified for GTAW, just SMAW and FCAW-G/S. Meanwhile he put up a crane to get stuff up the stairs to the office using structural I-Beam and a GTAW welder. Seems to work well, but I don't like standing under it when we're hoisting stuff...
 
Is the 510 submerged or not? If not, if you have the one nozzle that has the screens in it that creates a flood more than a jet of water from the top I would try that. Could be flushing is just deflecting off the part...

Flushing, flushing, flushing. I have had so many strange issues caused/solved by flushing. Then changing E-packs as was mentioned may be your best bet combined with slowing down the feedrate
 
I have an employee that has operated a 310 in the past.
When I described your problem, he say he had the very same problem with the 310,
.004 wire snapping on contact. He removed the lower contact trying to smooth the traveling wire.
Not only did the wire run smoother but the snapping stopped, he completed the job.
Go with what works.
Regards,
John

Removed the contact, the pin, or the guide?
 
lower contact i.e. the power contact, power pin, the lower ware part the wire contacts to become electrically charged.

I have an idea why this worked but for now, "Just take what the machine gives you".

Regards,
John


Back
Top