What's new
What's new

Best way to make U shaped sheet metal part

ME Newb

Aluminum
Joined
Sep 28, 2015
Quantities are 100 to 300 from 11 gauge mild steel. Part is 6" "deep" as pictured from the end. I was thinking of getting a die made that could hopefully do it in one whack on a press brake. Worst case bend the 90s then put it in the die to coin it. What are your thoughts? Also if I use the coining method(correct me if this wouldn't be considered coining, I'm new to the press brake/stamping scene) what clearance should be allowed for the punch/die,20 thou? Thanks

Screen Shot 2018-09-23 at 10.13.11 PM.jpg
 
It may be a pain for that quantity but my go to for radii where custom dies aren't an option is to step bend.

If you do a lot of weird radius jobs you can also get a urethane lower die and use a largish radius punch (whatever you already have) and make arbitrary radii with no marks.

Biggest downside is it would take on the order of 12 hits on that part to fully form it, but that's what, 2 hours for 300, if that? Unless you charge through the roof per hour or get custom tooling crazy cheap your would need to do something like 8 runs at an absolute minimum to pay off new tooling.
 
Simplest is just a stack of the thickest bits you can easily laser cut to make the male and female dies, a quick touch up with a grinder and your in production in no time. Add some simple holes and lengths of all thread to keep em together, its that easy
 
Simplest is just a stack of the thickest bits you can easily laser cut to make the male and female dies, a quick touch up with a grinder and your in production in no time. Add some simple holes and lengths of all thread to keep em together, its that easy

We do this all the time. We call it Laminated Tooling. Typically we use 4130, make a male and female set using Dowel Pins to align them or a longer piece of rod if needed.

We have some tools that are up to 60 inches long made this way.

If coining and the finish is an issue we cap them using Stainless VHB Taped to the Laminated Tool. They hold up to a lot of use.
 
Simplest is just a stack of the thickest bits you can easily laser cut to make the male and female dies, a quick touch up with a grinder and your in production in no time. Add some simple holes and lengths of all thread to keep em together, its that easy

Yes, this is exactly what I tried but the part wants to stay stuck in the die even though I put a 2 or 3 degree angle in the die wall(wider at the bottom). I may just need to clean the punch and die up a little better. Plus the parallel legs of the part are not parallel due to spring back. I've read you can put urethane in the bottom of the die to help with that. Where is a good source for this type of urethane?
 
Rubber suppliers, its readily findable online, i do a lot of smaller brackets this way with the exact profile, die finish greatly effects how stuck, i use about 5 degrees and they will pop out easy. A BFH and a suitable former is another easy fix for just 100 or so a year.

Getting the legs parallel takes a non flat top ie bend em past 90, that said, my parts end up going onto a curved item and the spring back kinda makes them self tension and pull down just right :-) That said, you will never get absolute perfection, steel hardness varies a little batch to batch, thickness varies and at best a solid form tool will only get you within +- a couple of degrees do to thoes variables. Hence the BFH correction device which goes pretty dang fast once you get the feel.

As a rule on this stuff i never allow any clearance, reality is sheets always about 4-5 thou thin over here and that gives me all i find i need.

If you want dead parrelel on the leg uprights its a lot harder to form this in one hit, far easier to rough form then pop a manderal in the curve and over bend it so it springs back to the perfect 180 degree as a secound operation, again do to material variations one batch will be diffrent to the next hence its easier and faster to just correct the low hundreds a year range that try to 100% it to perfection with one hit.
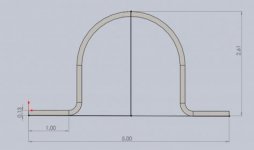
 
I started to figure the develop length of the part, the radius dimensions or the width have not been provided. On your part drawing the dimension height of the part is 2.41. In your description the part is 6" deep. Make the space for the part the thickness of the material.


Back
Top