What's new
What's new

Chromoly tubing

JEEPGUY

Plastic
Joined
Dec 10, 2007
Location
rutherfordton
thinking of starting to build chromoly 4 link suspension setups for offroad applications i plan to buy the heims and all that just cut the actual rods to length and tap the ends and assemble. can i use my current setup, chop saw with abrasive blade to cut the chromoly tubing to length? i plan to build the first one for my xj first and put it through hell until i break it and then go from there hopefully be building them to order in the next 6 months.

any of you done anything like this before?
 
That's about it. If you are going to tap the ends, beware that the abrasive saw may harden the end of the tubing and damage the tap. I use a bandsaw for that work.
 
When you use an abrasive wheel, the material gets red hot. If it cools rapidly(and it can, just by conduction from the uncut stock) it will harden right at the cut.

I can't guarantee that it will be a problem, try it and see.
 
wall thickness

what wall thickness you using? was wondering if you realy need molly if its going to be heavy enough to thred. i use weld in neds and make them .120 wall.

jason
 
Over at the motorcycle chassis design list serv which is run by PM'r Michael Moore, we've discussed the differences between 41xx and 10xx steels at some length.

The basic difference is that the 41xx steels can bend slightly further **for a given shape/weight** without taking a permanent deformation.

If you design the part slightly more robust and use 10xx steel, you will achieve the same durability of the part with a modest weight penalty.

Since you're designing suspension parts, the intended use of the suspension will drive your decision: is this going to be a rock-crawler (extremely long travel, but very low shock-shaft speeds, i.e. no penalty for heavy arms) or is this going to be a desert racer which will be hammering over sand whoops at 100mph, and have very high shock-shaft speeds? In that case light & strong suspension arms will be desirable for reduced unsprung weight.

Personally, I'd over-build in 10xx for your first effort, then when you've run them for a while you will probably think of the "New and Improved Version 2.0!" arms, at which point I'd build them out of 41xx. You'll save a lot of $$$$ on the first versions -- 41xx is usually double or more the price of 10xx.

BTW, if you use the abrasive saw, and don't mind a mess, you could put a small stream of water on the cut, which will preserve the temper of the tubing. 10xx won't harden as much as 41xx either, another point in it's favor. I'd still use a bandsaw if possible.

targeting the rock crawler guys the weight is not a real issue really actually having a little weight under the truck would improve the cog significantly
so i may look into building it from the lesser grade steel
thanks
 
the angles are not hard to figure out you basically want to keep your upper and lowers as parallel as possible. and the degree of angle is based on what you are going to be doing with the jeep/truck. research is the best thing to do i have done hours and hours of research and i dont enough to build one from ground up.

did you mean nissan triton???

Parallel is not usually the way to go. The control link angles, lengths, and attachment points(both on the chassis and on the axles) greatly affect things like Instant Center, Roll Center, Anti-Squat(Anti-Dive in a front axle) driveline plunge and driveline angles, to name a few.

What type of drive shafts are you going to use? Single cardon, or double-cardon? This alone will change how you work out your angles in the design stages.

Also, for the type of links you are probably going to build, you would probably be best off to just buy 4130N tubing, .120 wall, probably 1 3/4". Then buy pre-made weld-in bungs for your rod-ends(probably 1 1/4). This is far eaiser and cheaper than trying to tap heavy-wall tubing(ever try to run a 1 1/4 fine-thread tap full depth? Now do it in tubing and try to keep it straight. Oh yeah, you gotta buy the right size expensive drill bit. And you gotta buy at least one expensive tap, maybe a lefthand tap as well depending on your link design. Tapping this stuff in a big lathe is the only way to go-it's just heart-ache otherwise.) If you are worried about wall thickness, just sleeve some 2" 4130 over it when you are done. This gives you .250 wall, it's easy to work with, and if you just tack weld your bungs to the link tubes while you are doing your mock ups, you can always cut the tacks and change lengths. For your inital mock up, just use plain old seamed tubing, you will have to take a die grinder to the seam to allow the bung to fit, or use a thinner wall and let it fit a little sloppy, but it,s cheap. when you are happy and ready to test, then make the links that you will actually run on the vehicle out of 4130. Also, same yourself some other heart-ache, and don't use DOM tubing on the links to save a few bucks-not because of strength, but it seems that DOM does not hold manufacture tolerences as closely as 4130 and the bungs rarely fit right in DOM.

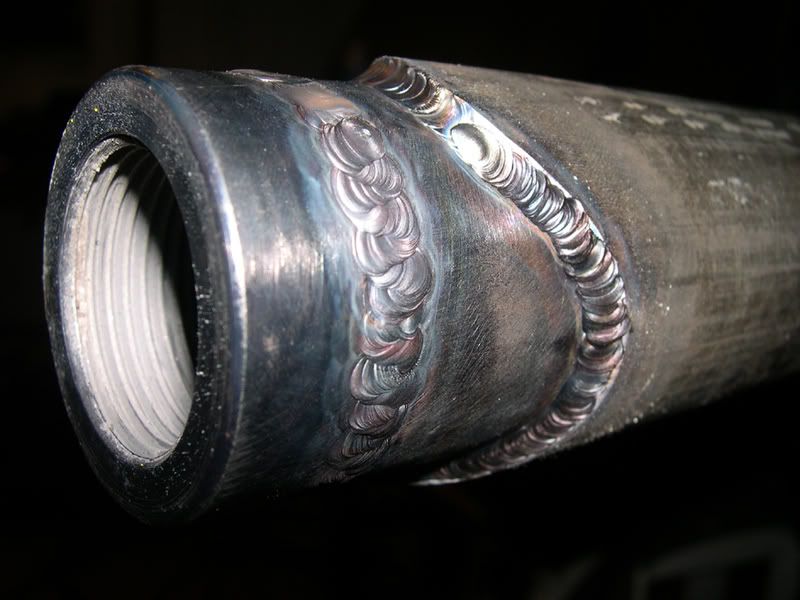
link1.jpg


Here's an example of a sleeved link with a welded-in bung. It's off an early Bronco.


Back
Top