What's new
What's new

6 jaw chuck won't stay true

scsmith42

Cast Iron
Joined
Jul 28, 2020
Location
New Hill, NC
I've searched the archives, but I haven't found a thread with a problem similar to mine.

I'm the new owner of a South Bend 17x60 Turn Nado lathe, circa 1964. The lathe is in overall good condition, and came with a 3 jaw chuck (D1-8 camlock).

Post clean up C.jpg

Recently I acquired a used Buck 10" 6 jaw chuck with a D1-8 camlock plate included.
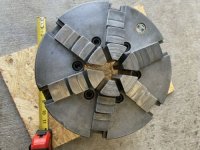
buck 6 jaw chuck.jpg

Camlock plate.jpg

Yesterday I installed it and trued it up using a length of tight tolerance 1" round bar from McMaster (.0005 - 0 tolerance).

I was able to true the round bar to within .001 along the entire length of the round bar (10" protrusion). However, when I loosened the chuck, rotated the round bar and retightened, I was out .020.

Trying the round bar in several locations results in variances from .002 up to .025. There is no correlation with regard to positioning of the round bar versus orientation in the chuck.

Because I was able to originally true to within a thousandth, I'm thinking that I have a problem with respect to the jaw alignment and that they jaw's are not gripping the same way every time.

Has anybody run into this before and can offer some suggestions, short of either having the chuck refurbished or replaced?

Thanks much.

Scott
 
Ha! I have posted alot about a Buck 6 jaw in the waste of a monarch forum here!

Anyway, first step is to take it apart, and check the condition of the front half of the body.
Two wear points, the pivot bearing at the center not more then .003" wear!
Next, since there is only one pinion, look at the thrust face inside the front half, where the gear action on the scroll from the pinion, pushes the scroll "jaw side" into the chucks front half thrust bearing surface "no wear allowed here as the scroll cocks when tightened.
Those problems can be corrected with regular machining/sleeving.
Then the jaws need to be loaded, and the jaws ground in the lathe with a decent post grinder.

As 6 jaw chucks wear, the jaw contact drops out, until only 3 are left in contact, evry time.
I have to go to work, prime metal moving time, I will check back to see if you really have interest when I can. Could be considering the price of a 6jaw!

Scroll chucks, are a point that causes vapor locked brains, especially here, but you have to fix it or go without, boo hoo.
 
The chuck can be repaired, you have no clue to what I have already posted.

It best to understand just how delicate an old Buck 6 jaw chuck is, and required maintenance for it to work for any reasonable length of time.
Or know the tool!
 
Pass the 6 jaw on to another poor unsuspecting ''soul'' and spend some of the proceeds on a lifetimes supply of soft jaws (inc pie & extra large) for your 3 jaw.
 
I would probably do like Sami. If you actually want to fix it you're going to have to do step 1 of fixing anything: find out what's wrong. Check the jaw gripping surfaces to see if they are forming a round and straight cylinder. Do that by clamping on a ring or short piece then put an indicator on the jaws to see if they are true and straight. If those are good you probably have scroll issues like donie mentioned. I would suspect out of whack jaws first with that much of a change. You may have both though.
 
When you quote those runout figures, is that at the chuck jaws or 10" out?

Tight tolerance round bar refers to diameter, not straightnes. When I looked at McMaster, straightness was 1/16" over 1 foot for 1" diam rod.
 
This a great machinist subject because most of them run, expected from a limy, but come on, a scroll chuck is not that complicated.
Hydraulic shop machinist know the mechanics of scroll chucks, you cant make money with bad chucks, simple as that.
I use to show photos, the troll stopped that.

What has to be done is the scroll re-set in the front chuck half by installing a bushing. At about the same time, any thrust wear is correct by machining the interface of the front half to remove end play to .002".
Of course, if enough material has to be removed, the pinion hole will have to be bored.
Price a new decent 10" 6 jaw chuck, and convince yourself its too much work.
 
Many thanks to all who have shared advice regarding my problem. I sincerely appreciate everybody taking the time to assist me with this problem.

The runout measurements that I'm taking are along the length of the 1" round bar that is protruding from the chuck. I am not measuring the runout at the jaws - only on the round bar.

With respect to the straightness of the round bar, I have verified it by rolling it across a Mojave granite surface plate, with a flashlight held behind the round bar. Bottom line - the bar is straight.

round bar.jpg

Donie - other than removing and replacing jaws, I have never disassembled lathe chuck. Are there any tips or tricks that you can share before I attempt to disassemble it?

I own a small tool post grinder (although I have not tried using it with the 17x60), so retruing the jaws is an option.

One thing that I also find odd is that the jaw surface does not appear to be centered on the round bar, per the attached photo. Note on one of the photo's the round bar appears to be very coarsely machined. It's actually a polished surface and the roughness is the reflection of the front of the chuck jaws.

Chuck 1.jpg

Chuck 1 zoom in jaw.jpg

backlit jaws.jpg


The fact that the round bar does not appear to be contacting the center of the jaws makes me wonder if my first step should be to use the tool post grinder to regrind the inside of the jaws.

Thoughts?

Scott
 

Attachments

  • 20201005_160806.jpg
    20201005_160806.jpg
    77.3 KB · Views: 105
Most people do not like rebuilding things. With the wear points Donnie mentions they are still in a state of wear and getting force and so since this Chuck is built such that it can be repaired all that it needs is someone who can rebuild it. Once rebushed and whatever needs doing it becomes stable.

Donnie would the scroll generally be in good shape?

Six jaws have to be a expensive item. I have always wanted to work with one. Rebuild resets the Chuck solid and repeatable. This kind of thing was always done back in the day. We repaired everything that we could as everything was expensive and it took too long to order something. At least if we did order something it was top notch quality to be expected. Today everything must be checked when it gets in.
 
6-jaws are meant for thin-section rings and tubes that would be too-easily shape-distorted by gripping with fewer jaws.

.

My intended use for this 6 jaw chuck is threading thin wall tubing - typically .065 but could be more or less - in aluminum, stainless steel and titanium.
 
Many good posts imho ..
despite the somewhat negative condescending tone I dislike, in some of the posts.

The mcmaster rod is no-where near straight or true --
but it´s still sufficient.

Your chuck is likely to grip unevenly and show various radial errors depending on size that is gripped.
The same rod gripped 3-4 ways can have different errors, because a 0.001" size difference per orientation can easily cause a clear radial error 10" out.

*You* likely cannot *fix* the errors in the chuck.
It is one of the hardest machining problems, exactly like improving the accuracy of a 5-axis machining center.
It *can* be done of course, but anyone asking here is unlikely to do be able to do so.

You might be able to improve the avg. error by internal tool-post grinding of the jaws.


The guys here who do precision grinding could of course make new jaws .. and you should re-size the jaw runners first to make them uniform.
Much more expensive than the best new industrial chuck, like a shunck, or equivalent.

Absolutley anything can be done if sufficient time and work hours are available -- but it will not be economically feasible.
Look at making the first diffraction grating ruling engine for inspiration - 17 years.
 
I simply do not work material that thin in diameters requiring a 10" 6jaw chuck, and on a gearhead lathe.
Working thin tubing on a Monarch EE with a 6" 6 jaw chuck, and of course smaller diameters are much more stable.
 
This a great machinist subject because most of them run, expected from a limy, but come on, a scroll chuck is not that complicated.
Hydraulic shop machinist know the mechanics of scroll chucks, you cant make money with bad chucks, simple as that.
I use to show photos, the troll stopped that.

What has to be done is the scroll re-set in the front chuck half by installing a bushing. At about the same time, any thrust wear is correct by machining the interface of the front half to remove end play to .002".
Of course, if enough material has to be removed, the pinion hole will have to be bored.
Price a new decent 10" 6 jaw chuck, and convince yourself its too much work.

This is not a great machinist subject. It's more of a great "do you like to piddle around with your tooling or use it" subject. It isn't like this is some rare artifact. Another can be had for probably the same money that is in better shape. Fixing such a chuck is absolutely child's play for anyone that is not a noob and is actually worth a damn at machining. If it was just in need of a jaw regrind I would say go for it. Otherwise it may be over his head - and no offense to the O.P. but note the method used for checking straightness of the "precision" shafting.

O.P. - if the jaws are not straight, you must grind them or you are chasing your tail. This has already been mentioned more than once. A 3-jaw with removable top jaws absolutely is a better general purpose chuck. As also mentioned, a 6-jaw is intended for use on thin walled parts, and does not hold as tightly as a 3-jaw for the same torque on the chuck wrench. For thin-walled work pie jaws on a 3-jaw work just as well or better than a 6-jaw.
 
To say the least, I have learned a great deal from the respondents on this thread. Again my thanks for taking the time to share your knowledge and advice.

Based upon the collective responses, here are my take-away's so far.

1 - true up the OD of the chuck first.
2 - Use the tool post grinder to true up the inside jaws of the 6 jaw chuck. Do this by expanding the jaws into a steel ring to preload them.
3 - Once the internal jaws are true, chuck up some precision bar stock in the appropriate diameter and then true up the outer jaw surfaces.

See if this solves the consistency issues. If not, then look into chuck disassembly and rework aka Donie's advice (if I want to invest that much time in dialing in the chuck)


Most likely, I will need to install the 3 jaw chuck, obtain some full circle soft jaws for it and align, and use this method for my tubing projects. My 3 jaw chuck is marked Poland PUUm-M12 1/2D8 ZD So, most likely the 6 jaw will end up sitting on the shelf....

Also I should look into acquiring a quality 4 jaw independent chuck as well.

Are there any recommended suppliers that I should look at regarding a 4 jaw chuck? Usually I purchase from Travers Tool.

Did I miss anything above?

Thx.

Scott
 
This is not a great machinist subject. It's more of a great "do you like to piddle around with your tooling or use it" subject. It isn't like this is some rare artifact. Another can be had for probably the same money that is in better shape. Fixing such a chuck is absolutely child's play for anyone that is not a noob and is actually worth a damn at machining. If it was just in need of a jaw regrind I would say go for it. Otherwise it may be over his head - and no offense to the O.P. but note the method used for checking straightness of the "precision" shafting.

O.P. - if the jaws are not straight, you must grind them or you are chasing your tail. This has already been mentioned more than once. A 3-jaw with removable top jaws absolutely is a better general purpose chuck. As also mentioned, a 6-jaw is intended for use on thin walled parts, and does not hold as tightly as a 3-jaw for the same torque on the chuck wrench. For thin-walled work pie jaws on a 3-jaw work just as well or better than a 6-jaw.

Thanks for the advice and no offense taken.

With respect to checking the straightness of the shaft, based upon your comment as well as those from others, it sounds as if my truing methods are questionable. Considering that the lathe is not currently chucking consistently what method would you advise to verify that the shaft is reasonably straight for chuck truing purposes?
 
before you grind anything, take it all apart, clean and inspect, pay close attention to the scroll and the threads on the jaws, chips and debris stuck there can cause runout


Back
Top