What's new
What's new

Can this 240 V motor be reversed ?

halexh

Plastic
Joined
Mar 7, 2020
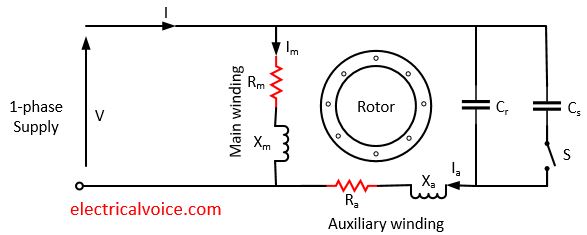
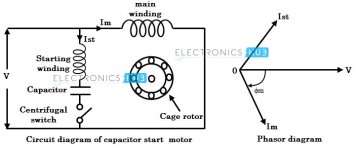
Having a hard time figuring this one out I replaced a damaged electric motor on my air compressor. The unit it was replaced with came from a IR 7.5 HP compressor and it seems like it was only designed to spin CW. From my limited knowledge if I can reverse the polarity on the Starting Winding it would change the direction of rotation. Looking through the wiring I am having a hard time figuring out the correct way to do this.

From what I can tell the 2 Black Capacitors are Start Capacitors that are wired in series and the 1 White Capacitor is the Run Capacitor. The 4 wires coming out from the motor are all blue 2 are connected to L1 and L2 and the other 2 are connected to the Run Capacitor.

image0 (2).jpgimage1 (1).jpg
 
Someone may want to verify this, but what I recall is this:
Step 1, measure resistance of the windings. The higher resistance is the starter.
Step 2, reverse polarity of starter winding. Keep everything else the same.
Are the grey wires coming from the switch for starter winding?

EDIT:
I think you have something like this:
capacitor-start-capacitor-run-induction-motor-diagram.jpg


Types of Single Phase Induction Motors
scroll about 50% down

edit2:
ignore/remove 2nd, attached, image. Wrong url, wrong image.
 

Attachments

  • Split-phase-induction-motor-circuit-diagram.jpg
    Split-phase-induction-motor-circuit-diagram.jpg
    46.3 KB · Views: 45
  • Capacitor-Start-Induction-Motor-circuit-diagram.jpg
    Capacitor-Start-Induction-Motor-circuit-diagram.jpg
    39.7 KB · Views: 67
I tried measuring the resistance on the 2 windings and I am getting really low readings from what I was expecting. Not sure if these are normal for 7.5hp motor but it runs just fine in CW rotation. I am getting 0.6 ohms on the main and 1.4 ohms on the starter winding. The centrifugal switch is the 2 grey wires coming up from the motor.

I am understanding that I need to reverse the polarity on the starter winding just can't get my head around to where to switch the wires to accomplish that.
 
Looking through the link I believe that motor I am working with is a Capacitor Start Capacitor Run Induction Motor because I have both a Start and a Run Capacitor in the panel.
 
I tried measuring the resistance on the 2 windings and I am getting really low readings from what I was expecting. Not sure if these are normal for 7.5hp motor but it runs just fine in CW rotation. I am getting 0.6 ohms on the main and 1.4 ohms on the starter winding. The centrifugal switch is the 2 grey wires coming up from the motor.

I am understanding that I need to reverse the polarity on the starter winding just can't get my head around to where to switch the wires to accomplish that.

Can you confirm that here is no continuity between the two sets of winding wires? Just to make sure that you have access to actual windings, not some preset configuration with "access" wires... Something in the photo does not click in my head as matching the schematic.
 
Can you confirm that here is no continuity between the two sets of winding wires? Just to make sure that you have access to actual windings, not some preset configuration with "access" wires... Something in the photo does not click in my head as matching the schematic.

For some reason that skipped my mind I guess seeing 4 wires coming out I just assumed they are separate. Just did a reading and there is continuity between the 2 wires that are next to each other in the middle of the second picture they are both blue so it makes it hard to tell them apart in the picture. Within the panel the wire are labeled T1 and T4 which is connected to L1 and L2 and T5 and T8 which are connected to the Run Capacitor. All 4 of these wire are blue and go inside the motor in the second picture. So the resistance between T1 and T4 is 0.6 ohms T5 and T8 is 1.4 ohms and I am getting continuity between T1 and T5. Just can't quite understand why they are connected and still running 2 wire out into the panel box as opposed to just using a common wire.
 
For some reason that skipped my mind I guess seeing 4 wires coming out I just assumed they are separate. Just did a reading and there is continuity between the 2 wires that are next to each other in the middle of the second picture they are both blue so it makes it hard to tell them apart in the picture. Within the panel the wire are labeled T1 and T4 which is connected to L1 and L2 and T5 and T8 which are connected to the Run Capacitor. All 4 of these wire are blue and go inside the motor in the second picture. So the resistance between T1 and T4 is 0.6 ohms T5 and T8 is 1.4 ohms and I am getting continuity between T1 and T5. Just can't quite understand why they are connected and still running 2 wire out into the panel box as opposed to just using a common wire.

T1 and T5 are separate wires to let you change the direction.

T# are standard codes and based on that i believe you will need to swap T5 and T8 to reverse the direction, however i cannot guarantee that the T# on your wires really do follow standard code.
https://www.naemotors.com/wp-content/uploads/2011/08/Single-Phase-Wiring-Diagram.pdf

Look at figure 9-34 here:
Electrical Wiring Industrial - Stephen L. Herman - Google Books

EDIT: A quich check would be to measure resistance between T4 and T8. It should be the sum of the other 2 resistances you got, so 2 ohm.
 
So looking at the first link the first diagram for a Single Voltage Motor 208-230 Volts I believe matches what I have Just not quite sure how T5 is connected to L1. On my motor T5 and T8 both go directly to the Run Capacitor. I understand that T5 and T8 need to be inverted and I understand that it would reverse the polarity of the Start Winding and I am pretty sure that everything matches up with the diagram just not sure how to accomplish it on this motor. To me it seems as if T1 and T5 are connected at the base of the windings if that is the case i am not sure if I tear into them if it would be possible to just switch T5 and T8 there. I know this is not ideal but I am starting to think that the manufacturer of this motor cut some corners to save some money since the motor seems like it was only designed for this particular application so there was no need to complicate it and add leads to reverse its rotation.
 
Just uploading a picture of the windings with the wires labeled hopefully that helps clear part of this up.

image1_1_50.jpg


Back
Top