What's new
What's new

Drilling larger size holes in the side of 4" bar

vonleyser

Cast Iron
Joined
Nov 23, 2008
Location
Brookshire,Texas USA
My upcoming task is to machine holes of various size down the length of a 4" diameter bar, 48" long.

My question is what tool/tools would be best to rough
these things out with, and then finish with a boring head, or just
get a 1-1/2" hole in all locations and use boring head to finish.
(I get paid by the hour)

1 piece order with a possible 2 more to follow.

machine 3 horse vertical mill, next size up from a series 1 Bridgeport,
will have to do this in 2 steps.

Thoughts/recommendations lets hear them.
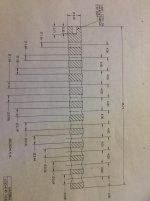


Holes.jpg
 
IMO unless you're going to spend a ton of $ on tooling you can't do much more than you've said - drill as large as you can then bore from there .................using the shortest stoutest bad you have.
 
IMO unless you're going to spend a ton of $ on tooling you can't do much more than you've said - drill as large as you can then bore from there .................using the shortest stoutest bad you have.

Thanks Limy

You are correct, we will not be spending money, job shop atmosphere, we hand grind
lots of broken high speed steel to do many things with, so probably twist drill or something, then maybe a large end mill to open it up some more, then start boring is my guess.

Can shorter spade drills be used with a spotting drill ?? seems like we have a bunch of them around, just not sure about going in the side of this thing.
 
Here is what I had to say, I mean rant about, in the other thread ;):

Cant help you with boring the holes but whenever I see a print like that, it pisses me off to no end. What are the tolerances on those measurements with 2 decimal places? +- .03, or +- .02?

So if you are within tolerance on each dimension but .01 off of perfection, at say 4.01" and 3.01 on the first one you will be .11 off location of the last hole but still well within the prints tolerance. :eek:
The better way to dimension a part like this is to zero one corner, or edge, and add the location of each holes center progressively down the line. So end is 0, first hole is 3.00, second hole is 7.00, third is 11.00 until the end at 46.72.
This way the tolerances can not stack up, so to follow the same .01 off location each hole will be only off by .01, not the first off by .01 and the last off by .11. This also cleans up the drawing by eliminating all the dimension lines since each measurement should be written right on the center line of each hole.
Rant over:cheers:


Back
Top