What's new
What's new

Everything I never knew about gage pins??

bellinoracing

Hot Rolled
Joined
Aug 27, 2009
Location
Arizona USA
Well I went to start making my first parts on my newly acquired Haas TM1 and they require me to mill a hole .709 -.001+.000, which is not terribly hard. The problem is I just realized I do not have anything to check a hole that size with. So I am looking at picking up a couple gage pins. I have used them quite a bit over the years but never had to buy any myself. What brand does everybody like? I have been buying most of my tools from amazon and they have Vermont gage and SPI. SPI has some black oxide coated pins which sounds like a good idea considering I use a swamp cooler in my shop. I dont think either one is a bad brand but is one better over the other? The ones I looked at were class ZZ, so what does that mean? Normally I have only used the minus pins. In general when would you use the plus pins? I am going to be buying a .708 pin and .709 pin. Should they be a .708 plus and a .709 minus so I am positive my size is right where it needs to be?

Thanks for any comments
 
Most popular/best brands that I know of are Vermont Gage and Meyer Gage, both I believe are made in US(doubt SPI is).

What I think you need is .709 GO/NO GO assembly, both Vermont and Meyer have them and they are very reasonable in ZZ class, which I believe is general inspection class.
 
Those gauge pins might not be the best to measure this. It'll work, but the .709 minus and .708 plus range kills 40% of your acceptable tolerance to work with (.0002 on each side is .0004 out of .0010). It's probably cheaper than a dial bore gauge or other more advanced setup, though.

Anyone good enough with their telescoping bore gauges and mic to hit that?
 
If you are going to mill the hole, you need to make sure the nogo pin is diamond shaped. A round nogo pin will pass an oval hole that is oversize. In extreme cases, a diamond nogo will go when a low limit go pin won't.

I agree with max. You need some method of measuring the hole. My preferred method would be a bore gage because of speed and accuracy. Second would be a bore mic.

I know you are just learning your machine, but to hit that dimension consistently I would ream or bore.
 
Class ZZ is specified with these limits: size deviation .0002”, roundness deviation .0001”, surface finish 10 microinch. This is a standard workshop grade. Classes Z, Y, X, XX, and XXX have increasingly tight tolerances.

The following swiped from the Meyer Gage website:
Plug Gage Tolerances
Description: Standard practice is to allow 5% of the hole tolerance for the GO gage and 5% for the NOGO gage tolerance. The Go gage whose nominal size is at the low limit of the hole to be checked is usually given a plus tolerance in order to insure all parts are within the low limit. The NOGO gage pin nominal size is at the high limit and is given a minus tolerance.

Meyer's tolerance calculator actually suggests using Class X pins for your .709-.710 situation, because their recommended practice would use a .70905+ GO and a .70995- NOGO. They only offer Class ZZ to .001 and Class Z to .0005 size increments, while they offer Class X in .00001 increments.

You can probably ignore the 10% standard practice and use .709+ GO and .710- NOGO in a pinch. Class Z would be a better choice than ZZ in this case. If you go with Class X, go ahead and get the .70905+ GO and .70995- NOGO.
 
Meyer or Vermont are good pins. Surprisingly the SPI are China and are pretty consistent. Deltronics are top notch but you pay a lot for them. One drop on the floor and they are gone.
I have a full set of pins M1-M5, with a lot of deltronics .0005 pins in the smaller ranges. I have some nice Mitutoyo .00005" I.D. mics that I use to creep up, but I rely on the pins to get that final fit confirmation.
Half thou pins are pretty common, and I would suggest to get a .7095" pin so you know if your tolerance is too big. Your .709 pin will fit and a .710 won't but that isn't indicating the full .0005 you could be over.
A cheap investment to prevent a lot of parts getting returned.
I assume you are using a reamer to get your .709 size, depending on the material, just howm many times can you use the reamer before it is out of tolerance.
 
Deltronic Class XX pins really aren't all that expensive if buying in specific range. At least they put their list prices right on their site so you can see how nice your local distributor is treating you.
 
Everyone has their own ideas here, but I wouldn't use pins for .001 limit holes, nor would I mill them.
You might as well start collecting the gages you'll need now-they won't get any cheaper.
A dial bore is great for this tolerance range, as is a Mahr split probe gage or the similar Comtor. You'll need a ring (preferred) or a good (grade 2 or better) set of blocks, along with a set of cages and fingers, to set them. Remember to factor in the inaccuracies inherent in your gaging method when you figure working tolerances.
Gaging is expensive, and skimping here is a false economy. Search PM for info, there are some good threads.
 
How deep is the hole, or thick is the material? Bore mic would be my choice, or you could use an inside mic if the hole is not too deep. Pin gauges are good if your working a range of a few thousands.

Telescoping gauges are only good to a couple of thousands as well.

A TM1 is a smallish cnc. I wouldn't rely on it to cut perfect circles and you might have to account for tool taper

Go with the bore mic. if you can afford it, other than that, a set of Deltronics.

Tom
 
Hold the phone.

If your customer will accept pass/fail functional gaging pins will be OK. Many will not depending on criticality and application. They may insist on actual measured size, that is, quantitative data: size of the hole, roundness, cylindricity, location etc.

It is possible for a hole to measure within tolerance and yet reject both limit gages. An odd number lobed condition is almost almost undetectable checking by diameter only and a circular interpolation is particularly vulnerable to this kind of error along with other errors like back taper, hourglass, barrel and other wierdness depending on the concenricity of the cutter flutes to the spindle axis..

Regardless circular interpolating a bore with an end mill is subject to too many sources of error to reliably hold a +001"/-.000" tolerance. An exception may be when the hole has little significant depth; a rabbet fit for example.

Your best bet is to rough with the end mill leaving 10 thou stock and bore to finish. A bored hole will far more likely be acceptable than one circular interpolated.

I suggest you check size with a mike and a telescope gage ir dial bore gage. Cheapo eBay $36 bore gages aren't that bad if compared to a reference bore of known size, a setting ring, or stack of jo blocks with the setting attachments. A good dial indicator is the saving if an indifferent quality bore gage.

Don't discount telescope gages. In experienced hands they are damn accurate. I've used telescope gages to work to 0.0001" checking on the micrometer provided the bore finish is up to snuff.

I suggest any who sneer at the accuracy attainable with telescope gages should learn how to use them. It's a skill and that takes practice and technique.

Here's a start: http://www.wikihow.com/Use-and-Read-a-Telescoping-Gage

http://bbs.homeshopmachinist.net/archive/index.php/t-27178.html

http://www.youtube.com/watch?v=SmXfGan_NXQ
The guy in this calls a telescope gage a "snap gage" which aint orthodox in most parts of the country but he shows the correct way to use it. Taking an accurate reading from the gage with a mike requires a careful touch, some back and forth to max the reading, and a little patience. Take several readings but do not average them. D=Measure blind: don't look at the mike. You can "wish" a couple of thousandths one waay or the other so easy you'd never credit the phenomena. Reject the extremes. Those that cluster within 0.0002" are the ones to take to the bank.
 
Last edited:
I figure if a hole is important, then I'd like to know what goes in it.

The nominal diameter of the hole is 18mm. If they are putting a bearing in the hole, then worry about boring it. If it is for a dowel pin, then ask if they want a press fit or a slide fit. It sounds like they don't know what kind of a fit they want, since 18mm = .70866 and their tolerance straddles that figure. Dowel pins also have a tolerance and may err on the oversize. Bearings err on the undersize.
 
I guess you could be like many school systems and "teach for the test".

So, how will the customers QA lab test for proper sizing?

And, when was the last time their tools were calibrated?

I know that comes off a bit nasty, but if the customers tools aren't up to snuff, they might be failing perfectly good parts.
 
For a start, I'd interpolate a hole of the desired size using the mill, and then sweep it with a .0001" DTI to see if it is round or not.

If it's round, that should answer a few questions and open a few doors to gauging methods.

If it's not, it may not make any difference how you gauge it, depending in what goes in the hole.

You may end up boring them!
 
Thanks everybody lot of good suggestions here. Sorry something I should have mentioned is that these are some parts that I designed myself and I am pretty much guessing as far as my tolerance goes. These parts are some motorcycle lowering links. I am interpolating the thru hole in some 3/8" thick 6061 aluminum using a 1/2 flat endmill. I have done a few of these parts in the past on a different machine with good luck. I thought these would be some good parts that I can sell and test out the tolerances and abilities of my new machine. Before I just used an inside mike which worked but I do think gage pins would be better. Yes, No?

These parts get a steel flange bushing pressed into them that a bolt goes through and pivots. The first pair of these I ran over a year ago I cut the hole .708 which worked but it was harder to press the bushing in than I would have liked. So I opened it up to .709 and they went in just like stock links. I imagine I could open it up as far as .711 but I dont want to get too loose or else the steel will start to turn in the aluminum and wear right through it. But I am no engineer so I am taking a educated guess here based on past success. Whats everyone think? Would .711 be too big? And as far as out of round or a diamond shaped hole, I dont think that would bother me one bit, as long as my steel bushing locates right and does not spin.

Thanks again
 
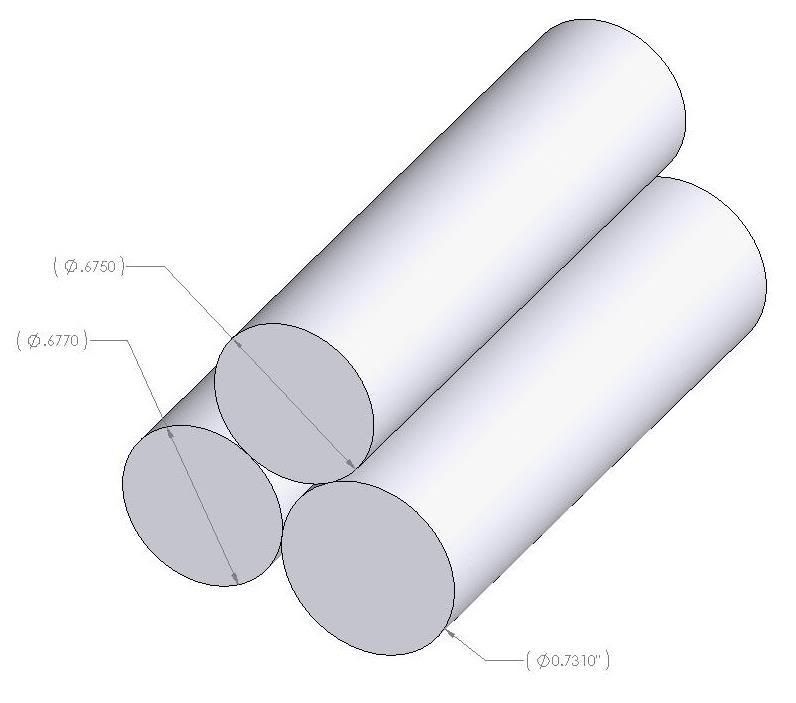
3 pin check

bellinoracing,
Here is another way,

a set of minus pins 0.250-.500" will work fine, Download Marv Klozt's utility PLUG, it runs under DOS Shell, "Read the instructions", output is PLUGOUT.txt, rename to rtf file save as something like your size, 0P7081.rtf or 0P7089.rtf; eg below.

Down load at: Marv Klotz's Utilities: home shop, mathematical and utility software

For (-) pins, 0.2499" thru .4999" average, even a tenth off will only effect the results a few "millionths".

Hole size = 0.708100 in

0.2779, 0.3269, 0.3689 => 0.7081035 (error = +0.0000035) *
0.2789, 0.3359, 0.3599 => 0.7080915 (error = -0.0000085)
0.2799, 0.3279, 0.3669 => 0.7081024 (error = +0.0000024) *
0.2809, 0.3379, 0.3569 => 0.7080944 (error = -0.0000056)
0.2829, 0.3419, 0.3519 => 0.7081042 (error = +0.0000042)
0.2839, 0.3319, 0.3609 => 0.7080909 (error = -0.0000091)
0.2859, 0.3139, 0.3759 => 0.7081023 (error = +0.0000023) *
0.2859, 0.3219, 0.3689 => 0.7081079 (error = +0.0000079)
0.2859, 0.3349, 0.3569 => 0.7081089 (error = +0.0000089)
0.2879, 0.3419, 0.3489 => 0.7081087 (error = +0.0000087)
0.2879, 0.3429, 0.3479 => 0.7080973 (error = -0.0000027)
0.2899, 0.3179, 0.3699 => 0.7080939 (error = -0.0000061)
0.2909, 0.3389, 0.3499 => 0.7080995 (error = -0.0000005) *
0.2929, 0.3269, 0.3599 => 0.7080971 (error = -0.0000029)
0.2939, 0.3389, 0.3479 => 0.7081076 (error = +0.0000076)
0.2939, 0.3399, 0.3469 => 0.7080904 (error = -0.0000096)
0.2949, 0.3319, 0.3539 => 0.7080905 (error = -0.0000095)
0.2969, 0.3099, 0.3719 => 0.7081004 (error = +0.0000004) *
0.2979, 0.3339, 0.3499 => 0.7080931 (error = -0.0000069)
0.2989, 0.3289, 0.3539 => 0.7081097 (error = +0.0000097)
0.2999, 0.3109, 0.3689 => 0.7080962 (error = -0.0000038)
0.3039, 0.3059, 0.3699 => 0.7080905 (error = -0.0000095)
0.3039, 0.3109, 0.3659 => 0.7080980 (error = -0.0000020)
0.3059, 0.3349, 0.3429 => 0.7081084 (error = +0.0000084)
0.3079, 0.3179, 0.3569 => 0.7080936 (error = -0.0000064)
0.3089, 0.3249, 0.3499 => 0.7080975 (error = -0.0000025)
0.3099, 0.3229, 0.3509 => 0.7080990 (error = -0.0000010)
0.3109, 0.3139, 0.3579 => 0.7081060 (error = +0.0000060)
0.3119, 0.3129, 0.3579 => 0.7080947 (error = -0.0000053)
0.3119, 0.3329, 0.3399 => 0.7081033 (error = +0.0000033)
0.3139, 0.3269, 0.3439 => 0.7080917 (error = -0.0000083)
0.3149, 0.3249, 0.3449 => 0.7080943 (error = -0.0000057)
0.3169, 0.3219, 0.3459 => 0.7080922 (error = -0.0000078)
0.3219, 0.3299, 0.3339 => 0.7081069 (error = +0.0000069)
0.3219, 0.3309, 0.3329 => 0.7080966 (error = -0.0000034)
0.3229, 0.3279, 0.3349 => 0.7080992 (error = -0.0000008)
and;

Hole size = 0.708900 in

0.2789, 0.3369, 0.3599 => 0.7089086 (error = +0.0000086) *
0.2799, 0.3289, 0.3669 => 0.7088995 (error = -0.0000005) *
0.2809, 0.3389, 0.3569 => 0.7089096 (error = +0.0000096)
0.2829, 0.3159, 0.3769 => 0.7088930 (error = -0.0000070)
0.2829, 0.3249, 0.3689 => 0.7089017 (error = +0.0000017)
0.2829, 0.3439, 0.3509 => 0.7089082 (error = +0.0000082)
0.2829, 0.3449, 0.3499 => 0.7088980 (error = -0.0000020)
0.2829, 0.3459, 0.3489 => 0.7088913 (error = -0.0000087)
0.2839, 0.3129, 0.3789 => 0.7088997 (error = -0.0000003) *
0.2849, 0.3269, 0.3659 => 0.7088958 (error = -0.0000042)
0.2859, 0.3359, 0.3569 => 0.7089046 (error = +0.0000046)
0.2869, 0.3119, 0.3779 => 0.7088985 (error = -0.0000015)
0.2879, 0.3249, 0.3659 => 0.7088965 (error = -0.0000035)
0.2879, 0.3439, 0.3479 => 0.7089048 (error = +0.0000048)
0.2879, 0.3449, 0.3469 => 0.7088992 (error = -0.0000008)
0.2889, 0.3329, 0.3579 => 0.7089041 (error = +0.0000041)
0.2899, 0.3279, 0.3619 => 0.7088915 (error = -0.0000085)
0.2909, 0.3239, 0.3649 => 0.7089009 (error = +0.0000009)
0.2909, 0.3399, 0.3499 => 0.7088921 (error = -0.0000079)
0.2919, 0.3319, 0.3569 => 0.7088953 (error = -0.0000047)
0.2939, 0.3239, 0.3629 => 0.7088905 (error = -0.0000095)
0.2939, 0.3399, 0.3479 => 0.7088940 (error = -0.0000060)
0.2949, 0.3209, 0.3649 => 0.7089025 (error = +0.0000025)
0.2949, 0.3319, 0.3549 => 0.7089061 (error = +0.0000061)
0.2959, 0.3119, 0.3719 => 0.7088957 (error = -0.0000043)
0.2979, 0.3339, 0.3509 => 0.7088966 (error = -0.0000034)
0.2999, 0.3259, 0.3569 => 0.7089009 (error = +0.0000009)
0.3009, 0.3409, 0.3419 => 0.7089091 (error = +0.0000091)
0.3019, 0.3139, 0.3659 => 0.7089037 (error = +0.0000037)
0.3019, 0.3209, 0.3599 => 0.7089054 (error = +0.0000054)
0.3029, 0.3189, 0.3609 => 0.7089077 (error = +0.0000077)
0.3049, 0.3099, 0.3669 => 0.7088912 (error = -0.0000088)
0.3069, 0.3129, 0.3629 => 0.7088981 (error = -0.0000019)
0.3069, 0.3299, 0.3479 => 0.7089041 (error = +0.0000041)
0.3079, 0.3179, 0.3579 => 0.7089031 (error = +0.0000031)
0.3099, 0.3229, 0.3519 => 0.7088930 (error = -0.0000070)
0.3119, 0.3129, 0.3589 => 0.7089056 (error = +0.0000056)
0.3119, 0.3319, 0.3419 => 0.7088930 (error = -0.0000070)
0.3159, 0.3229, 0.3469 => 0.7088992 (error = -0.0000008)
0.3209, 0.3299, 0.3359 => 0.7089000 (error = +0.0000000) *
0.3219, 0.3279, 0.3369 => 0.7088939 (error = -0.0000061)
0.3239, 0.3249, 0.3379 => 0.7089023 (error = +0.0000023)

One example above .3209 (.321 - pin) + .3299 (.330" -pin)
+.3359 (.336 -pin) = inscribed dia of 0.7089"

You get a three point check,can find lobes, can feel taper.
I used a cruder version for years, Marv's Nails it with inexpensive pin sets.
Or even Deltronics or Meyers.

Here's a different size example:

3pinchck01.jpg


Using the SODDY CIRCLE program the above is 1.49775",
by measuring your actual pin sizes used run Soddy to get the actual size.

Cheers,


I need reading glasses, badly.

Meyer's tolerance calculator actually suggests using Class X pins for your .709-.710 situation, because their recommended practice would use a .70905+ GO and a .70995- NOGO.
Of course, you said .709-.001+0.000, or .708-.709.

Meyer's tolerance calculator says: .70805+ GO and .70895- NOGO in Class X. but a .708+/.709- pair will work if you don't care about the 10% tolerance margin.


Back
Top