What's new
What's new

Forming die construction- simple U shaped part

M. Moore

Titanium
Joined
Jun 8, 2007
Location
Vancouver Island, B.C. Canada
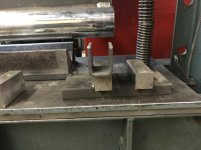
Looking for some advice on constructing a simple die to make about 500 or so parts.
I did make a quick jig to make a few so I could produce a sample product and it worked but not great.
I was getting some galling on the part and it wasn't exactly to the correct size after forming. Part was also getting stuck in the jig.

So here are the specs, material is HRFB, 3/16" x 1.5", finished part is 1" ID and each leg is about 1.5" long.
I would like a very flat bottom on the U shape and a pretty tight tolerance on the 1" dimension, not sure exactly what is achievable but +.010, - .000 would be ok, better than that if possible.

I have a 50 ton Dake press and want to use that to make these parts, I know it is slow but should be fine for such a short run I think. There is not much manufacturing in this area so it is do it myself or it won't get done.

So here are the questions, choice of material, radius on the die for starting the bend and radius on the punch, height of the die etc etc. Should I blast clean the parts before bending or after?

I have a decent assortment of machines to make this die but not really any grinding machines. I will be able to accurately cut the parts to length and prep them so after forming they are done.

Thanks for your help,

Michael
 
I don’t know all your requirements/capabilities but I’ll offer a few comments.

1) The short run of 500 small pieces will cut many standard die designs out due to costs eating profits
2) Using only a manual press will dictate a single hit operation to cut/form part if material is fed by coil
3) Not having grinding equipment will limit the precision of the die design and material used
4) It would help to see what you’ve come up with so far and attempt to use/improve what you’ve already spent time/money making. Re-designing the die will cost more time/money.
5) Galling is controlled by surface finish/hardness of components, polishing working surfaces (diamond paste) is standard procedure. So are hardened D-2 components but you don’t have a surface grinder.
6) If HRFB is the material does it have scale on it? Scale will make for problems, especially with your target tolerance.
7) Galling can/will contribute to parts getting stuck. Ejectors (pins) are standard procedure on punch. So are stripper plates, spool lifters, and spring pads on die. Can these be used on existing die design you have?
8) Radius on die for initial bend should be large (within die travel per stroke) to lessen force needed to create the bend. Small radius is too severe in action, large radius better. High polish required here on entry radius of die, less important on punch unless it's a "wipe down" vs. "wipe up" design. What surface(s) material travels against requires high polish, almost mirror finish. Polish in direction of travel important too.
9) Holding leg length will likely require a pressure pad to clamp part and prevent it moving/shifting
10) Radius of punch should be smaller than bottom radius of die cavity to “set” the formed radius. Sometimes a “set bead” is ground into the punch for this purpose to help control "spring back".
11) Even the same coil of material can behave differently from end to end, plan on adjusting the die with shims as you go.
12) Are there any holes in the part that can use pilots to locate consistently?
13) “A very flat bottom” means what? Pressure pad recommended here. Control/cut/flow the material, often in that order.
14) Rubber/urethane can possibly be substituted for springs and/or stripper plates and pressure pads
15) Your aim will be for consistent behavior of the material and adjust the die to suit the tolerances. This is often accomplished by adjustable cams in the die but at a significant cost for this.
16) Clean parts fed into the die is better, less chance of crud causing blemishes or mislocation.

That’s all that comes to mind at the moment (4 hours of sleep) and nothing I’ve contributed should be considered gospel. Die stamping has so many variables it always comes down to conditions of cost, shop capabilities, material, part required, and tolerances. You’re bucking up against a worst case scenario for all of the above if profit is to be achieved. It’s not impossible but it’s difficult to offer good advice for things unseen. I was once a die maker for 25 years but I’ve been out of it for 10 years so others (that have had more sleep) may offer better advice than I’ve given you. My apologies if I’ve come across badly in wording my reply.
 
do em hot.
the die can be much simpler, and you will get the radius you want.
I do small flat bar like this hot all the time.
You need a small forge of some kind, and then, for 500 pieces, you just get in the groove, timing the loading of parts in the forge to the time needed to load the press and bend.
 
Doing blacksmith work, I made a small fixture to make collars with in my arbor press (12 ton). A square box of 3/4" x 1" steel 4" x 4" inside measure. Inside this goes two bars that are 1/2"square with a 9/16 chrome round welded to it. This is what material to be bent bends against. (I think the shaft was from old shock absorber or something). The ram is 1" wide two thicknesses of 3/16 are 3/8" so set the inside of the two rounds at a hair over 1 3/8". This is done with an assortment of 1" tall spacer bars of different thicknesses. I have one bar that is 1 1/4" tall that is the material stop. Depending on how you set up the spacers the stop is easily adjustable. To make the flat bottom just run it down onto a solid table. You will need to squeeze it to pull it out, if you do it hot there would be no spring back and a much flatter bottom. More pics to follow.
P1070034.jpgP1070035.jpg P1070036.jpgP1070037.jpgP1070038.jpg
 
Rest of pics of collar bending tool doing 3/16 x 1 1/2. Fist pic is showing assortment of spacers, second is the amount of springback. I put no effort beyond eyeball into centering the part so one leg is longer than the other.
P1070039.jpgP1070040.jpgP1070041.jpg
 
Thanks for all the replies.
A good subject for discussion it seems.
Robf, my crude jig was basically the same idea but I did not use round bar, I have some chromed rod and will try that.
Ries, I thought about doing these hot, I have done hot bending and have a very good small forge.
My results in cold forming were pretty good except for the galling. I am going to experiment some more with a new jig and see what happens.

I did consider making these by bending twice but it doubles the time and possibly reduces the accuracy. ( two chances to be off a bit) I do have a gooseneck punch and could easily give it a try. My press brake attachment is not the most accurate setup as I didn’t spend much time building it and it is on the rebuild list. However it works well for the majority of what I do on the press, straightening and the odd bend or two. This may inspire me to make a new press brake attachment.
 
On the piece I bent quickly, it has a small amount of marking or even very light galling where it slid over the round chrome die. I made no attempt to clean the dirt, rust and scale off it other than to wipe it with a rag, which probably spread grit evenly over the whole surface. The marking might be visible in the pics if you look. Sandblast or tumble might remove most of it. If it is critical to have NO marks then you can use two pieces of sheet metal to take the abuse of the die edge and the part should be pristine. These would be best if some kind of harder material like 1 1/4" wide pallet banding. Just be sure to spread the die edges apart the additional thickness.
 
Here are the photo's of my super quick test jig.
I think using round bar would help with the release after pressing, the part does get stuck in this setup.
I am getting a nice flat bottom with crisp corners, which is good. 50 tons does help that result, I actually only use about 18 tons.
So how can I get the part to release better and still maintain an accurate size?
I have some 1.5" chromed rod, is that too large? Robf's was only 9/16.

I do have some time next week to try out a new die setup and utilize some of the suggestions.

Thanks for all the input.
 

Attachments

  • formjig2.jpg
    formjig2.jpg
    90.1 KB · Views: 253
  • formjig1.jpg
    formjig1.jpg
    89 KB · Views: 223
You could definitely do this on a press brake with the right dogleg punch and and with a good set up it would be fast and you could get within .005" of the width and length quite easily. Mr Moore, you should get a place like KSM Stainless Fabricators in Langley to quote this for you, in particular if you could add other features on the part, if it needs holes and whatnot and then get them laser cut. (I have just sent an RFQ for a large and complex cut and form job for a project led by a friend of mine who is on the Island, so I guess I'm in the laser-cut-and-form-all-the-island-jobs mode)
 
Rcoope,
This part does not have any other features. Laser cutting is very good, I have used Brenco in the past.
Cutting ten bars into short parts won’t take too long with my dual cold saw set-up.
I actually like the slighly rounded edges of hot rolled material, it works for this application. If I can get the part to eject easier and reduce the galling it will be perfect for this project.
I will check if I can get the material wheeled only and for now I will test with blasted parts.
As a guess for a part this small I would think $4-$5 per part lasered and bent?
 
Here are the photo's of my super quick test jig.
I think using round bar would help with the release after pressing, the part does get stuck in this setup.
I am getting a nice flat bottom with crisp corners, which is good. 50 tons does help that result, I actually only use about 18 tons.
So how can I get the part to release better and still maintain an accurate size?
I have some 1.5" chromed rod, is that too large? Robf's was only 9/16.

I do have some time next week to try out a new die setup and utilize some of the suggestions.

Thanks for all the input.

I knew that part looked familiar....:
Single-Axle Trailer Hanger Kit for Double-Eye Springs - 3-1/4" Front, 1-1/4" Rear etrailer Trailer Suspension APS4
 
Here are the photo's of my super quick test jig.
I think using round bar would help with the release after pressing, the part does get stuck in this setup.
I am getting a nice flat bottom with crisp corners, which is good. 50 tons does help that result, I actually only use about 18 tons.
So how can I get the part to release better and still maintain an accurate size?
I have some 1.5" chromed rod, is that too large? Robf's was only 9/16.

I do have some time next week to try out a new die setup and utilize some of the suggestions.

Thanks for all the input.

Put some draft on the "punch", use lube. They make lube for drawing dies, but I'm sure even a bit of spindle oil or waylube would help.
 
I would remove one of those dies from the base and reweld another block (without round corner) farther away, so you have a wider slot. Then use the block you removed with spacers behind it (or stout bolts threaded into back block) Then you would have room to use a sacrifice piece to protect edge from galling. I thin your 1 1/2" round is to big, material may bulge out below the round and get stuck or not look as crisp a bend. It could work if you split it in half and welded it to a square edged riser. If you do this you want the riser to be short, maybe 3/8" or so. This will let you use vise grips to squeeze the part to the ram so the ram will pull it out, part needs to stick up out of the dies so you can grab it.
Here is another pic of my set up, I made this after a few like you made thad were never the right size again. If you look you see a 1/16" spacer tacked to the 1/2" sq riser so the bent material can not bulge under the round top part. You can also see the frame has no bottom so if you do parts without a square bottom they can be pushed through.
P1070042.jpg
 
Jig made, parts made, all went well.
Here is a link to a quick video of the jig in action.
I mounted it on my scotchman ironworker table, it cycles a lot faster than the Dake.
I did all 600 parts in about less than two hours, plus the second op to close them up to parallel, hit them quick on the Dake with a sizing block.

My first attempt worked but I bent the ram, it is only 1" square stock, it also mushroomed at the top and started to stick in the tubing.
Second attempt I used a piece of axle shaft that I milled square, that stood up well to the pressure!


cid:4CB9F676-4711-4276-AE6F-4435D182FE09/08B6784A-7033-4A7F-8A07-2DE4AAEA1BFE

Not sure if this link will work.

Michael
 
That link did not work on my iPhones Tapatalk app. I found this thread very informative and I await a working link.

I had a very similar part I needed to make out of 3/16 cold rolled steel. I opted for the press brake option. I actually didn’t have a press brake but a $100 Craigslist score lead me to a 12 ton electric hydraulic c frame press. It’s the mechanical type, similar to a Whitney punch. I was concerned about the adjustability of a single shot punch and die set, but would consider building one in the future.

Goose neck die milled from 4140 ph, base milled from 4140 ph, the adjustment screws and rail allow me to position the parts consistently.

585424f762cd994bd4c711099a2f47c1.jpg


259eabd2e0a4f9f0a1922832607b9560.jpg


2ba632fb4883e40f24bd964c06df40a9.jpg


Setup could use some improvement, mostly my hydraulic pump is acting up, slow press cycle and the valve hasn’t been cutting out consistently. I’m not sure how accurate I can reasonably expect it to be, but with some refinement it should be an inexpensive yet effective production tool. I ran 100 at a painfully show 20 seconds per bend. Would like to replace the pump so I can get closer to 5 second.

It’s possible I’m wasting my time, a small press brake might be a better tool for the job. Expected production is 300-500pcs/year for the next several years.

Don’t mean to threadjack, I just found myself contemplating a very similar issue.


Sent from my iPhone using Tapatalk
 
Setup could use some improvement, mostly my hydraulic pump is acting up, slow press cycle and the valve hasn’t been cutting out consistently. I’m not sure how accurate I can reasonably expect it to be, but with some refinement it should be an inexpensive yet effective production tool. I ran 100 at a painfully show 20 seconds per bend. Would like to replace the pump so I can get closer to 5 second.
Get a flywheel machine and it will do parts as fast as you can feed it.


Back
Top