dgfoster
Diamond
- Joined
- Jun 14, 2008
- Location
- Bellingham, WA
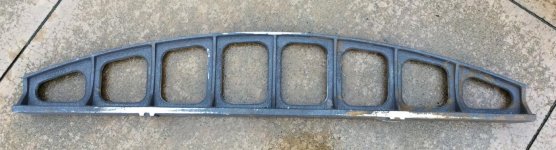
FS 19 to 23# Featherweight 36" Camelback Straight Edge. Rough casting or machined.
Note to moderator: Please move this to the "For Sale" forum as I posted here in error. Sorry and thank you.
At long last, after previously having my Straight Edges commercially cast, I have gotten all the kinks worked out of my own foundry and am casting my own straight edges start to finish. The complexities of making a working small-scale foundry greatly exceeded my estimates. But the satisfaction of getting a working foundry set up and making better castings than I could have cast commercially has been a very interesting and satisfying labor of love.
I am using the same pattern as before, but now am sourcing and pouring Class 40 Grey Iron Straight Edges and doing every step in that process myself. My feed stock comes from a commercial foundry and is spectoscopically checked to confirm that it meets specifications. Every straight edge is stress relieved in a commercial heat treat oven following initial in-sand cool down. Taking both steps minimizes retained internal stresses.
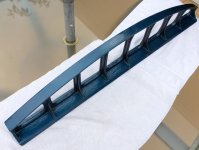
I have previously sold half a dozen of these of these to straight edges to PMers (some pros and some neophytes) with universally glowing reviews from those owners. I now have four back from heat treat and will be casting more as needed. As cast it weighs 28#. But to get it flat and cleaned up, it machines to 23#. From there it is a matter of personal preference. I machined mine to 19 pounds which is probably the lower end of what most folks would want though it would certainly be practical to go thinner without loss of rigidity.
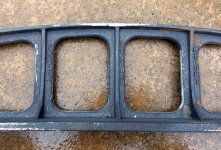
The sole measures 2 7/8" wide and 1/2" thick as cast. It requires roughly an eighth of an inch of milling on the sole base to clean it up.
Though it is very light in weight compared to comparable 36" SE's, it is very rigid. I tested it to have less than .0001" deflection when supported at its ends and loaded with 30 pounds at its midpoint. Its broad base distinguishes it from any other 36" SE new or old. (Check it out----other 36" straight edges whether new or vintage look more like a narrow railroad track in profile) That broad base allows the user to reach well under dovetails and other potentially interfering features. It is not intended to be used as a prism on doves, though. More on that later.
I can supply it as a rough casting or with the sole machined to .002 flatness and the sides machined as well. (Flatness of .002 means that when mapped, the highest high point of the sole to the lowest low point is less than or equal to .002. I can usually do better than .002 as I have developed a proprietary method to fixture the SE's that minimizes distortion)
Local pickup would be ideal, though I can box and ship for about 80 dollars (depends on location) to most places in the US. Shipping to Canada is possible at greater expense.
If interested, please PM or preferably email me, at all one word denis g foster at gmail dot COM. Please note that my first name has one “n.”
I will be able cast more as needed to keep up with demand.
The pictures in the next post show a plywood, plastic pad, and brass grommet storage shoe I made for mine---not supplied but for illustration.
Price is 450 USD as cast and 625 USD machined. Shipping, obviously would have to be worked out depending on buyer needs.
Denis
I added a photo of the profile of the end of the SE and then posted again some photos of the casting. Your back will thank you for choosing a lightweight straight edge.
PS Tomorrow I will be casting a proof-of-concept Featherweight prism that I plan to offer for sale in the near future. It is designed so that it can be cast in 36" lengths but conveniently cut to 12 or 24 inch lengths as needed with no compromise in utility or quality.
Later this summer I hope to be casting 48" Featherweight straight edges of similar design to the 36.
Note to moderator: Please move this to the "For Sale" forum as I posted here in error. Sorry and thank you.
At long last, after previously having my Straight Edges commercially cast, I have gotten all the kinks worked out of my own foundry and am casting my own straight edges start to finish. The complexities of making a working small-scale foundry greatly exceeded my estimates. But the satisfaction of getting a working foundry set up and making better castings than I could have cast commercially has been a very interesting and satisfying labor of love.
I am using the same pattern as before, but now am sourcing and pouring Class 40 Grey Iron Straight Edges and doing every step in that process myself. My feed stock comes from a commercial foundry and is spectoscopically checked to confirm that it meets specifications. Every straight edge is stress relieved in a commercial heat treat oven following initial in-sand cool down. Taking both steps minimizes retained internal stresses.
I have previously sold half a dozen of these of these to straight edges to PMers (some pros and some neophytes) with universally glowing reviews from those owners. I now have four back from heat treat and will be casting more as needed. As cast it weighs 28#. But to get it flat and cleaned up, it machines to 23#. From there it is a matter of personal preference. I machined mine to 19 pounds which is probably the lower end of what most folks would want though it would certainly be practical to go thinner without loss of rigidity.
The sole measures 2 7/8" wide and 1/2" thick as cast. It requires roughly an eighth of an inch of milling on the sole base to clean it up.
Though it is very light in weight compared to comparable 36" SE's, it is very rigid. I tested it to have less than .0001" deflection when supported at its ends and loaded with 30 pounds at its midpoint. Its broad base distinguishes it from any other 36" SE new or old. (Check it out----other 36" straight edges whether new or vintage look more like a narrow railroad track in profile) That broad base allows the user to reach well under dovetails and other potentially interfering features. It is not intended to be used as a prism on doves, though. More on that later.
I can supply it as a rough casting or with the sole machined to .002 flatness and the sides machined as well. (Flatness of .002 means that when mapped, the highest high point of the sole to the lowest low point is less than or equal to .002. I can usually do better than .002 as I have developed a proprietary method to fixture the SE's that minimizes distortion)
Local pickup would be ideal, though I can box and ship for about 80 dollars (depends on location) to most places in the US. Shipping to Canada is possible at greater expense.
If interested, please PM or preferably email me, at all one word denis g foster at gmail dot COM. Please note that my first name has one “n.”
I will be able cast more as needed to keep up with demand.
The pictures in the next post show a plywood, plastic pad, and brass grommet storage shoe I made for mine---not supplied but for illustration.
Price is 450 USD as cast and 625 USD machined. Shipping, obviously would have to be worked out depending on buyer needs.
Denis
I added a photo of the profile of the end of the SE and then posted again some photos of the casting. Your back will thank you for choosing a lightweight straight edge.
PS Tomorrow I will be casting a proof-of-concept Featherweight prism that I plan to offer for sale in the near future. It is designed so that it can be cast in 36" lengths but conveniently cut to 12 or 24 inch lengths as needed with no compromise in utility or quality.
Later this summer I hope to be casting 48" Featherweight straight edges of similar design to the 36.