What's new
What's new

Help needed manually turning helical web (square thread)

Purbrook

Plastic
Joined
Sep 2, 2020
Hello All,

I'm trying cut a helical web on a water cooled jacket core (see 'overview' photo) from 50mm(2.000")aluminium stock.
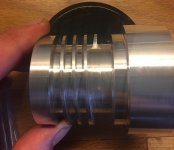
Overview.jpg

I'm using a HSS parting style tool 3.7mm(0.146") wide x 6.00mm(0.236") pitch to single point cut a square 'thread' 8mm(0.315") deep.

0.25mm(0.010) depth of cut. 38 RPM

The problem I'm getting is that the resulting 'thread' side wall is not square but is tapered (see 'detail' photo)and the width is not consistent.

Helical_cut_problem.jpg

I cannot measure any movement of the HSS in the tool holder. The workpiece was secure in a 3 jaw chuck and supported with a live centre.

The lathe is old and will have some wear on the half nuts but as its always cutting in the same direction surely this cannot be the reason.

Any ideas??

Thanks
 
Possibly not enough clearance angle on that side. Thread flank being created is 2.54 degrees just from helix angle (at half depth) - tool has to have more clearance than that on that side - and the deeper it goes the more angle it needs.

At full depth the helix angle is 3.13 degrees
 
Cutoff tools are flimsy. Odds are there's no relief on the sides, so when you try to thread with it you're getting a cutting then rubbing situation.

You'd probably have better luck hand grinding something from a HSS blank. Put a little relief and back taper on the sides.
 
Thank you for the advice!! I hadn't thought of that.

I ground the tool myself from a HSS blank but maybe I didn't put enough clearance on it.

Thanks John for the 3.13 deg calculation. I'll use that and have another go tomorrow.

:)
 
Try turning it through by hand and you should be able to see the problem. Use a mirror and bright light with some magnification. That's a step I always try when I run into one of those type situations.
 
Hello All,

I'm trying cut a helical web on a water cooled jacket core (see 'overview' photo) from 50mm(2.000")aluminium stock.

View attachment 298334

I'm using a HSS parting style tool 3.7mm(0.146") wide x 6.00mm(0.236") pitch to single point cut a square 'thread' 8mm(0.315") deep.

0.25mm(0.010) depth of cut. 38 RPM

The problem I'm getting is that the resulting 'thread' side wall is not square but is tapered (see 'detail' photo)and the width is not consistent.

View attachment 298335

I cannot measure any movement of the HSS in the tool holder. The workpiece was secure in a 3 jaw chuck and supported with a live centre.

The lathe is old and will have some wear on the half nuts but as its always cutting in the same direction surely this cannot be the reason.

Any ideas??

Thanks

In Addition to all the great post, I notice the stack up to the end is slightly off, your good the first three threads. with drop indicator on the zero out the start of the cut, then adjust as necessary after a trial and error. were to put it depends on the machine config. the end of the start of thread is normally sharp.
and has to be deburred to remove the feathered edge. and I agree with the other post trial and error to get the correct tool geometry. is there an off the self tool that can be purchased?

Edit also the drop indicator will determine if there is a back lash issue, may not repeating. on the old manual machine I was taught to put indicators on the z & x axis. to make sure
it was zero out and the proper stock removal was insured. my 2 cents.
 
Thank you all for sharing your experience. It's invaluable for someone less experienced like me.

On checking the tool on a surface table with a square it shows there is not much (if any in some areas) clearance so I'm embarassed to say it's probably due to sloppy grinding.

I haven't had time to try again yet but will shortly.


Could you post a picture of the cutting tool?
 
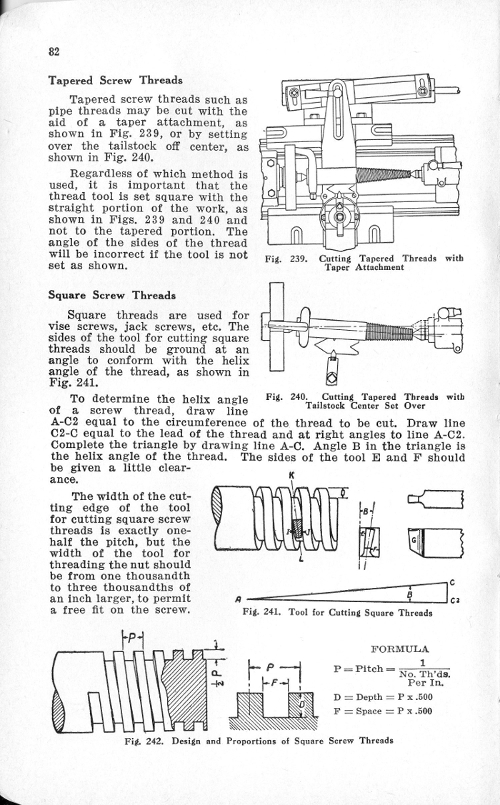
The rules for the cutter geometry was mentioned earlier but here's a page from "How to Run a Lathe" explaining it in detail (just ignore the "tapered screw threads" part):

htralp82.jpg


-Ron
 
Yeah, I can see from the diagram (fig. 241) in MetalCarnage's post I am way off with the relief angle.

I look forward to having another go with a better ground tool.
 
Just touch that one up. You'll need 3.13 deg to match the helix angle per johnoder plus a couple for clearance. Make sure you clear that nose radius pretty good too.
 
Some feedback for all those who helped me out.

I finally got to making this part again and with a newly ground tool using all your advice it went really well. Photos below.

Thanks again for all the advice.

54_1_sml.jpg

54_3_sml.jpg

54_4_sml.jpg
 
To quote myself and make a revision

Minor dia. times "pi" divided into pitch = tangent of helix angle at full depth

That is true for single start. To apply to more than a single start, you have to divide into LEAD, not PITCH


Back
Top